Picture this: you’re halfway through a beautiful granny square blanket when you realize one of your early squares looks wonky. The corners aren’t quite right, and it’s driving you crazy every time you look at it. Sound familiar? You’re definitely not alone – granny squares can be tricky little things, especially when you’re starting out.
Here’s the thing about granny squares: they’re simultaneously one of the most beginner-friendly and most versatile crochet techniques out there. Once you get the hang of them, you’ll find yourself making everything from coasters to full-sized afghans. But getting that first square to look just right? That’s where a lot of people stumble.
I’ve been crocheting for over fifteen years, and I still remember the frustration of my first granny square attempt. The corners were loose, the sides were uneven, and don’t even get me started on trying to join them together. But here’s what I’ve learned: with the right approach and a few insider tricks, you can master granny squares faster than you think.
Whether you’re a complete beginner who’s never held a crochet hook or someone who’s tried granny squares before and got frustrated, this guide will walk you through everything you need to know. We’ll cover the basic technique, troubleshoot common problems, explore different variations, and even talk about how to turn your squares into finished projects.
Quick Answer
A granny square starts with a magic ring or chain 4, then uses clusters of double crochet stitches separated by chain spaces to create the classic square shape. Each round builds outward with corner increases, and the key is maintaining consistent tension and proper corner placement.
Materials and Tools You’ll Need
Let’s start with the basics – you don’t need a lot of fancy equipment to make granny squares, but having the right materials makes a huge difference in your results.
For yarn, I recommend starting with a worsted weight (size 4) acrylic yarn. Lion Brand Vanna’s Choice or Red Heart Super Saver are excellent choices for beginners. They’re affordable, forgiving, and come in tons of colors. You’ll want about 50-75 yards per square if you’re making 4-inch squares.
Hook size matters more than you might think. For worsted weight yarn, I usually go with a 5.5mm (I/9) hook, though some people prefer a 5mm (H/8) for tighter stitches. The key is consistency – whatever hook you choose, stick with it throughout your project.
Pro tip: If you’re planning to make a blanket or large project, buy all your yarn at once. Dye lots can vary significantly, and you don’t want your squares to look mismatched.
You’ll also need a yarn needle for weaving in ends (trust me, there will be many), scissors, and stitch markers if you’re making multiple squares. A row counter can be helpful too, especially when you’re working on larger squares with many rounds.
Choosing Colors
Color choice can make or break your granny square project. If you’re just learning, start with two contrasting colors – maybe a light and a dark. This makes it easier to see your stitches and count your rounds. Once you’re comfortable, you can experiment with color theory for crochet projects to create more sophisticated combinations.
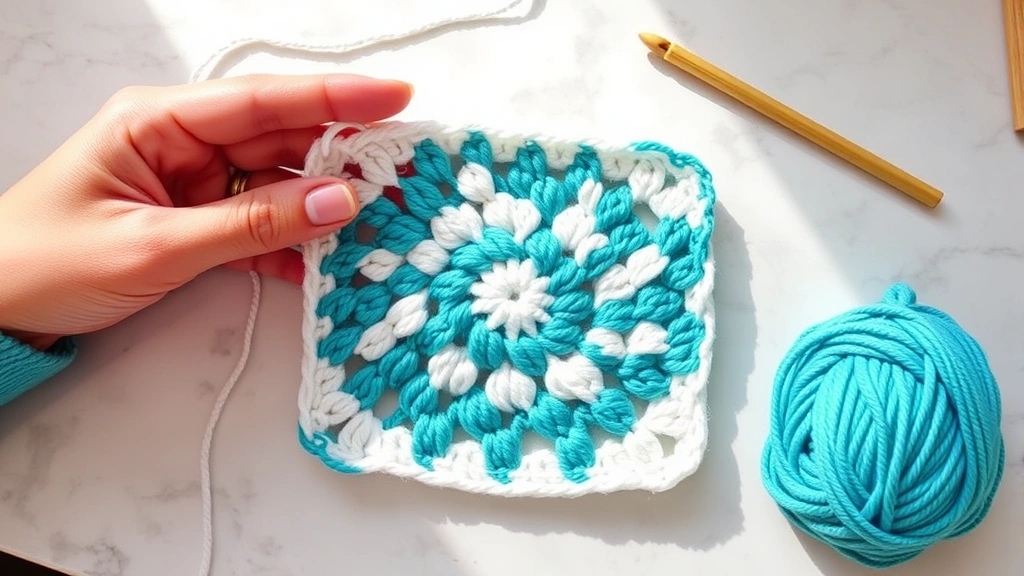
The Basic Granny Square Technique
The traditional granny square is built on a simple concept: clusters of double crochet stitches separated by chain spaces, with increases at the corners to keep the work flat and square. Each round adds another layer of these clusters, gradually building outward.
The magic happens in the corners. Instead of working straight across like you would in regular rows, you’re creating corner increases by working extra chains and stitch clusters. This is what gives the granny square its characteristic shape and prevents it from curling up like a tube.
Most granny squares start with either a magic ring (my preferred method) or a chain-4 joined into a ring. From there, you work in rounds, not rows, which means you’re always working from the right side of your fabric. This is different from many other basic crochet stitches for beginners, where you turn your work at the end of each row.
Understanding the Structure
Each side of a granny square consists of groups of three double crochet stitches (called clusters) separated by chain-2 spaces. The corners are where you work two clusters with a chain-2 space between them, all in the same corner space from the previous round.
As you add rounds, the sides get longer by adding more clusters, but the corner construction stays the same. This consistent pattern is what makes granny squares so addictive – once you get the rhythm, you can work almost without thinking.
Step-by-Step Tutorial
Let’s walk through making a basic granny square step by step. I’m assuming you know how to make a magic ring and basic double crochet stitches.
- Start with the Center Ring
Make a magic ring or chain 4 and join with a slip stitch to form a ring. Chain 3 (this counts as your first double crochet throughout the project).
- Round 1: Create the Foundation
Work 2 more double crochet into the ring, then chain 2. This creates your first corner. Repeat this pattern three more times: *3 double crochet, chain 2*. Join with a slip stitch to the top of your beginning chain-3. Pull your magic ring tight if you used one.
- Round 2: Build the Corners
Chain 3, then work 2 double crochet in the same corner space. Chain 2, then work 3 double crochet in the same corner space – you’ve just made your first corner. Chain 1, then move to the next corner space. Repeat around: *3 dc, ch 2, 3 dc in corner space, ch 1*. Join with slip stitch.
- Round 3 and Beyond: Add Length to Sides
Chain 3, work 2 dc in same corner space, ch 2, 3 dc in same corner space (corner made). *Ch 1, 3 dc in next ch-1 space, ch 1, (3 dc, ch 2, 3 dc) in next corner space*. Repeat around. Join with slip stitch.
Continue this pattern for as many rounds as you want. Each round adds about 0.75 inches to your square’s width, so a 4-round square will be roughly 4 inches across.
Remember: the corner pattern never changes – it’s always (3 dc, ch 2, 3 dc) in the corner space. Only the sides get longer as you add more cluster groups.
Troubleshooting Common Issues
Even experienced crocheters run into problems with granny squares sometimes. Here are the most common issues and how to fix them.
Squares That Aren’t Square
If your “square” looks more like a wonky rectangle, you’re probably not placing your corners correctly. Make sure you’re working your corner increases in the actual corner spaces (the chain-2 spaces), not in the gaps between clusters on the sides.
Tension issues can also cause shape problems. If you’re crocheting too tightly, your square might cup up in the middle. Too loose, and it’ll ruffle at the edges. Consistent tension comes with practice, but using the right hook size for your yarn helps a lot.
Holes That Are Too Big
Large, gaping holes between stitches usually mean your hook is too big for your yarn, or your tension is too loose. Try going down a hook size or consciously tightening up your stitches slightly.
Difficulty Joining Squares
If your squares don’t want to line up when you try to join them, they’re probably not the same size. This happens when you change your tension between squares or use different yarn weights. Measure your squares as you go – they should all be within about 1/8 inch of each other.
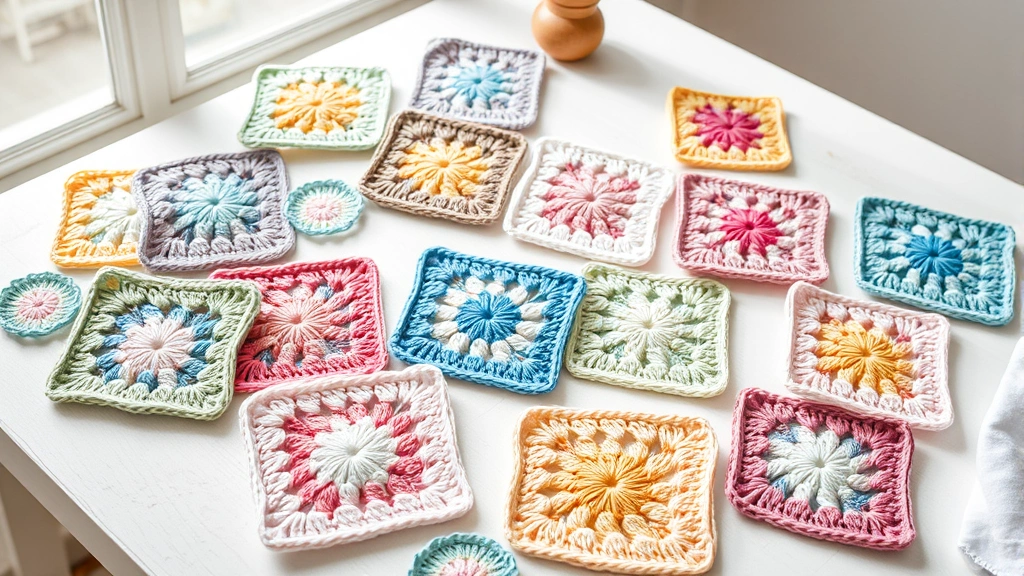
Popular Variations and Patterns
Once you’ve mastered the basic granny square, there’s a whole world of variations to explore. The traditional granny square is just the beginning.
Solid Granny Squares
Instead of changing colors each round, work the entire square in one color. This creates a more subtle, sophisticated look that’s perfect for modern home decor. The texture is still interesting because of the cluster pattern, but the overall effect is calmer.
Sunburst Granny Squares
Start with a bright center color (like yellow), then work outward with progressively darker colors. This creates a beautiful gradient effect that looks complex but uses the same basic technique.
African Flower Squares
These aren’t technically granny squares, but they’re often grouped together. African flowers use a combination of double crochet and chain stitches to create petal-like shapes. They’re a bit more advanced but absolutely stunning when worked in bright colors.
| Variation | Difficulty | Best Yarn | Recommended Projects |
|---|---|---|---|
| Traditional Granny | Beginner | Worsted acrylic | Baby blankets, afghans |
| Solid Granny | Beginner | Cotton or wool blend | Pillows, bags, modern blankets |
| Sunburst | Intermediate | DK weight cotton | Wall hangings, summer tops |
| African Flower | Intermediate | Sport weight | Decorative blankets, bags |
When working with different yarn weights for crochet, remember to adjust your hook size accordingly. Lighter weight yarns need smaller hooks, and you’ll need more rounds to achieve the same finished size.
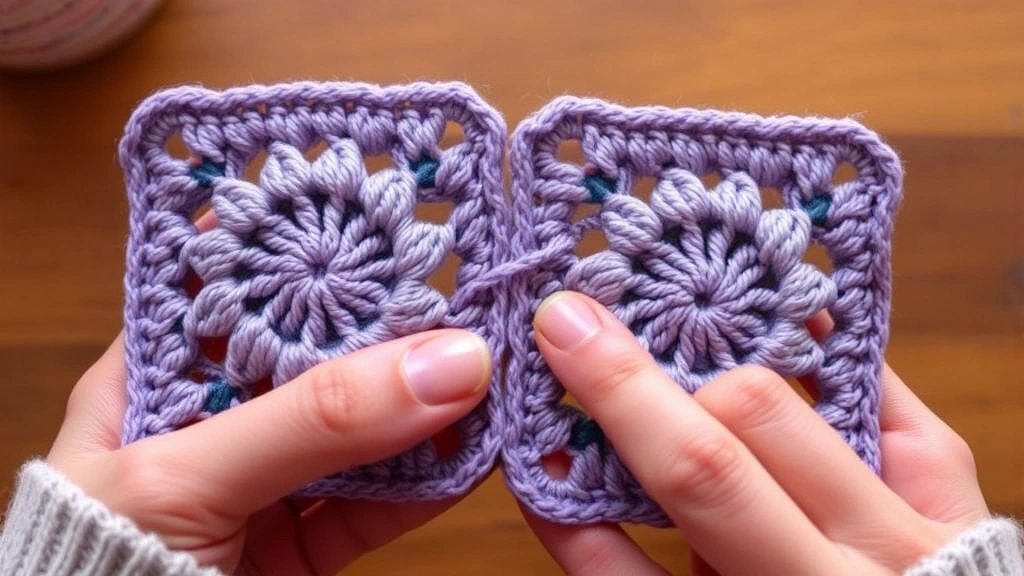
Joining Your Squares Together
This is where many people get stuck – you’ve made all these beautiful squares, now what? There are several methods for joining granny squares, each with its own advantages.
Whip Stitch Method
The simplest method is to whip stitch your squares together with a yarn needle. Place two squares with right sides together and stitch through both layers along the edges. This creates a flat seam that’s nearly invisible from the right side.
Single Crochet Join
Place squares with wrong sides together and single crochet through both layers along the edges. This creates a raised seam on the right side that becomes part of the design. It’s faster than sewing and very secure.
Join-as-You-Go Method
This is my favorite method for large projects. As you work the last round of each square, you join it to adjacent squares by working through the loops of both squares simultaneously. It eliminates the need for separate joining later, though it requires careful planning.
Whatever joining method you choose, consistency is key. Pick one method and stick with it throughout your project for the most professional-looking results.
Project Ideas for Your Granny Squares
Granny squares are incredibly versatile. Once you can make them consistently, you can create almost anything.
Beginner Projects
Start with small projects to build confidence. Coasters are perfect – they only need 3-4 rounds each, and you can practice your color combinations. Dishcloths are another great option, and they’re actually useful around the house.
A simple baby blanket is an excellent first large project. You’ll need about 48 squares for a 36×48 inch blanket, which sounds like a lot but goes faster than you’d think. Plus, baby blankets are forgiving – slight imperfections just add to the handmade charm.
Intermediate Projects
Once you’re comfortable, try a throw pillow cover. You’ll need 8-10 squares depending on the size, and it’s a great way to practice different joining techniques. Crochet bag patterns often incorporate granny squares too, especially tote bags and market bags.
A full-size afghan is the classic granny square project. Plan on 80-100 squares for a throw-size blanket, or 120-150 for a full-size bed covering. This is definitely a commitment project, but the results are so worth it.
Advanced Applications
Experienced crocheters can use granny square techniques in amigurumi projects, creating textured surfaces on stuffed animals or incorporating them into garment construction. Some designers even use modified granny square techniques for sweater yokes or decorative elements.
Common Questions
How many granny squares do I need for a blanket?
For a throw blanket (about 50×60 inches), you’ll need approximately 80-100 four-inch squares. A baby blanket (36×36 inches) needs about 36 squares. Always make a few extra squares – you’ll inevitably have some that don’t quite match the others in size or tension.
What’s the best yarn for granny squares?
Worsted weight acrylic yarn is ideal for beginners because it’s affordable, easy to work with, and machine washable. Red Heart Super Saver and Lion Brand Vanna’s Choice are popular choices. For more advanced projects, cotton yarn creates beautiful definition, while wool blends add warmth and drape.
Why do my granny squares curl up?
Curling usually indicates tension that’s too tight. Try using a larger hook or consciously loosening your grip on the yarn. Sometimes switching to a different yarn brand helps too – some yarns are naturally more elastic and prone to curling.
How do I keep my squares the same size?
Measure each square after completing it and aim for consistency within 1/8 inch. If a square is significantly smaller, add an extra round. If it’s larger, consider whether your tension changed or if you accidentally added stitches. Using a crochet gauge guide can help maintain consistency across your project.
Can I use different yarn weights in the same project?
It’s possible, but challenging. Different yarn weights will create different-sized squares even with the same number of rounds. If you want to mix weights, plan to adjust the number of rounds for each weight to achieve similar finished sizes.
How long does it take to make a granny square?
A basic 4-round square takes about 15-20 minutes once you’re comfortable with the technique. Beginners might need 30-45 minutes per square initially. The time investment for a full blanket varies widely – plan on 2-6 months for a throw-size project, working a few squares per week.
What’s the difference between American and British crochet terms?
In American terms, granny squares use double crochet stitches. In British terms, the same stitch is called treble crochet. Always check which terminology a pattern uses – British patterns will call for “treble crochet” where American patterns say “double crochet.”
How do I fix a mistake in the middle of a square?
For minor mistakes like a missed stitch, you can often fudge it by adjusting subsequent stitches slightly. For major errors, it’s usually faster to frog (rip out) back to the mistake and rework from there. This is why many crocheters work one complete round at a time rather than trying to work ahead.
Granny squares really are one of those techniques that get better with practice. Don’t worry if your first few squares look a bit wonky – even experienced crocheters have practice squares that didn’t quite work out. The important thing is to keep trying and enjoy the process.
Once you get the hang of the basic technique, you’ll find yourself reaching for granny squares for all sorts of projects. They’re portable, relatively quick to work up, and endlessly customizable. Whether you’re making a simple dishcloth or an elaborate heirloom blanket, the skills you learn making granny squares will serve you well throughout your crochet journey. Happy stitching!