Last month, I watched my friend Sarah struggle with her first attempt at the Lemon Peel Stitch. She’d seen this gorgeous blanket pattern online and dove right in, but after three hours of frogging and re-starting, she was ready to throw her hook across the room. Sound familiar? The Lemon Peel Stitch looks deceptively simple in photos, but it has a few quirks that can trip up even experienced crocheters.
Here’s the thing about the Lemon Peel Stitch – it’s actually one of the most versatile texture stitches in crochet, but nobody tells you about the little tricks that make it work smoothly. I’ve been using this stitch for years in everything from baby blankets to dishcloths, and I’ve learned the hard way what works and what doesn’t.
The beauty of this stitch lies in its subtle texture that looks complex but uses only single crochet and chain stitches. It creates a lovely pebbly surface that’s perfect for projects where you want visual interest without overwhelming color work. Plus, it’s surprisingly quick once you get the rhythm down.
Quick Answer
The Lemon Peel Stitch alternates single crochet and chain-1 spaces in a specific pattern that creates a textured, pebbly surface. Work SC, CH 1, skip 1 across, then alternate the placement of stitches in subsequent rows for the signature texture.
What is the Lemon Peel Stitch?
The Lemon Peel Stitch, sometimes called the Seed Stitch in crochet (not to be confused with the knitting version), creates a bumpy, textured fabric that resembles the surface of a lemon peel. It’s a simple two-row repeat that uses only basic stitches, making it accessible for adventurous beginners while still being satisfying for experienced crocheters.
What makes this stitch special is how it creates visual texture without adding bulk. Unlike bobble stitches or popcorn stitches that can make fabric thick and heavy, the Lemon Peel Stitch maintains a relatively flat profile while still giving you that lovely tactile quality.
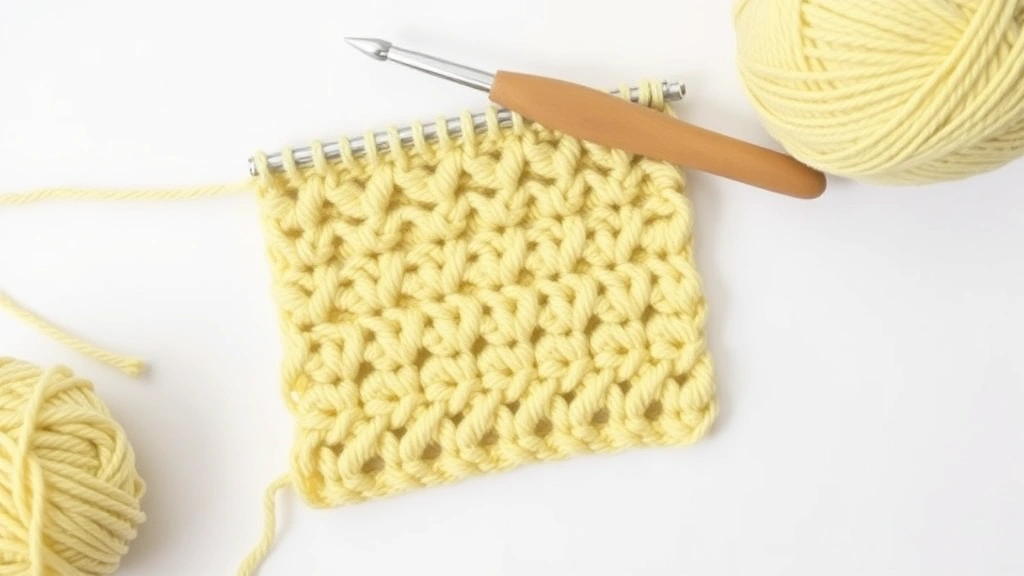
The stitch works by alternating single crochet stitches with chain-1 spaces, then offsetting this pattern in the next row. This creates small “bumps” where the single crochet stitches stack on top of the chain spaces from the previous row. The result is a fabric that’s both visually interesting and pleasant to touch.
Pro Tip: This stitch looks fantastic in solid colors where the texture can really shine. Variegated yarns tend to camouflage the beautiful pattern.
I love using this stitch for projects where I want something more interesting than plain single crochet but don’t want the complexity of colorwork. It’s perfect for those times when you want to crochet while watching TV – once you get the rhythm, it’s almost meditative.
Materials and Tools You’ll Need
The beauty of the Lemon Peel Stitch is that it works with almost any yarn weight, but some combinations definitely work better than others. Let me break down what I’ve found works best after trying this stitch with everything from thread weight to chunky yarn.
Yarn Weight Recommendations
| Yarn Weight | Hook Size | Best For | Texture Visibility |
|---|---|---|---|
| DK (3) | 4.5mm (G) | Baby blankets, dishcloths | Excellent |
| Worsted (4) | 5.5mm (I) | Afghans, scarves | Very good |
| Chunky (5) | 6.5mm (K) | Quick blankets | Good |
| Fingering (1) | 3.25mm (D) | Delicate shawls | Subtle but lovely |
I’ve had the best results with Lion Brand Vanna’s Choice in worsted weight – it has great stitch definition and comes in beautiful solid colors that really show off the texture. For baby projects, I love using Bernat Baby yarn in DK weight.
Essential Tools
You don’t need anything fancy for this stitch, but having the right tools makes the process much smoother:
- Crochet hook: Match your hook size to your yarn weight (see table above)
- Stitch markers: Helpful for marking your turning chains
- Yarn needle: For weaving in ends
- Scissors: Sharp ones make clean cuts
- Row counter: Optional but helpful for larger projects
Hook Tip: I prefer using hooks with ergonomic handles for this stitch since you’ll be doing a lot of repetitive motions. My favorite is the Clover Amour series – they’re gentle on your hands during long crocheting sessions.
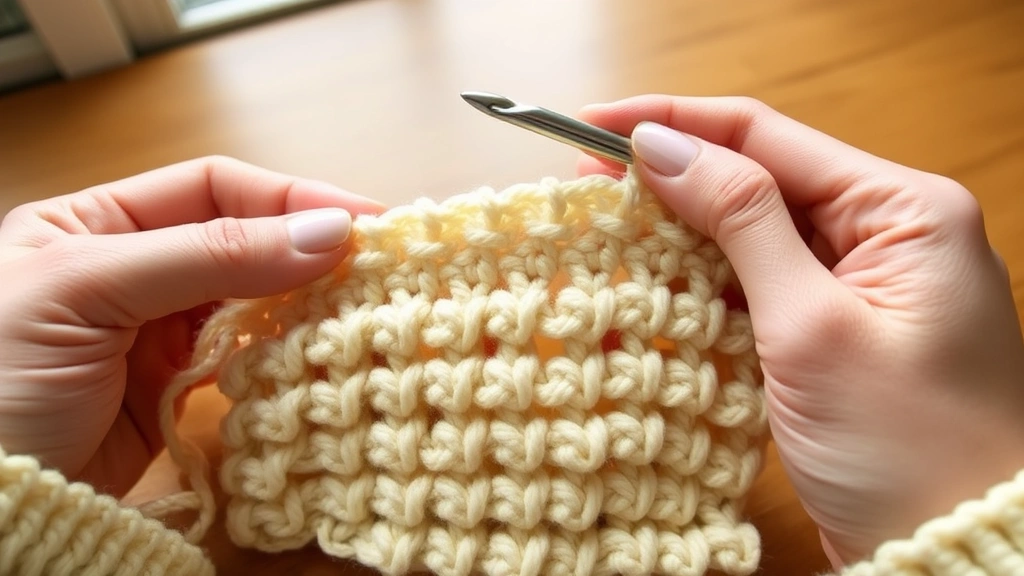
Step-by-Step Tutorial
Alright, let’s dive into the actual technique. I’m going to walk you through this like I’m sitting right next to you, because honestly, this stitch is much easier to understand when someone explains the “why” behind each step.
Foundation Chain
Start with an odd number of chains. For practice, try 25 chains – that’ll give you a nice swatch to see how the pattern develops. The key thing to remember is that your foundation chain needs to be an odd number for the pattern to work correctly.
- Make your foundation chain
Chain 25 (or any odd number). Don’t make it too tight – you’ll be working into these chains, and tight chains are frustrating to work with.
- First row setup
Skip the first chain from your hook (this doesn’t count as a stitch), then single crochet in the second chain from the hook.
Row 1 (Right Side)
This is where the magic starts. You’re going to establish the alternating pattern that creates the texture.
- Single crochet, chain 1 pattern
After your first SC, *chain 1, skip the next chain, single crochet in the following chain*. Repeat from * across the entire row.
- End the row
You should end with a single crochet stitch. If you don’t, recount your foundation chain – you might have started with an even number instead of odd.
- Turn your work
Chain 1 and turn. This chain-1 doesn’t count as a stitch.
Row 2 (Wrong Side)
This is where the Lemon Peel texture really starts to emerge. You’re going to work single crochet stitches into the chain-1 spaces from the previous row, and chain 1 over the single crochet stitches.
- Start with single crochet
Single crochet in the first stitch of the previous row.
- Create the offset pattern
*Chain 1, skip the next single crochet, single crochet in the next chain-1 space*. Repeat from * across the row.
- End properly
End with a single crochet in the last stitch of the previous row.
Here’s what’s happening: by working SC into the chain spaces and chaining over the SC stitches, you’re creating the offset that gives this stitch its characteristic bumpy texture. The single crochet stitches from Row 1 will create little “bumps” on the right side of your fabric.
Visual Check: After your second row, you should start to see the texture emerging. If your fabric looks flat, double-check that you’re alternating correctly – SC in chain spaces, chain over SC stitches.
Continuing the Pattern
From Row 3 onward, you’ll simply repeat Row 2. The pattern is essentially a two-row repeat, but since Row 2 creates the offset, you just keep repeating that same offset pattern. This is what makes the stitch so meditative once you get going – it’s the same motion over and over.
Common Mistakes and How to Fix Them
Let me save you some frustration by sharing the mistakes I see most often with this stitch. Trust me, I’ve made every single one of these myself!
The Dreaded Stitch Count Problem
This is the big one. If your stitch count keeps changing, you’re probably making one of these errors:
Not working in the turning chain: Remember, your turning chain doesn’t count as a stitch in this pattern. Always work your first SC of each row into the first actual stitch, not the turning chain.
Working into the wrong places: In Row 2 and beyond, make sure you’re working SC into chain spaces (not the chains themselves) and chaining over the SC posts. It helps to really look at what you’re doing for the first few rows.
Missing the last stitch: It’s easy to miss that final SC at the end of each row. I like to place a stitch marker in the last stitch of each row until I get comfortable with the pattern.
Tension Issues
The Lemon Peel Stitch can look wonky if your tension is inconsistent. Here’s what I’ve learned:
Chain spaces too tight: Your chain-1 spaces need to be loose enough to work into easily in the next row. If you’re a tight crocheter (like me), try going up a hook size.
Single crochet too loose: Loose SC stitches won’t create the nice bumpy texture you want. Focus on keeping your SC stitches snug but not tight.
Tension Tip: Practice a few rows, then set your work aside for an hour. When you come back, you’ll be able to see tension inconsistencies more clearly.
Pattern Placement Confusion
Sometimes the offset pattern gets confusing, especially when you’re tired. Here’s my foolproof method: always look at the previous row and do the opposite. If there’s a SC below, chain 1. If there’s a chain space below, work a SC into it.
Perfect Projects for Lemon Peel Stitch
Now for the fun part – what can you actually make with this stitch? I’ve used it in dozens of projects over the years, and some work much better than others.
Baby Blankets
This is hands-down my favorite use for the Lemon Peel Stitch. The texture is interesting enough to keep you engaged during those long blanket rows, but not so complex that you can’t crochet while chatting with friends or watching TV. I typically use DK weight yarn with a 4.5mm hook for baby blankets – the texture shows beautifully, and the fabric has a lovely drape.
For a standard baby blanket (about 36″ x 36″), you’ll need approximately 1,200 yards of DK weight yarn. The stitch creates a fabric that’s about 15% wider than the same number of stitches in single crochet, so plan accordingly.
Dishcloths and Washcloths
The bumpy texture of the Lemon Peel Stitch makes it fantastic for dishcloths. I love making these with cotton yarn – the texture helps with scrubbing, and cotton holds up well to frequent washing.
Try using Sugar’n Cream cotton yarn with a 4.5mm hook. Chain 31 for a nice 8-inch square dishcloth. The stitch pattern looks great in kitchen colors like sage green or cream.
Scarves and Cowls
The Lemon Peel Stitch creates a reversible fabric, which makes it perfect for scarves. Both sides have the same texture, just slightly offset. For a standard scarf, I usually work about 25-30 stitches wide and continue until I reach my desired length.
One thing to note: this stitch doesn’t have a lot of stretch, so it’s better for loose, drapey scarves rather than fitted cowls. If you want to make a cowl, add some extra ease.
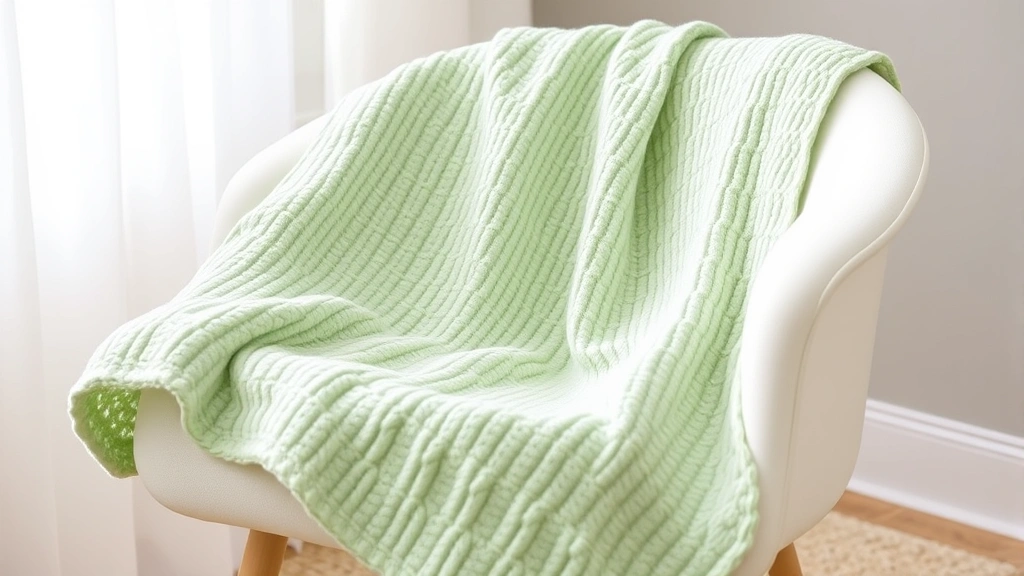
Blankets and Afghans
For larger blankets, the Lemon Peel Stitch is wonderful because it works up relatively quickly and doesn’t require any color changes or complex stitch patterns. I’ve made several throw blankets using this stitch, and they always get compliments.
The key with larger projects is maintaining consistent tension. I recommend taking breaks every hour or so to stretch your hands and check your work.
Stitch Variations and Modifications
Once you’re comfortable with the basic Lemon Peel Stitch, there are several fun variations you can try. These modifications can completely change the look and feel of your finished project.
Double Crochet Lemon Peel
Instead of using single crochet, try using double crochet stitches. This creates a taller, more open fabric with larger “bumps.” The pattern works the same way – DC, CH 1, skip 1 across, then offset in the next row. This variation works beautifully with chunky yarn for quick blankets.
Multi-Color Lemon Peel
While I usually recommend solid colors for this stitch, you can create interesting effects with color changes. Try changing colors every two rows to create subtle stripes, or use a slow-color-change yarn for gradual transitions.
The key with color changes is to change colors at the end of a row, not in the middle. This keeps your edges neat and makes weaving in ends easier.
Lemon Peel Border
The Lemon Peel Stitch makes a lovely border for other projects. I often use 3-4 rows of Lemon Peel around the edges of granny square blankets or simple single crochet afghans. It adds just enough texture to make the border interesting without being overwhelming.
Troubleshooting Your Work
Even with careful attention, sometimes things go wrong. Here are the most common problems I see and how to fix them without starting over.
Uneven Edges
If your edges are getting wavy or pulling in, check your turning chain technique. Remember, the turning chain doesn’t count as a stitch, and you should always work into the first actual stitch of the previous row.
For wavy edges, you might be adding stitches somewhere. Count your stitches every few rows until you get comfortable with the pattern.
Lost Pattern
If you lose track of where you are in the pattern, don’t panic. Look at your last completed row and identify the pattern – SC stitches create bumps, chain spaces create valleys. In your current row, work the opposite: SC into chain spaces, chain over SC stitches.
Gauge Issues
If your gauge is off for a specific pattern, try going up or down a hook size rather than changing your tension dramatically. A half-size difference can make a big impact on the finished fabric.
Blocking Tip: The Lemon Peel Stitch benefits from light blocking. A gentle steam or wet blocking will even out your stitches and make the texture more uniform.
Common Questions
How much yarn do I need for a throw blanket in Lemon Peel Stitch?
For a standard throw blanket (approximately 50″ x 60″), you’ll need about 2,000-2,200 yards of worsted weight yarn. The Lemon Peel Stitch uses slightly more yarn than plain single crochet due to the chain spaces, so always buy a little extra. I typically add 10% to whatever the pattern calls for.
Can beginners learn the Lemon Peel Stitch?
Absolutely! If you can single crochet and chain, you can do this stitch. I’d recommend that beginners be comfortable with basic single crochet first, but this is actually a great “next step” stitch. The repetitive nature helps build muscle memory, and the texture is forgiving of small tension inconsistencies.
Why does my Lemon Peel Stitch look flat instead of bumpy?
This usually happens when you’re not creating the proper offset. Make sure you’re working single crochet stitches into the chain-1 spaces from the previous row, not into the chain stitches themselves. The bump effect comes from stacking SC stitches on top of chain spaces.
How do I fix a mistake several rows back?
For small mistakes, you can often fix them by carefully dropping down to the error, fixing it, and then working back up. However, with textured stitches like this, it’s sometimes easier to frog back to the mistake. The good news is that the Lemon Peel Stitch works up relatively quickly, so re-doing a few rows isn’t too painful.
Can I use the Lemon Peel Stitch for wearables?
Yes, but with some considerations. The stitch creates a fairly firm fabric with minimal stretch, so it’s better for loose-fitting garments like cardigans or ponchos rather than fitted tops. I’ve seen beautiful cardigans made with this stitch, especially in lighter weight yarns.
Does this stitch curl at the edges?
The Lemon Peel Stitch has minimal curl compared to other crochet stitches, which is one of its advantages. The alternating pattern helps keep edges relatively flat. If you do experience some curling, a light blocking usually solves the problem.
How long does it take to complete a baby blanket?
For an experienced crocheter working at a moderate pace, a baby blanket in Lemon Peel Stitch typically takes 15-20 hours. Beginners might need 25-30 hours. The stitch works up faster than more complex patterns but slower than plain single crochet due to the chain spaces.
What’s the best way to join new yarn in this pattern?
I prefer to join new yarn at the beginning of a row rather than in the middle. This keeps your joins neat and makes weaving in ends easier. You can join at the end of any row – just leave long tails and weave them in later using the Russian join method for extra security.
Ready to Create Something Beautiful
The Lemon Peel Stitch might seem intimidating at first glance, but once you get the rhythm, it’s incredibly satisfying to work. There’s something almost meditative about the repetitive pattern, and the texture that emerges is just gorgeous.
Remember, every crocheter struggles with new techniques at first. I still remember my first attempt at this stitch – it took me three tries to get the pattern right, and my tension was all over the place. But now it’s one of my go-to stitches when I want something interesting but not too complex.
Start with a small project like a dishcloth or baby blanket square. Once you see how the texture develops and get comfortable with the offset pattern, you’ll be ready to tackle larger projects. The key is to be patient with yourself and remember that practice really does make progress.
Happy crocheting, and I hope you love this stitch as much as I do!