Last week, I was scrolling through Instagram when I saw the most gorgeous crochet sweater. The texture was incredible – these beautiful raised bobbles that seemed to pop right off the fabric. My first thought? “I need to learn how to make those!” If you’ve ever admired bobble stitch work and wondered how to create those satisfying little puffs of yarn, you’re in exactly the right place.
Bobble stitches might look intimidating at first glance, but here’s the thing – they’re actually just a clever combination of basic stitches worked in a specific way. Once you understand the technique, you’ll be adding texture and dimension to everything from baby blankets to cozy winter sweaters. I’ve taught this stitch to dozens of crocheters over the years, and the moment it clicks, their faces absolutely light up.
The key to beautiful bobbles isn’t complicated – it’s all about tension control and understanding how incomplete stitches work together. You’ll be creating multiple partial double crochets in the same stitch, then pulling them all together at the end to form that satisfying little bump. Trust me, once you get the rhythm down, you’ll find yourself adding bobbles to projects you never even planned to embellish.
Quick Answer
A bobble stitch is created by working 4-5 incomplete double crochets in the same stitch, then pulling them all together with a final yarn over and through. The key is maintaining consistent tension and completing all loops at once to create a raised, textured bump.
What Is a Bobble Stitch?
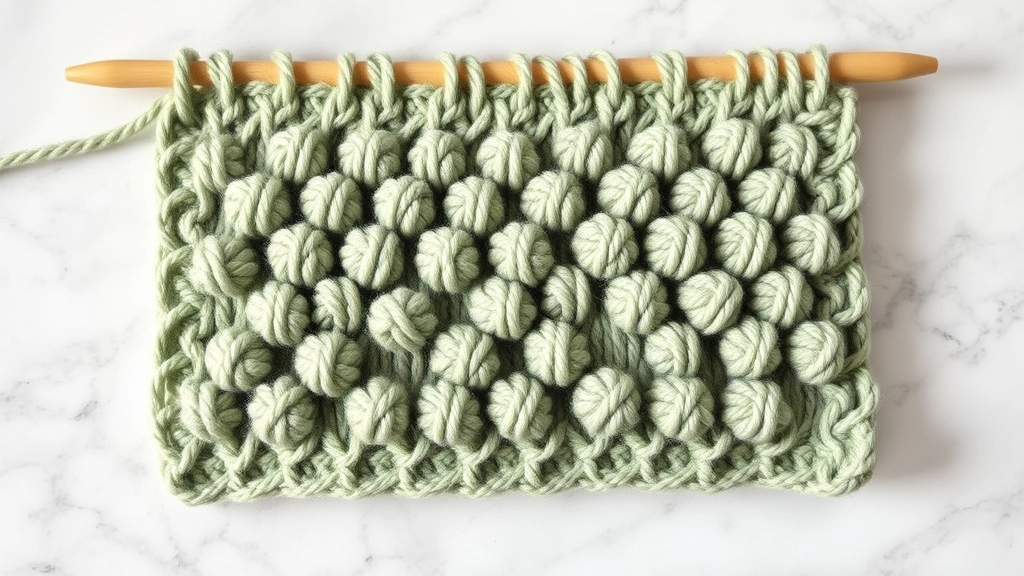
A bobble stitch is essentially a cluster of incomplete stitches that are joined together at the top to create a raised, three-dimensional bump on your fabric. Think of it as several stitches trying to occupy the same space – they push against each other and naturally pop forward, creating that distinctive bobble texture we all love.
The magic happens because you’re working multiple double crochets into the same stitch, but you’re not completing them individually. Instead, you leave the last loop of each double crochet on your hook, building up a collection of loops. When you finally yarn over and pull through all those loops at once, they compress together and push forward, forming the bobble.
What makes bobble stitches so appealing is their versatility. You can space them out for a subtle textural accent, cluster them together for dramatic effect, or arrange them in patterns to create everything from flowers to geometric designs. I’ve seen bobbles used to create realistic-looking berries on dishcloths, add cozy texture to winter accessories, and even form the centers of decorative flowers.
The beauty of bobble stitches lies in their three-dimensional quality – they add depth and interest to otherwise flat crochet fabric, making your projects feel more luxurious and handcrafted.
Most patterns will specify exactly how many incomplete stitches to use in each bobble. A 3-dc bobble uses three incomplete double crochets, a 5-dc bobble uses five, and so on. The more stitches you include, the larger and more pronounced your bobble will be. For beginners, I always recommend starting with 4-dc bobbles – they’re substantial enough to see clearly but not so large that they become unwieldy.
Materials and Tools You’ll Need
The great news about learning bobble stitches is that you don’t need any special tools – just your regular crochet supplies. However, choosing the right materials can make a huge difference in how your bobbles turn out, especially when you’re learning.
For yarn, I strongly recommend starting with a worsted weight (size 4) yarn in a light color. Lion Brand Vanna’s Choice or Red Heart Super Saver work beautifully for practice. Light colors help you see your stitch definition clearly, and worsted weight gives you enough bulk to create satisfying bobbles without being too chunky to manage.
| Yarn Weight | Hook Size | Best For |
|---|---|---|
| DK (3) | 5.0mm (H) | Delicate bobbles, baby items |
| Worsted (4) | 5.5mm (I) | Learning, general projects |
| Chunky (5) | 6.5mm (K) | Bold texture, quick projects |
Your hook choice matters more than you might think. I prefer aluminum hooks for bobble work because they have just enough grip to help control tension, but they’re still smooth enough to pull through multiple loops easily. If you’re using a larger hook size, make sure it’s comfortable in your hand – you’ll be doing some pulling that requires a good grip.
One tool that’s not essential but incredibly helpful is a stitch marker. When you’re learning, it’s easy to lose track of where your bobbles should go, especially if you’re working them in a pattern. A simple removable marker can help you keep track of your placement.
Step-by-Step Bobble Stitch Tutorial
Let’s walk through creating a basic 4-dc bobble step by step. I’ll be honest – your first few bobbles might look a little wonky, and that’s completely normal. Like any new technique, it takes a few tries to get the muscle memory down.
- Start with a foundation
Begin with a foundation chain and work a row of single crochets. This gives you a stable base to work your bobbles into. For practice, chain 20 and single crochet across – this gives you 19 stitches to work with.
- Begin the first incomplete double crochet
Yarn over, insert your hook into the stitch where you want your bobble. Yarn over and pull through (3 loops on hook). Yarn over, pull through 2 loops. Stop here! You should have 2 loops remaining on your hook. This is your first incomplete double crochet.
- Work the remaining incomplete stitches
Repeat step 2 three more times in the same stitch. Each time, you’ll add 1 more loop to your hook. After completing all four incomplete double crochets, you should have 5 loops total on your hook (the original loop plus one from each incomplete stitch).
- Complete the bobble
Yarn over and pull through all 5 loops at once. This is where the magic happens – you might need to grip your hook firmly and give a good pull. Chain 1 to secure the bobble.
- Continue your row
Work your next stitch into the next foundation stitch as normal. The bobble is complete and should pop forward from your fabric.
The trickiest part for most people is that final pull-through. If you’re struggling, check your tension – you might be working too tightly. The loops should slide over each other easily when you pull through. If they’re fighting you, try loosening up your yarn tension slightly.
When working granny squares or other projects with bobbles, remember that the bobble will naturally want to pop toward the front of your work. If you want it on the back side, you’ll need to push it through as you work.
Common Mistakes and How to Fix Them
After teaching bobble stitches to countless crocheters, I’ve seen the same mistakes pop up over and over. The good news? They’re all totally fixable, and recognizing them early will save you hours of frustration.
The most common mistake is inconsistent tension. I see people either pulling so tight that they can barely get their hook through the loops, or working so loose that their bobbles look more like saggy lumps than defined bumps. The sweet spot is firm but not tight – your yarn should have structure but still move freely over your hook.
Flat or Undefined Bobbles
If your bobbles aren’t popping forward prominently, you’re likely not completing them properly. Make sure you’re actually pulling through ALL the loops at once in that final step. Sometimes people accidentally pull through just a few loops, which doesn’t create the compression needed for a good bobble.
Another cause of flat bobbles is working into the wrong part of the stitch below. You want to insert your hook under both loops of the stitch, just like a regular double crochet. Working under only one loop can cause your bobble to lean or not form properly.
Bobbles Leaning or Twisting
This usually happens when your tension is uneven across the incomplete stitches. Try to maintain the same yarn tension for each of the 4 (or 5) incomplete double crochets. If one is much tighter or looser than the others, it’ll pull the whole bobble in that direction.
Sometimes bobbles twist because you’re accidentally adding extra yarn overs or missing them entirely. Count your steps carefully: yarn over, insert hook, yarn over and pull through, yarn over and pull through 2. That should leave you with exactly 2 loops on your hook after each incomplete stitch.
Difficulty Pulling Through Multiple Loops
This is probably the most frustrating issue for beginners. If you can’t pull through all the loops at once, first check that you haven’t accidentally split your yarn anywhere. Split yarn creates friction that makes pulling through nearly impossible.
If your yarn isn’t split, the issue is likely tension. Try working your incomplete stitches just a tiny bit looser. You want them firm enough to create structure, but not so tight that they bind up when you try to complete the bobble.
Different Types of Bobble Stitches
Once you’ve mastered the basic 4-dc bobble, there’s a whole world of variations to explore. Each type creates a slightly different effect, and understanding these options will help you choose the right bobble for your project.
The 3-dc bobble is perfect for delicate work or when you want subtle texture. I love using these in baby hats because they add interest without being too chunky for little heads. They work up quickly and use less yarn than larger bobbles, making them economical for big projects.
5-dc bobbles are my go-to for statement pieces. They’re substantial enough to really stand out, making them perfect for accent work or when you want your texture to be the star of the show. I’ve used 5-dc bobbles to create gorgeous textured panels on sweaters and dramatic borders on blankets.
Popcorn Stitches vs. Bobble Stitches
People often confuse bobble stitches with popcorn stitches, and I get why – they both create raised bumps on your fabric. The key difference is in construction: popcorn stitches are made by working complete double crochets in the same stitch, then folding them together and securing with a slip stitch.
Bobbles tend to be rounder and more compact, while popcorns are often taller and more cylindrical. For most textural applications, I prefer bobbles because they create a more uniform surface and are less likely to snag.
Front Post and Back Post Bobbles
You can work bobbles around the posts of stitches from previous rows to create even more dimensional effects. Front post bobbles pop forward dramatically, while back post bobbles create interesting negative space and shadowing effects.
These techniques are fantastic for creating ribbing effects or geometric patterns. I’ve seen gorgeous scarves that use alternating front and back post bobbles to create a wave-like texture that’s both visually striking and incredibly cozy.
| Bobble Type | Best Use | Skill Level |
|---|---|---|
| 3-dc bobble | Delicate texture, baby items | Beginner |
| 4-dc bobble | General texture work | Beginner |
| 5-dc bobble | Bold statements, borders | Intermediate |
| Front post bobble | Dramatic texture | Intermediate |
Perfect Projects for Bobble Stitches
Now that you’ve got the technique down, let’s talk about where bobble stitches really shine. I’ve incorporated bobbles into dozens of different project types over the years, and some applications are definitely more successful than others.
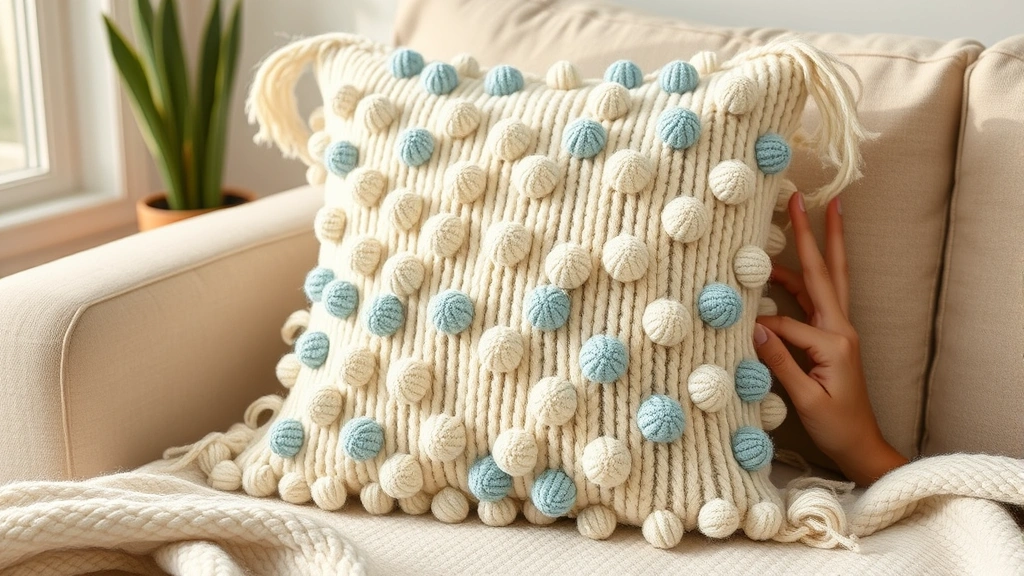
Throw pillows are probably my favorite bobble project for beginners. The relatively small size means you won’t get tired of the technique before finishing, and pillows are forgiving – if your bobbles aren’t perfectly uniform, it just adds to the handmade charm. Plus, the three-dimensional texture of bobbles makes pillows feel incredibly luxurious.
Baby blankets with scattered bobbles are absolutely precious. The key is restraint – too many bobbles can make a blanket heavy and less cuddly. I like to work bobbles in gentle patterns, maybe every 5th stitch in every 7th row, to create subtle texture without overwhelming the softness babies need.
Wearables with Bobble Accents
Bobbles can transform simple garments into showstoppers, but placement is everything. I love adding bobble borders to the bottom of sweaters or around necklines. A single row of bobbles can elevate a basic pullover into something special.
For accessories, bobble stitches add wonderful texture to hats and cowls. The three-dimensional quality helps trap warm air, making these pieces not just beautiful but extra cozy. Just remember that bobbles do add bulk, so account for that in your sizing.
Home decor items like baskets and storage containers benefit beautifully from bobble texture. The raised stitches add visual interest and help disguise any irregularities in shaping that might occur with functional items.
Seasonal and Holiday Projects
Bobbles are fantastic for creating textural elements that mimic natural objects. I’ve seen gorgeous autumn leaves created entirely with strategically placed bobbles, and Christmas ornaments that use bobbles to represent berries or snow.
The Craft Yarn Council has some wonderful free patterns that incorporate bobble stitches into seasonal designs, and they’re a great way to practice your technique while creating something useful.
Troubleshooting Your Bobbles
Even experienced crocheters run into bobble challenges sometimes. Here are the solutions to the most persistent problems I encounter when helping people perfect their technique.
If your bobbles are consistently smaller than expected, you’re probably not working loosely enough during the incomplete stitch phase. Remember, those stitches need room to compress together – if they’re too tight individually, they can’t form a proper bobble when joined.
Conversely, if your bobbles look loose and undefined, you might be working too loosely or not pulling firmly enough when completing the bobble. That final pull-through should require some effort – you’re compressing multiple stitches into the space of one.
Fixing Wonky Bobbles
Sometimes you’ll work a bobble that just doesn’t look right – maybe it’s leaning weird or one side is higher than the other. Don’t stress about ripping out the entire thing. Often, you can gently manipulate a bobble with your fingers to encourage it into better shape.
Use your hook tip to gently nudge bobbles into position while the yarn is still somewhat pliable. This works especially well with natural fibers that have some memory and will hold the shape you encourage them into.
Remember, slight irregularities in handmade items are part of their charm. Perfect uniformity is what machines do – your bobbles should look lovingly crafted, not factory-produced.
If you’re working a large project with many bobbles and notice inconsistency creeping in, take breaks. Tension changes when we get tired, and maintaining consistent bobbles requires steady hands and consistent pressure.
Yarn Choice Impact
Different yarn fibers behave differently when worked into bobbles. Cotton tends to create crisp, defined bobbles that hold their shape well over time. Wool has more give and creates softer, rounder bobbles that feel wonderful but might relax slightly with wear.
Acrylic yarns are fantastic for learning because they’re forgiving and hold their shape well. Once you’re comfortable with the technique, experimenting with different fibers can create interesting textural variations in your work.
Common Questions
How much extra yarn do bobble stitches use?
Bobble stitches use approximately 30-40% more yarn than the same area worked in single crochet. For a typical throw pillow with scattered bobbles, plan on an extra 50-75 yards of worsted weight yarn beyond what a plain pattern would require.
Can I work bobbles in different yarn weights?
Absolutely! Lighter weights like DK create delicate, subtle bobbles perfect for garments, while chunky yarns make bold, dramatic bobbles ideal for home decor. Adjust your hook size according to the yarn manufacturer’s recommendations and expect different visual effects with each weight.
Why do my bobbles pop to the back instead of the front?
This happens when you’re working on the wrong side of your fabric or if your tension is pulling the bobbles backward. Make sure you’re working with the right side facing you, and try pushing each bobble forward with your finger immediately after completing it.
How do I wash items with bobble stitches?
Bobbled items should be hand-washed or machine-washed on gentle cycle in cold water. The texture can trap soap, so rinse thoroughly. Lay flat to dry and gently reshape any bobbles that might have flattened during washing. Avoid wringing or twisting the fabric.
Can I add bobbles to existing crochet patterns?
Yes, but plan carefully! Bobbles change the fabric’s drape and stretch, so test on a swatch first. Replace regular double crochets with bobbles at a ratio of about 1:3 to maintain proper fabric dimensions. Afghan patterns are especially good candidates for bobble modifications.
What’s the difference between a 3-dc and 5-dc bobble?
The number refers to how many incomplete double crochets you work before completing the bobble. 3-dc bobbles are smaller and more subtle, perfect for delicate work. 5-dc bobbles are larger and more prominent, ideal for statement pieces or when you want bold texture.
How do I keep bobbles evenly spaced?
Use stitch markers to mark bobble placement before you start each row. Count carefully and consider drawing a simple chart for complex patterns. Many crocheters find it helpful to work bobbles in odd-numbered stitches (1st, 3rd, 5th) for natural spacing.
Can beginners learn bobble stitches?
Definitely! If you’re comfortable with double crochet stitches, you can learn bobbles. Start with worsted weight yarn in a light color, practice on swatches first, and don’t worry if your first few attempts aren’t perfect. The technique clicks quickly with practice.
Learning bobble stitches opens up a whole new world of textural possibilities in your crochet work. Yes, they take a little practice to master, but the satisfaction of creating those perfect little dimensional bumps is absolutely worth the effort. I still get excited every time I see a row of bobbles coming together – there’s something so satisfying about watching flat fabric transform into something sculptural and touchable.
Start with simple projects and don’t be afraid to experiment. Try different yarn weights, play with spacing, combine bobbles with other textural stitches. Some of my favorite pieces have come from happy accidents while practicing new techniques. The beauty of crochet is that every mistake is just a learning opportunity in disguise.
Remember, your bobbles don’t need to be perfect to be beautiful. Embrace the handmade quality – those slight variations that show a human made this with love and care. Now grab your hook and yarn, and go create some gorgeous texture. Your future self will thank you for taking the time to master this wonderful technique.