Last week, I was teaching my neighbor how to crochet when she picked up her hook and asked, “Should I hold this like a pencil or a knife?” It’s such a fundamental question, yet one that can make or break your entire crochet journey. The way you hold your hook affects everything – your speed, comfort, stitch tension, and whether you’ll end up with sore hands after an hour of crocheting.
I’ve been crocheting for over fifteen years, and I’ll be honest – I held my hook “wrong” for the first three years. My stitches were uneven, my hand cramped constantly, and I couldn’t figure out why other crocheters seemed to work so much faster than me. Once I learned proper hook holding techniques, everything changed. My stitches became more consistent, I could crochet for hours without pain, and my speed nearly doubled.
Here’s the thing: there isn’t just one “right” way to hold a crochet hook. Different grips work better for different people, depending on your hand size, the type of project you’re working on, and even what feels most natural to you. But there are definitely techniques that will set you up for success, and others that will leave you frustrated and sore.
Quick Answer
Hold your crochet hook like a pencil (pencil grip) or like a knife (knife grip), keeping your grip relaxed about 1-2 inches from the hook tip. The pencil grip offers more control for detailed work, while the knife grip provides power for larger projects and faster stitching.
The Two Main Hook Grips
When you’re learning to crochet, you’ll encounter two primary ways to hold your hook: the pencil grip and the knife grip. Both are perfectly valid techniques used by experienced crocheters worldwide, and neither is inherently better than the other.
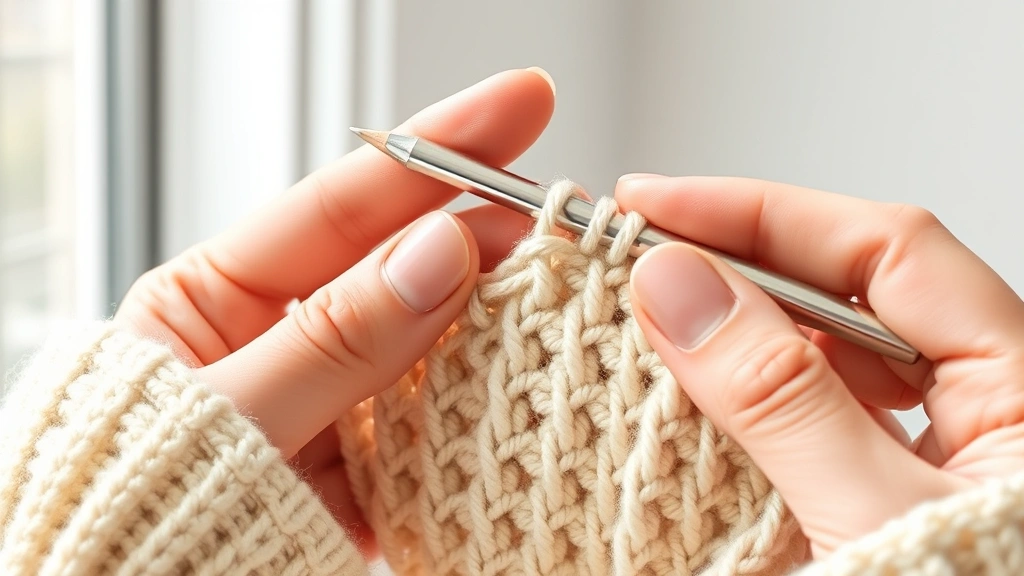
The pencil grip, as the name suggests, involves holding your hook similar to how you’d hold a pencil when writing. Your thumb and index finger pinch the hook shaft, while your middle finger provides support from underneath. This grip offers excellent control and precision, making it ideal for amigurumi projects and detailed stitch work.
The knife grip involves holding the hook more like you’d grip a knife when cutting food. Your entire hand wraps around the hook shaft, with your thumb resting on top. This grip provides more power and leverage, which many crocheters find helpful for larger projects or when working with chunky yarn weights.
Personal Experience: I started with the knife grip because it felt more natural, but switched to pencil grip when I began making intricate lace patterns. Now I use both depending on the project – knife grip for blankets and scarves, pencil grip for detailed work.
Mastering the Pencil Grip
The pencil grip is often recommended for beginners because it provides excellent stitch control and tends to produce more even tension. Here’s how to position your hand correctly:
Hold the hook shaft between your thumb and index finger, about 1 to 2 inches from the hook tip. Your thumb should rest on one side of the shaft, your index finger on the opposite side. Your middle finger curves underneath to provide support, while your ring finger and pinky naturally curl inward.
The key is keeping your grip relaxed. Many new crocheters squeeze the hook too tightly, which leads to hand fatigue and can actually make it harder to manipulate the yarn smoothly. Think of holding a delicate flower – firm enough that it won’t slip, but gentle enough not to crush it.
Benefits of the Pencil Grip
This grip excels when you’re working on projects that require precision. If you’re planning to tackle intricate lace patterns or detailed colorwork, the pencil grip gives you the fine motor control you need. It’s also excellent for working with finer yarn weights like fingering or sport weight.
The pencil grip tends to produce more consistent stitch tension because your fingers have better control over the hook’s movement. This is particularly helpful when you’re learning fundamental stitches and want to ensure each one looks the same.
Pro tip: If you’re switching from knife grip to pencil grip, give yourself at least a week to adjust. Your muscle memory needs time to adapt, and your first few projects might feel awkward.
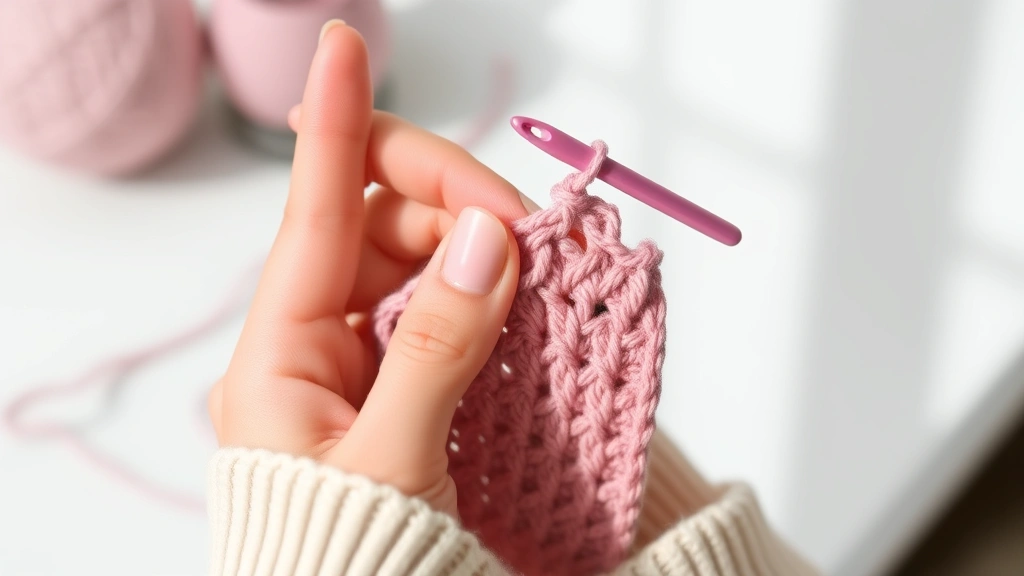
Perfecting the Knife Grip
The knife grip wraps your entire hand around the hook shaft, creating a powerful and stable hold. Position your hand so the hook shaft runs along your palm, with your thumb resting on top of the shaft and your fingers wrapped around the bottom.
Your grip point should still be 1-2 inches from the hook tip – any closer and you’ll block your view of your work, any further and you’ll lose control. The shaft should rest in the web between your thumb and index finger, with your remaining fingers providing support.
This grip generates more power with each stitch, which is why many crocheters prefer it for larger projects. When I’m working on a king-size blanket with worsted weight yarn, the knife grip lets me work faster with less effort.
When the Knife Grip Shines
The knife grip really excels with bulky and super bulky yarns. The extra leverage helps you pull the yarn through multiple loops without straining your hand. It’s also fantastic for repetitive stitches like single crochet or double crochet, where you’re making the same motion hundreds of times.
Many speed crocheters prefer the knife grip because it allows for more fluid, sweeping motions. Once you develop muscle memory, you can maintain a steady rhythm that’s hard to achieve with the pencil grip.
| Grip Type | Best For | Yarn Weights | Project Types |
|---|---|---|---|
| Pencil | Precision, detail work | Fingering to worsted | Amigurumi, lace, colorwork |
| Knife | Speed, power | Worsted to super bulky | Blankets, scarves, hats |
Proper Hand and Wrist Position
Your grip is only part of the equation – how you position your entire hand and wrist affects your comfort and stitch quality. Your wrist should remain in a neutral position, not bent up or down. Think of your hand as an extension of your forearm, forming a straight line from your elbow to your knuckles.
Avoid the temptation to rest your wrist on the table or your lap while crocheting. This creates an awkward angle that can lead to repetitive strain injuries over time. Instead, let your arm move freely, supporting your work with your non-dominant hand.
Your shoulder should be relaxed, not hunched up toward your ear. I see this mistake constantly in my local crochet groups – people get so focused on their stitches that they unconsciously tense their entire upper body.
Creating an Ergonomic Setup
Good lighting is crucial for maintaining proper posture. When you can see your stitches clearly, you won’t lean forward and strain your neck. Position yourself so natural light comes from your left side (or right if you’re left-handed) to minimize shadows on your work.
Your chair height matters too. Your feet should rest flat on the floor, with your thighs parallel to the ground. If you’re crocheting on a couch, use pillows to support your back and bring your work up to a comfortable level.
Ergonomic Hook Options: If you experience hand pain, consider investing in ergonomic hooks. Brands like Clover and Furls make hooks with larger, more comfortable grips that can reduce hand strain significantly.
Managing Yarn Tension While You Work
Your hook grip works in partnership with how you control yarn tension in your non-dominant hand. Most crocheters wrap the working yarn around their pinky finger, then bring it up and over their index finger. This creates consistent tension that makes stitches easier to form.
The key is finding the right balance – too loose and your stitches will be sloppy and uneven, too tight and you’ll struggle to insert your hook. Your yarn should glide smoothly through your fingers with just enough resistance to maintain control.
Some crocheters prefer to wrap the yarn around their middle finger instead of their pinky, especially when working with cotton yarns that can be less forgiving. Experiment with different tensioning methods to find what feels most natural for your hands.
Adjusting Tension for Different Yarns
Slippery yarns like bamboo or silk require a bit more tension to prevent stitches from loosening up. Wrap the yarn around your finger one extra time, or pinch it gently between your thumb and index finger as you work.
For sticky or grabby yarns like some acrylics, you might need to loosen your tension slightly. These yarns naturally want to stick together, so you don’t need as much finger pressure to maintain control.
Avoiding Common Grip Mistakes
The most common mistake I see is gripping the hook too tightly. Your knuckles shouldn’t be white, and you shouldn’t feel strain in your forearm after just a few minutes of crocheting. A death grip on your hook will tire you out quickly and can actually make your stitches less consistent.
Another frequent error is holding the hook too close to the tip. This blocks your view of where you’re inserting the hook and makes it harder to manipulate the yarn. Keep that 1-2 inch distance from the tip – it gives you better leverage and visibility.
Many beginners also make the mistake of changing their grip mid-project. Consistency is key to even stitches, so once you choose a grip, stick with it for the entire project. Your gauge and tension can change dramatically if you switch grips halfway through.
Signs You Need to Adjust Your Grip
Pay attention to your body’s signals. If your hand starts cramping within 15-20 minutes, your grip is probably too tight or positioned incorrectly. Uneven stitches often indicate inconsistent grip pressure or frequent grip changes.
Sore wrists or forearms suggest your hand position needs adjustment. Take breaks every 30 minutes to stretch your hands and assess how you’re holding your tools.
Remember: It takes about 21 days to form a new habit. If you’re changing your grip technique, be patient with yourself and practice regularly in short sessions.
Which Grip Should You Choose?
The honest answer? Try both and see which feels more natural for your hands and the projects you want to make. There’s no universal “best” grip – it’s about finding what works for your unique combination of hand size, project preferences, and comfort level.
If you’re planning to focus on detailed work like thread crochet doilies or intricate amigurumi, the pencil grip will likely serve you better. The precision control makes it easier to work into tight spaces and maintain consistent stitch definition.
For those who want to tackle large projects like afghans or are drawn to chunky, cozy pieces, the knife grip might be your better choice. The power and speed advantages really shine when you’re working through hundreds of repetitive stitches.
Consider Your Physical Factors
Hand size plays a role in grip comfort. People with smaller hands often find the pencil grip more natural, while those with larger hands might prefer the knife grip’s full-hand engagement. Arthritis or other joint issues might make one grip more comfortable than the other.
Your crafting goals matter too. If you’re hoping to sell your work or crochet professionally, speed might be more important than precision, pushing you toward the knife grip. If you crochet purely for relaxation and enjoy detailed projects, the pencil grip’s control might be more appealing.
Troubleshooting Grip Problems
If you’re experiencing hand fatigue, first check your grip pressure. Relax your hold and see if you can maintain control with less force. Most tension control comes from your non-dominant hand anyway, so your hook hand can stay relatively relaxed.
Uneven stitches often stem from inconsistent grip pressure or position. Mark your hook with a small piece of tape at your optimal grip point, then practice maintaining that position throughout your work session.
For persistent wrist pain, evaluate your entire setup. Are you supporting your work properly? Is your chair at the right height? Sometimes grip problems are actually posture problems in disguise.
When to Seek Professional Help
If you experience numbness, tingling, or persistent pain that doesn’t improve with rest and technique adjustments, consult a healthcare provider. Repetitive strain injuries are real and shouldn’t be ignored.
An occupational therapist can assess your specific situation and recommend modifications or exercises to prevent injury while still allowing you to enjoy crocheting.
Quick Relief: Keep a stress ball or therapy putty nearby. Squeezing and releasing it between crochet sessions can help maintain hand strength and flexibility.
Common Questions
How long does it take to get comfortable with a new grip?
Most crocheters need about 1-2 weeks of regular practice to feel comfortable with a new grip, and about a month to develop true muscle memory. Start with simple projects like dishcloths or scarves while you’re adjusting – don’t attempt complex patterns until your grip feels natural.
Can I switch between grips during the same project?
It’s not recommended for the same project because different grips can produce slightly different tensions, leading to visible changes in your fabric. However, many experienced crocheters use different grips for different types of projects or even different parts of complex projects.
Should left-handed crocheters hold their hooks differently?
The basic grip principles are the same for left-handed crocheters, just mirrored. Left-handed crocheters hold the hook in their left hand and control yarn tension with their right hand. Both pencil and knife grips work equally well for lefties.
What if my hands are too small or too large for standard techniques?
Hand size does affect comfort, but both grips can be adapted. Smaller hands might benefit from gripping closer to the hook tip (but not less than 1 inch), while larger hands might need to grip further back on the shaft. Ergonomic hooks with larger handles can help people with bigger hands feel more comfortable.
Does yarn weight affect which grip I should use?
Heavier yarn weights (worsted and above) often work better with the knife grip because you need more power to pull yarn through multiple loops. Lighter weights (sport, DK) work well with either grip, while very fine threads usually require the precision of a pencil grip.
How tight should I grip my hook?
Your grip should be firm enough to maintain control but relaxed enough that you could easily slide the hook out of your hand if needed. Think “confident handshake” rather than “crushing a can.” You should be able to crochet for 30 minutes without hand fatigue.
What’s the best way to practice proper grip technique?
Start with simple, repetitive stitches like single crochet in rows. Use a smooth, medium-weight yarn (worsted weight acrylic works well) and focus on maintaining consistent grip pressure and position. Practice for 15-20 minutes at a time to avoid fatigue while building muscle memory.
Are there any exercises to improve my grip strength and flexibility?
Simple hand exercises can help prevent fatigue and injury. Try finger stretches, wrist circles, and gentle hand squeezes with a stress ball. The Craft Yarn Council recommends taking breaks every 30 minutes to stretch and rest your hands.
Learning to hold your crochet hook properly is one of those foundational skills that affects everything else you’ll do with yarn and hook. It might feel awkward at first, especially if you’re changing from a grip that felt natural but wasn’t serving you well. Give yourself time to adjust, and don’t be afraid to experiment with both techniques.
Remember, the “perfect” grip is the one that allows you to crochet comfortably for extended periods while producing the stitches you want. Whether you end up preferring the precision of a pencil grip or the power of a knife grip, the key is consistency and comfort. Your hands will thank you for taking the time to learn proper technique, and your finished projects will show the difference that good fundamentals make.
Happy crocheting, and don’t forget to take breaks to stretch those hardworking hands!