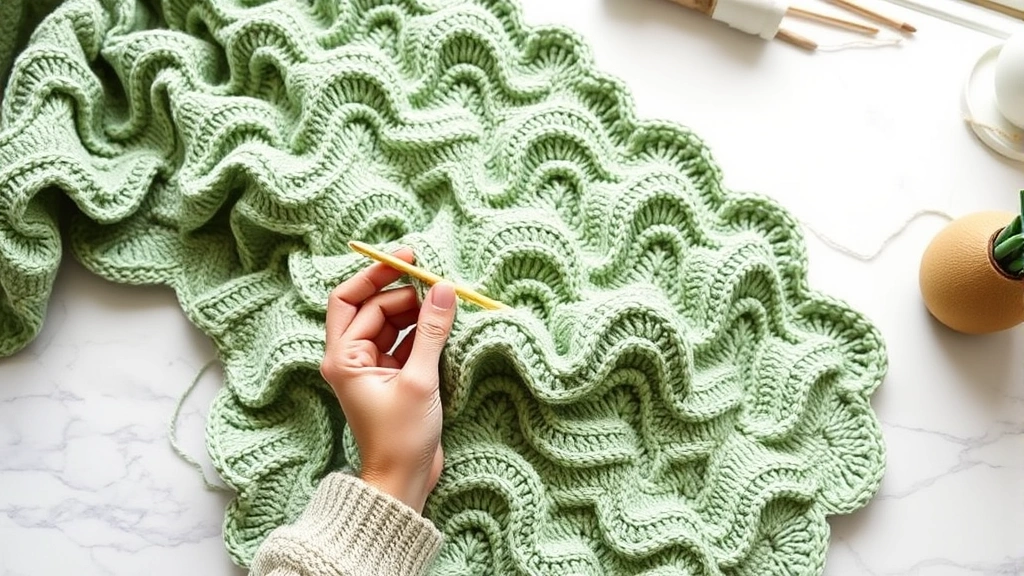
You know that moment when you’re scrolling through Pinterest at 2 AM and suddenly stumble upon the most gorgeous crochet blanket you’ve ever seen? That was me three months ago, staring at this intricate ripple pattern that looked like ocean waves frozen in time. I saved it immediately, then spent the next week obsessing over how to recreate it.
Here’s the thing about ripple crochet patterns – they look intimidatingly complex, but once you understand the basic mechanics, they’re actually quite meditative to work. The secret lies in understanding how increases and decreases create those beautiful undulating waves. I’ve spent countless hours perfecting different ripple techniques, and I’m excited to share what I’ve learned with you.
Whether you’re dreaming of a cozy baby blanket with gentle waves or a bold throw that makes a statement, ripple patterns offer endless possibilities. The rhythm of the stitches becomes almost hypnotic once you get into the groove, and there’s something deeply satisfying about watching those peaks and valleys emerge row by row.
Quick Answer
Ripple crochet patterns create wave-like designs using strategic increases and decreases across each row. The basic technique involves working multiple stitches in peak points and skipping stitches or working decreases in valley points, typically following a mathematical repeat pattern.
Understanding Ripple Pattern Basics
The magic of ripple crochet lies in its mathematical foundation. Every ripple pattern follows a specific repeat that creates the wave effect through calculated increases and decreases. Think of it like a heartbeat on a monitor – the peaks represent increases (usually 3-5 stitches worked into one space), while the valleys represent decreases (typically skip stitches or work decreases).
Most traditional ripple patterns use a multiple of 14 plus 3 stitches for the foundation chain. This might seem arbitrary, but it’s actually perfectly calculated. Within each 14-stitch repeat, you’ll typically have 2 peak points (increases), 2 valley points (decreases), and connecting stitches that maintain the wave shape.
The beauty of understanding this mathematical base means you can adjust any ripple pattern to your desired width. Want a baby blanket that’s 36 inches wide? Calculate your gauge, determine how many repeats you need, and adjust accordingly. I’ve found that keeping track of your repeats is crucial for maintaining pattern consistency.
Pro tip: Always work a gauge swatch with your chosen yarn and hook before starting a large ripple project. The wave effect can significantly impact your final measurements.
The Science Behind the Waves
What creates those gorgeous undulating waves isn’t magic – it’s tension management. When you work multiple stitches into the same space (the peaks), you’re adding extra fabric that naturally wants to buckle upward. Conversely, when you skip stitches or work decreases (the valleys), you’re removing fabric, creating a natural dip.
The connecting stitches between peaks and valleys are equally important. They provide the structural integrity that maintains the wave shape wash after wash. I learned this the hard way when I rushed through a project and didn’t maintain consistent tension – my waves looked more like gentle hills than dramatic peaks.
Essential Ripple Techniques
Before diving into specific patterns, let’s master the fundamental techniques that make ripple crochet successful. These skills will serve you well across all ripple variations, from simple chevrons to complex wave patterns.
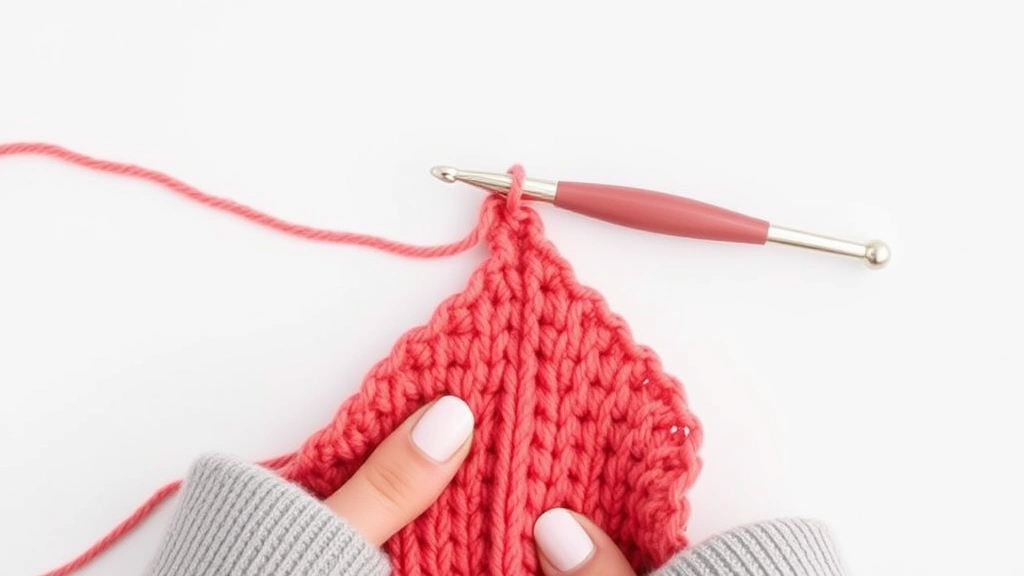
Creating Perfect Peaks
The peak is where most beginners struggle. The standard technique involves working 3 double crochet stitches into the same space, but here’s what pattern instructions don’t always tell you: yarn over before inserting your hook into the peak space, then work all three stitches with consistent tension.
I’ve found that slightly loosening your grip during peak stitches prevents the fabric from puckering. The goal is to create a gentle fan effect, not a tight cluster. Practice this technique with worsted weight yarn and a size H (5mm) hook until it becomes second nature.
Mastering Valley Decreases
Valleys require a different approach depending on your pattern. The most common method involves skipping the center stitch of a 3-stitch group from the previous row, then working a single crochet into the next stitch. Some patterns use double crochet decreases (dc2tog) for a more pronounced valley effect.
The key to clean valleys is maintaining consistent stitch height. If you’re working double crochet peaks, your valley stitches should also be double crochet height, even if you’re technically working fewer stitches. This creates the smooth wave effect you’re after.
| Stitch Type | Peak Technique | Valley Technique | Best For |
|---|---|---|---|
| Single Crochet | 3 sc in same space | Skip 2 stitches | Dishcloths, tight fabric |
| Double Crochet | 3 dc in same space | Dc2tog or skip center st | Blankets, scarves |
| Treble Crochet | 3 tr in same space | Tr2tog | Dramatic waves, shawls |
Choosing the Right Materials
Your yarn and hook choices significantly impact how your ripple pattern performs. I’ve learned through trial and error that not all yarns are created equal when it comes to ripple work.
Yarn Weight Considerations
Worsted weight yarn remains the gold standard for ripple patterns, especially for beginners. It provides excellent stitch definition while being forgiving enough to hide minor tension inconsistencies. Lion Brand Yarn and Red Heart both offer extensive worsted weight collections perfect for ripple projects.
DK weight yarn creates more delicate waves and works beautifully for baby projects, while chunky weight yarn produces bold, dramatic waves that work up quickly. I avoid using very fine yarns like lace weight for ripple patterns – the wave effect gets lost, and tension becomes critical.
My go-to combination: Red Heart Super Saver in worsted weight with a size H (5mm) hook. It’s affordable, durable, and the slight stiffness actually helps maintain wave shape.
Hook Size Impact
Hook size affects more than just gauge in ripple patterns – it influences wave definition. A hook that’s too small creates tight, cramped waves that lack fluidity. Too large, and your waves become floppy and lose their structural integrity.
Start with the hook size recommended on your yarn label, then adjust based on your tension. If your peaks are too tight or your valleys too shallow, go up a hook size. If everything looks loose and undefined, size down. I keep multiple hook sizes handy when starting a new ripple project for this exact reason.
Classic Chevron Ripple Pattern
Let’s walk through the most fundamental ripple pattern – the classic chevron. This pattern forms the foundation for countless variations and teaches you the essential rhythm of ripple crochet.
Foundation Setup
Chain a multiple of 14 plus 3. For a throw blanket approximately 50 inches wide, I typically chain 157 (11 repeats × 14 + 3). The extra 3 chains account for the turning chain and pattern alignment.
Row 1 starts the wave pattern immediately. Skip 3 chains (counts as first dc), then work 2 dc in the 4th chain from hook. This creates your first peak. Continue following the established pattern: *dc in next 3 chains, skip 2 chains, dc in next 3 chains, work 3 dc in next chain* across the row.
- Establish Your Rhythm
The pattern repeat is: 3 dc in peak space, dc in next 3 stitches, skip 2 stitches (valley), dc in next 3 stitches, 3 dc in peak space. Practice this rhythm slowly until it becomes automatic.
- Maintain Consistent Tension
Your peaks should fan out gently, not bunch up tightly. Your valleys should create a clear dip without pulling the fabric. Consistent tension takes practice, so don’t get discouraged if your first few rows look uneven.
- Count Your Repeats
Each row should have the same number of peaks and valleys. I use stitch markers to mark every third repeat – it makes counting easier and helps catch mistakes early.
Building the Wave Structure
After completing your foundation row, the subsequent rows follow the established peak and valley points. The key is working your peaks directly above previous peaks and valleys above previous valleys. This vertical alignment creates the consistent wave pattern.
Row 2 and beyond: Chain 3 (turning chain), turn. Work 2 dc in the first stitch (this maintains your edge peak), then follow your established pattern. The turning chain plus 2 dc creates a full 3-dc peak at the beginning of each row.
Advanced Ripple Variations
Once you’ve mastered the basic chevron, a world of ripple variations opens up. These advanced techniques add texture, visual interest, and complexity to your projects.
Shell Ripple Patterns
Shell ripples combine the wave effect with decorative shell stitches. Instead of working 3 dc in peak spaces, you work shell clusters (typically 5 dc in the same space). The valleys often feature picot stitches or chain spaces for added texture.
This variation works beautifully with cotton yarn for summer tops or lightweight throws. The shell clusters create natural drape while maintaining the ripple structure. I recommend using a slightly larger hook than usual to accommodate the shell clusters without creating overly tight fabric.
Bobble Ripple Techniques
Bobble ripples incorporate raised bobble stitches at peak points, creating dimensional waves with incredible texture. The bobbles are typically worked as 5-dc clusters that are closed together, then the loop is pulled through to create the raised effect.
These patterns require more yarn than standard ripples due to the dimensional elements, but the visual impact is stunning. I’ve used bobble ripples for decorative pillow covers where the texture really shines.
| Pattern Type | Skill Level | Yarn Usage | Best Projects |
|---|---|---|---|
| Classic Chevron | Beginner | Standard | Blankets, scarves |
| Shell Ripple | Intermediate | 10% more | Shawls, summer tops |
| Bobble Ripple | Advanced | 25% more | Decorative throws, pillows |
| Feather & Fan | Intermediate | Standard | Baby blankets, wraps |
Troubleshooting Common Issues
Every crocheter encounters challenges with ripple patterns. Here are the most common issues I see and practical solutions that actually work.
Waves That Won’t Wave
If your ripple looks more like a flat rectangle than rolling waves, the issue is usually insufficient contrast between peaks and valleys. Check that you’re actually working 3 full stitches in peak spaces and properly executing your valley decreases.
Sometimes the problem is yarn choice. Very stiff acrylic yarns can resist the natural drape needed for wave formation. Try blocking your work with steam to encourage the wave shape, or consider switching to a yarn with better drape characteristics.
Edges That Curl or Flare
Edge issues plague many ripple projects. Curling edges usually indicate too much tension in your valley stitches, while flaring edges suggest loose peak stitches. The solution often lies in adjusting your hook size rather than fighting your natural tension.
I’ve found that adding a simple border can resolve many edge issues. A round of single crochet around the entire project, working 3 sc in each peak and skipping stitches in valleys, creates a stable edge that lies flat.
Stitch Count Problems
Losing or gaining stitches is the bane of ripple crochet. The mathematical precision required means even one missed stitch throws off your entire pattern. I recommend using row counters and checking your stitch count every few rows.
When you discover a stitch count error, resist the urge to fudge it by adding or skipping random stitches. This creates permanent waves in your wave pattern that will be visible forever. It’s better to tink back (unknit/uncrochet) to the error and fix it properly.
Color Work and Striping Strategies
Color changes can make or break a ripple pattern. The wave structure naturally lends itself to certain color arrangements while fighting others. Understanding these principles will help you create stunning color effects.
Stripe Patterns That Work
Simple stripe patterns work beautifully with ripples. Two-row stripes create a classic look that emphasizes the wave structure without overwhelming it. I prefer changing colors at the end of rows rather than mid-row to maintain clean color transitions.
For dramatic effect, try alternating light and dark colors every two rows. The contrast helps define the wave structure and creates visual depth. The Craft Yarn Council provides excellent guidance on color coordination for multi-color projects.
Gradient effects work particularly well with ripple patterns. Start with your darkest color and gradually transition to lighter shades, changing every 4-6 rows. This creates an ombre effect that flows beautifully with the wave structure.
Managing Color Changes
Clean color changes require planning. Always complete your last stitch of the old color, then yarn over with the new color for the turning chain. This ensures your color change happens at the most visually appropriate point.
When working with multiple colors, I keep a color journal noting which rows use which colors. This prevents mistakes and makes it easier to replicate successful color combinations in future projects. Color planning worksheets can be incredibly helpful for complex color schemes.
Pro tip: When changing colors in ripple patterns, always change at the end of a row, never mid-row. This maintains the clean lines that make ripple patterns so visually appealing.
Finishing and Blocking Tips
Proper finishing transforms a good ripple project into a great one. The wave structure requires specific blocking techniques to achieve the best results.
Blocking for Wave Definition
Ripple patterns benefit enormously from blocking, but the technique differs from flat pieces. Instead of stretching the fabric taut, you want to encourage the natural wave formation while ensuring consistent measurements.
I use the spray blocking method for most ripple projects. Lay your project on a flat surface, then gently shape the waves by hand. Spray lightly with water (or blocking spray for natural fibers), then allow to dry completely. The moisture helps the stitches relax into their natural positions.
For projects that will see heavy use, like afghans, consider steam blocking. The heat helps set the wave structure more permanently, though always test on a swatch first to ensure your yarn can handle steam.
Border Considerations
Adding a border to ripple projects requires careful planning. The wave structure means your edges aren’t straight, so traditional border patterns may not work well. I typically use borders that follow the wave pattern rather than fighting it.
A simple single crochet border that works 3 sc in each peak and skips stitches in valleys maintains the wave structure while providing a finished edge. For more decorative borders, shell stitches worked in peaks with chain spaces in valleys create beautiful scalloped edges.
Common Questions
How much yarn do I need for a ripple blanket?
For a standard throw blanket (50″ × 60″), you’ll need approximately 2,000-2,400 yards of worsted weight yarn. This assumes a classic chevron pattern with minimal color changes. Add 10-15% more yarn for shell or bobble variations, and always buy an extra skein to account for gauge differences and potential mistakes.
Why do my ripple waves look uneven?
Uneven waves usually result from inconsistent tension between peaks and valleys. Make sure you’re working the same number of stitches in each peak (typically 3 dc) and maintaining consistent valley decreases. Practice your tension on swatches before starting large projects, and consider adjusting your hook size if the problem persists.
Can I adjust ripple patterns for different widths?
Yes! Most ripple patterns are based on mathematical repeats. Classic chevron uses multiples of 14 plus 3. To adjust width, calculate how many complete repeats you need, multiply by 14, then add 3. Always work a gauge swatch to confirm your measurements before starting your project.
What’s the best stitch for ripple beginners?
Double crochet creates the most forgiving and visually appealing ripples for beginners. The stitch height provides good wave definition while being tall enough to work quickly. Single crochet ripples can look cramped, while taller stitches like treble crochet can be harder to control for new ripple crocheters.
How do I fix a mistake several rows back in a ripple pattern?
Don’t try to fudge stitch counts in ripple patterns – it will create permanent distortions. Instead, carefully tink back (unknit) to the row with the error. Use a smaller hook to pick up dropped stitches as you go. It’s time-consuming but worth it for a professional-looking finished project.
Can I use self-striping yarn for ripple patterns?
Self-striping yarns can work beautifully with ripples, but choose carefully. Yarns with long color sections (4+ inches) work better than those with short sections that change mid-row. The wave structure can pool colors in unexpected ways, so always work a large swatch to preview the effect.
How long does it take to crochet a ripple blanket?
A throw-sized ripple blanket typically takes 40-60 hours of active crocheting time for an intermediate crocheter. This assumes working 2-3 hours per session with worsted weight yarn and a standard chevron pattern. Complex patterns with bobbles or shells will take longer, while simpler patterns work up faster.
Should I use a pattern or create my own ripple design?
Start with established patterns to learn the mechanics, then experiment with variations. Understanding the mathematical foundation (multiples of 14 for classic chevron) gives you the confidence to modify patterns safely. Ravelry offers thousands of free ripple patterns to inspire your creativity.
Wrapping Up Your Ripple Journey
Ripple crochet might seem intimidating at first glance, but like most crochet techniques, it’s really about understanding the underlying structure and practicing until it becomes second nature. The mathematical precision that creates those gorgeous waves is actually what makes the technique so reliable once you grasp it.
I’ve walked you through everything from basic chevron techniques to advanced variations, troubleshooting common problems, and finishing touches that make your projects shine. Remember, every experienced crocheter has frogged their share of ripple projects – it’s part of the learning process.
Start with a simple chevron pattern using worsted weight yarn and a comfortable hook size. Master that rhythm of peaks and valleys, then gradually experiment with different stitches, colors, and variations. Before you know it, you’ll be creating those Pinterest-worthy ripple masterpieces that first caught your eye.
The meditative quality of ripple crochet is one of its greatest rewards. Once you settle into the pattern repeat, there’s something deeply satisfying about watching those waves emerge row by row. Whether you’re making a cozy throw for movie nights or a special baby blanket, ripple patterns create heirloom pieces that showcase both your skill and creativity.
Happy crocheting, and may your waves always be perfectly aligned!