
Last week, I was teaching my neighbor how to crochet her first blanket, and she kept asking me the same question every experienced crocheter gets: “How do I know if I’m holding my hook right?” I watched her struggle for about ten minutes, her hand cramping up and her stitches looking wonky, before I realized she was gripping that poor hook like she was trying to strangle it.
Here’s the thing about crochet hook grip – it’s one of those fundamentals that can make or break your entire crochet experience. Get it wrong, and you’ll end up with sore hands, uneven stitches, and probably some choice words about this “relaxing” hobby. Get it right, and suddenly everything flows better. Your stitches become more consistent, your hands don’t ache after an hour, and you can actually enjoy the process instead of fighting it.
I’ve been crocheting for over fifteen years, and I still remember how awkward that hook felt in my hands when I started. Nobody really teaches you that there are different ways to hold it, or that your grip affects everything from stitch tension to how fast you can work. Most people just wing it and hope for the best, which is exactly why so many beginners get frustrated and give up.
The truth is, there’s no single “perfect” way to hold a crochet hook. What works beautifully for me might feel completely wrong for you, and that’s totally normal. Your hand size, finger length, and even whether you’re left or right-handed all play a role in finding your ideal grip.
Quick Answer
Hold your crochet hook like a pencil (pencil grip) or a knife (knife grip), keeping your grip relaxed about 1-2 inches from the hook’s throat. The pencil grip works best for detailed work, while the knife grip offers more power for bulky projects.
The Two Main Crochet Hook Grips
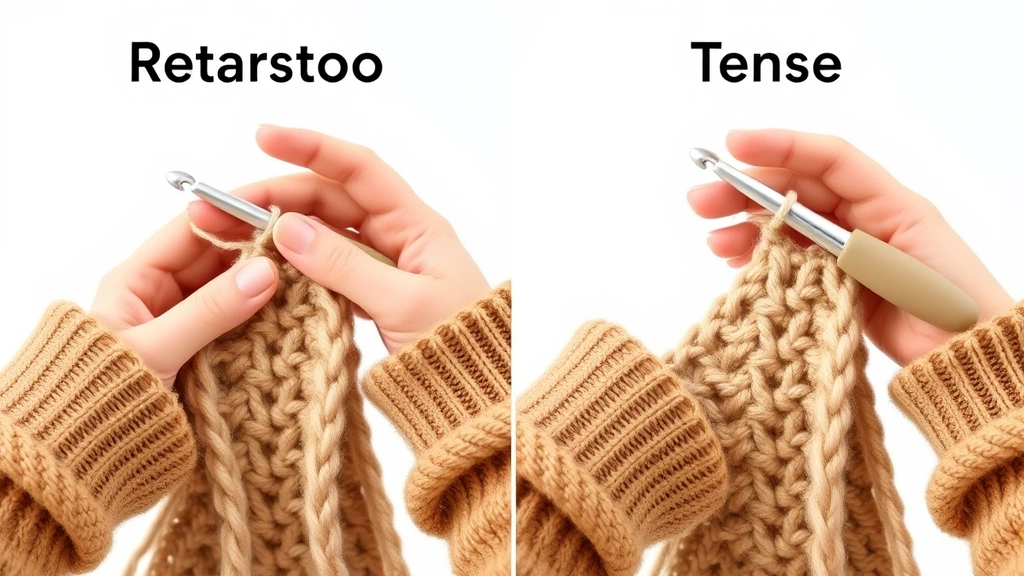
Let’s start with the basics. There are really only two main ways to hold a crochet hook, and everything else is just variations on these themes. I like to call them the pencil grip and the knife grip, because that’s exactly what they look like.
The pencil grip is probably what feels most natural to most people. You hold the hook between your thumb and index finger, with the hook resting on the side of your middle finger for support. It’s the same way you’d hold a pencil when writing, hence the name. This grip gives you excellent control over fine movements, which is why it’s fantastic for amigurumi projects or any detailed work.
The knife grip, on the other hand, involves holding the hook more like you’d grip a dinner knife. Your whole hand wraps around the hook handle, with your thumb and index finger controlling the movement. This grip gives you more power and is often more comfortable for people with larger hands or those working on bigger projects with chunky yarn.
Here’s what I’ve noticed after years of teaching: about 60% of my students naturally gravitate toward the pencil grip, while 40% prefer the knife grip. Neither is better than the other – they’re just different tools for different situations and hand types.
Regional Differences
Interestingly, I’ve found that grip preferences can vary by region and how people learned. Many European crocheters prefer the knife grip, while American crocheters often lean toward the pencil grip. But honestly, these are just trends, not rules.
Mastering the Pencil Grip
If you’re going with the pencil grip, here’s how to get it right. Hold your hook about 1 to 2 inches back from the throat (that’s the narrow part just behind the actual hook). Your thumb should be on one side, your index finger on the other, and the hook should rest along the side of your middle finger.
The key is keeping your grip relaxed. I can’t stress this enough – you’re not trying to crush the hook. Think about how lightly you hold a pencil when you’re sketching versus when you’re pressing hard to make a dark line. You want that sketching pressure most of the time.
Your wrist should be straight, not bent up or down. I see a lot of beginners cock their wrist at weird angles, which leads to fatigue and sometimes even pain. Keep that wrist neutral, like you’re shaking someone’s hand.
Pro tip: Practice the pencil grip by actually holding a pencil first. Draw some circles and lines, paying attention to how your hand feels. Then pick up your hook and try to replicate that same relaxed control.
With the pencil grip, your hook movement comes primarily from your fingers and wrist. You’re not using your whole arm – that would be exhausting and imprecise. The motion should feel controlled and deliberate, which is why this grip works so well for tapestry crochet or any project requiring stitch precision.
Fine-Tuning Your Pencil Grip
Everyone’s hands are different, so you might need to adjust the basic pencil grip to fit you. If you have longer fingers, you might hold the hook a bit further back. Shorter fingers might need to grip closer to the throat. The important thing is that you can easily manipulate the hook without straining.
Perfecting the Knife Grip
The knife grip feels more natural to some people, especially those who do a lot of cooking or have experience with other hand tools. With this grip, you’re essentially making a fist around the hook handle, with your thumb and index finger doing most of the steering.
Position your hand so the hook extends from the thumb side of your fist. Your thumb should be roughly parallel to the hook shaft, providing control and stability. The index finger wraps around from the other side, helping to guide the hook’s movement.
This grip gives you more leverage, which is fantastic when you’re working with resistant yarns or need to maintain consistent tension on larger projects. I always switch to a knife grip when I’m making blankets with worsted weight yarn or anything bulkier.
The movement with a knife grip comes more from your wrist and forearm than with the pencil grip. You’re using bigger muscle groups, which can be less tiring over long crochet sessions. However, you sacrifice some fine motor control, which is why this grip isn’t ideal for tiny, detailed work.
Try this: Hold a butter knife like you’re about to spread something on toast. Notice how your hand naturally positions itself? That’s essentially your knife grip for crochet, just adapted for a hook instead of a blade.
Power vs. Precision
Think of the knife grip as your power tool. When I’m working on a large afghan or dealing with thick, chunky yarn, this grip lets me maintain consistent tension without wearing out my hand. But when I switch to fine thread work or intricate colorwork, I go right back to the pencil grip.
Choosing the Right Grip for You
So how do you decide which grip is right for you? Honestly, try both for at least 30 minutes each. I know that sounds like a lot of time, but your hand needs time to adjust to any new position. What feels awkward at first might become completely natural after a bit of practice.
Consider your hand size and finger length. People with smaller hands often find the pencil grip more comfortable because it doesn’t require wrapping your whole hand around the hook. Larger hands might feel cramped with the pencil grip and prefer the more open knife grip.
Think about what you like to crochet too. If you’re drawn to amigurumi, delicate lacework, or detailed colorwork, the pencil grip will serve you better. If you prefer making blankets, scarves, or other larger items with thicker yarns, the knife grip might be your friend.
| Project Type | Best Grip | Why |
|---|---|---|
| Amigurumi | Pencil | Precise stitch placement |
| Lace work | Pencil | Fine motor control needed |
| Blankets | Knife | Power for consistent tension |
| Chunky scarves | Knife | Better leverage with thick yarn |
| Thread work | Pencil | Delicate handling required |
Don’t feel like you have to stick with one grip forever. I switch between them depending on what I’m making, and many experienced crocheters do the same. It’s like having different tools in your toolbox – use the right one for the job.
Proper Hand and Wrist Positioning
Your grip is only part of the equation. How you position your entire hand and wrist makes a huge difference in comfort and stitch quality. I’ve seen people with perfect hook grips still struggle because their wrist positioning was off.
Keep your wrist in a neutral position – not bent up toward the ceiling or down toward the floor. Imagine you’re reaching out to shake someone’s hand. That’s the angle you want to maintain while crocheting. Bending your wrist puts strain on the tendons and can lead to discomfort or even repetitive stress injuries.
Your elbow should be relaxed at your side, not held out away from your body. I see this mistake a lot with new crocheters – they hold their elbow out like they’re doing the chicken dance. This creates unnecessary tension in your shoulder and arm.
Remember: Your shoulders should be relaxed and level. If you notice them creeping up toward your ears while you crochet, take a break and do some shoulder rolls to release the tension.
The angle of your work matters too. Hold your project so you can see what you’re doing without craning your neck down. I like to work with my project at about chest level, which keeps my head in a comfortable position and reduces neck strain.
Supporting Your Work
For larger projects, don’t try to hold everything in your hands. Use a basket or bag to support the weight of your work. When I’m making a king-size blanket, I keep most of it in a large tote bag next to my chair and only handle the section I’m actively working on.
Common Grip Mistakes to Avoid
Let me share some of the most common grip mistakes I see, because recognizing these early can save you a lot of frustration and potential hand problems.
The death grip is probably the biggest one. New crocheters often hold their hook so tightly that their knuckles turn white. This creates tension that travels up your arm and makes your stitches inconsistent. Your hook should feel secure in your hand, but you should be able to slide it forward and backward slightly without adjusting your grip.
Another mistake is holding the hook too close to the actual hook part. This gives you less leverage and control. You want to grip the handle, not the throat of the hook. Think about holding a hammer – you don’t grip it right behind the head, you hold it on the handle where you get the most control.
Changing your grip mid-project is something I see a lot. You start with one grip, get tired, and unconsciously switch to another. This often results in noticeable changes in your stitch tension. If you need to change grips, finish your row first, then make the switch at the beginning of the next row.
Quick check: Every 15-20 minutes, consciously check your grip. Are you still holding the hook the same way you started? Are your shoulders tense? Is your wrist bent? Make adjustments before problems develop.
Gripping too far back on the handle is another issue, especially with longer hooks. This reduces your control and can make your stitches less precise. Find the sweet spot on your hook where you have good control without straining your hand.
Tension-Related Grip Issues
Your hook grip directly affects your stitch tension, which is crucial for consistent results. If you’re gripping too tightly, your stitches will be tight and hard to work into. Too loose, and your fabric will be floppy and full of holes. Finding that middle ground takes practice, but it’s worth the effort.
Adjusting Your Grip for Different Projects
Here’s something most crochet tutorials don’t tell you – you might need to adjust your grip for different types of projects. What works perfectly for a simple single crochet dishcloth might feel awkward when you’re working complex cable patterns.
For projects with a lot of post stitches or cables, I often use a slightly modified knife grip that gives me more leverage. These stitches require you to insert your hook in different places and sometimes work around existing stitches, so you need that extra power and flexibility.
When I’m doing tapestry crochet or any colorwork, I stick religiously to the pencil grip. The precision it offers is essential for keeping color changes clean and patterns accurate. Plus, you’re often working with multiple yarns, and the pencil grip gives you better control over yarn management.
Thread crochet requires an even more delicate touch. I actually hold my hook a bit closer to the throat than usual for thread work, which gives me more precise control over those tiny stitches. The trade-off is that my hand gets tired faster, but the improved stitch quality is worth it.
- Assess Your Project
Before you start, think about what type of stitches you’ll be using most and what yarn weight you’re working with.
- Choose Your Primary Grip
Select either pencil or knife grip based on your project needs and comfort level.
- Make Micro-Adjustments
Fine-tune your grip position based on how the stitches feel as you work.
- Stay Consistent
Once you find what works, stick with it throughout the project for even tension.
Ergonomic Hooks and Comfort Tips
Let’s talk about hooks themselves, because the right hook can make a huge difference in how comfortable any grip feels. I’ve tried dozens of different hook brands and styles over the years, and I can tell you that the handle design matters more than you might think.
Ergonomic hooks with larger, cushioned handles can be a game-changer if you have arthritis, hand pain, or just want to crochet for longer periods without discomfort. Brands like Clover and Furls make hooks specifically designed for comfort.
The material matters too. Aluminum hooks are lightweight and smooth, making them great for fast crochet work. Wood hooks have more grip and warmth, which some people find more comfortable. Plastic hooks are lightweight but can snag on certain yarns.
Investment tip: If you’re experiencing hand discomfort, try an ergonomic hook before changing your entire technique. Sometimes the solution is as simple as a better tool.
For people with smaller hands, shorter hooks (around 5-6 inches) can be more comfortable than standard length hooks. The Craft Yarn Council has guidelines on hook sizes and lengths that can help you choose the right tools for your hands.
Don’t forget about lighting and seating. Poor lighting makes you lean forward and strain your neck, while bad seating affects your overall posture. I always crochet with a good lamp positioned to eliminate shadows on my work, and I use a chair with proper back support.
When to Take Breaks
No matter how perfect your grip, you need to take breaks. I follow the 20-20-20 rule: every 20 minutes, take a 20-second break and look at something 20 feet away. This helps prevent eye strain and gives your hands a moment to relax.
Common Questions
How long does it take to get comfortable with a new grip?
Most people need about 2-3 weeks of regular practice to feel completely comfortable with a new grip. Your muscle memory needs time to adapt, so don’t get discouraged if it feels awkward at first. I recommend practicing for 15-20 minutes daily rather than trying to force it during a long crochet session.
Should I switch grips if my hand hurts?
Yes, definitely try switching grips if you’re experiencing pain. However, also check your overall posture, hook type, and how long you’ve been crocheting without breaks. Sometimes the pain isn’t from your grip but from other factors. If pain persists, consider consulting a healthcare professional.
Can I use different grips for different parts of the same project?
You can, but be aware that it might affect your stitch tension. If you do switch grips mid-project, try to do it at natural break points like the beginning of a new row or section. Practice maintaining consistent tension with both grips before attempting this on an important project.
Do left-handed crocheters need different grip techniques?
The basic grip principles are the same for left-handed crocheters, but everything is mirrored. Left-handed crocheters often find it helpful to sit across from a right-handed teacher to see the mirror image of the movements. Some left-handed crocheters prefer online video tutorials that are specifically made for lefties.
What’s the best grip for speed crocheting?
Most speed crocheters use a modified knife grip because it allows for larger, more efficient movements. However, the key to speed isn’t just grip – it’s also about yarn management, consistent tension, and muscle memory. Focus on accuracy first, and speed will come naturally.
Should beginners start with pencil or knife grip?
I usually recommend beginners start with whichever feels more natural, but if they’re unsure, the pencil grip is often easier to learn because most people are familiar with holding a pencil. Once they’re comfortable with basic stitches, they can experiment with the knife grip if they want.
How do I know if I’m gripping too tightly?
Signs of gripping too tightly include hand cramping, white knuckles, sore forearms, and stitches that are difficult to work into. Your grip should feel secure but relaxed. Try the “slide test” – you should be able to slide the hook forward and backward slightly in your grip without readjusting your fingers.
Can hook size affect which grip works better?
Absolutely. Smaller hooks (sizes B through F) often work better with a pencil grip because you need more precision. Larger hooks (sizes I and up) can be more comfortable with a knife grip because you’re dealing with bulkier yarn and need more leverage. However, personal preference still trumps these general guidelines.
Finding the right crochet hook grip is like finding the right pair of shoes – it’s personal, and when you get it right, everything just feels better. Don’t be afraid to experiment and adjust as you go. What matters most is that you can crochet comfortably and enjoy the process.
Remember, even experienced crocheters sometimes need to reassess their grip, especially when trying new techniques or working with different yarn weights. I still catch myself gripping too tightly when I’m concentrating hard on a complex pattern, and I have to consciously relax my hand.
The most important thing is to listen to your body. If something hurts or feels wrong, trust that instinct and make adjustments. Crochet should be relaxing and enjoyable, not a source of pain or frustration. With the right grip and a little practice, you’ll be crocheting comfortably for hours. Happy hooking!