Last week, I was teaching my neighbor how to crochet, and she kept asking about different stitch patterns she’d seen online. “What’s that pretty one that looks like little shells?” she asked, pointing to a photo on Pinterest. After scrolling through dozens of patterns together, I realized just how overwhelming it can be when you’re starting out and don’t know the names or techniques behind all those gorgeous stitches.
Here’s the thing about crochet stitch patterns – they’re like building blocks. Once you understand the basic combinations and how they work together, you can read any pattern with confidence and even start creating your own designs. Whether you’re making a simple dishcloth or an intricate afghan, knowing your stitch patterns opens up a whole world of possibilities.
I’ve been crocheting for over fifteen years, and I still get excited when I discover a new stitch combination or finally master one that’s been giving me trouble. The best part? Most complex-looking patterns are just variations of stitches you probably already know. You don’t need to memorize hundreds of different techniques – you just need to understand how the fundamentals work together.
Quick Answer
Crochet stitch patterns are combinations of basic stitches (single, double, treble) worked in specific sequences to create texture, lace, or colorwork effects. Master the fundamentals first, then build complexity gradually through shell stitches, clusters, and post stitches.
Foundation Stitches Every Pattern Uses
Before diving into fancy stitch patterns, let’s make sure you’re solid on the basics. Every crochet pattern, no matter how complex it looks, is built from these fundamental stitches: chain (ch), slip stitch (sl st), single crochet (sc), half double crochet (hdc), double crochet (dc), and treble crochet (tr).
The magic happens when you combine these stitches in different ways. For example, alternating single crochet and double crochet in the same row creates a subtle texture that’s perfect for dishcloths. Working three double crochets into the same stitch creates the foundation for shell patterns.
Here’s what I wish someone had told me when I started: height matters more than you think. Single crochet stitches are short and dense, while treble crochets are tall and create more drape. When patterns call for different yarn weights, they’re often trying to balance stitch height with the desired fabric texture.
Practice tip: Make a sampler square using worsted weight yarn and a size H (5mm) hook. Work 10 stitches each of sc, hdc, dc, and tr in separate rows. This gives you a visual reference for how each stitch looks and feels.
Understanding stitch multiples is crucial too. Most patterns repeat every 2, 3, 4, or 6 stitches. If a pattern says “multiple of 4 + 2,” you need a foundation chain that’s divisible by 4, plus 2 extra stitches, plus your turning chain. So for a 20-stitch wide project, you’d chain 24 (20 + 2 + 2 for turning).
The Craft Yarn Council has standardized symbols that make reading patterns much easier once you learn them. A chain looks like an oval, single crochet is an X, and double crochet is a vertical line with a cross through it.
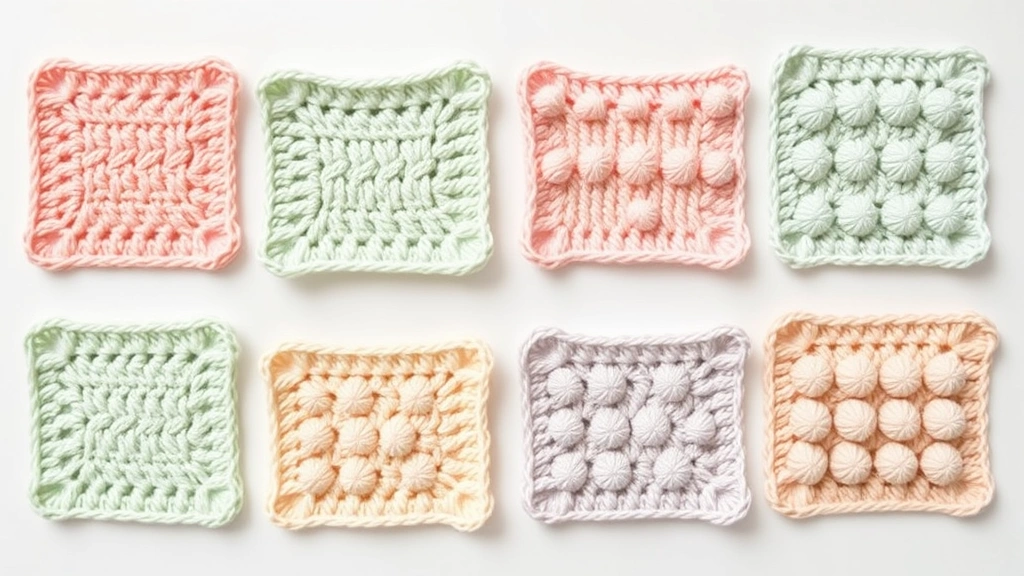
Texture Patterns for Cozy Projects
Texture patterns are my go-to for blankets, scarves, and anything that needs to feel substantial and warm. These patterns use the same basic stitches but work them in ways that create raised surfaces, ridges, or bumpy textures.
The moss stitch is probably the easiest texture pattern to master. You alternate single crochet and chain 1 across each row, then in the next row, you work single crochet into the chain spaces and chain 1 over the single crochets. It creates a lovely bumpy texture that’s perfect for baby blankets because it’s soft but has enough texture to be interesting.
For something with more dramatic texture, try the bobble stitch. You work 5 double crochets into the same stitch, but only complete the last step of each dc (leaving 6 loops on your hook), then yarn over and pull through all loops at once. It creates these puffy little bumps that kids love to touch.
| Pattern Name | Difficulty | Best Yarn Weight | Perfect For |
|---|---|---|---|
| Moss Stitch | Beginner | Worsted | Baby blankets, scarves |
| Bobble Stitch | Intermediate | Worsted to Bulky | Pillows, accent pieces |
| Seed Stitch | Beginner | DK to Worsted | Dishcloths, washcloths |
| Waffle Stitch | Intermediate | Worsted | Blankets, pot holders |
The waffle stitch creates a grid-like texture that looks complicated but is actually just double crochets and front post double crochets worked in a specific pattern. When you’re working with cotton yarn, this pattern creates fantastic kitchen textiles because the raised grid helps with scrubbing.
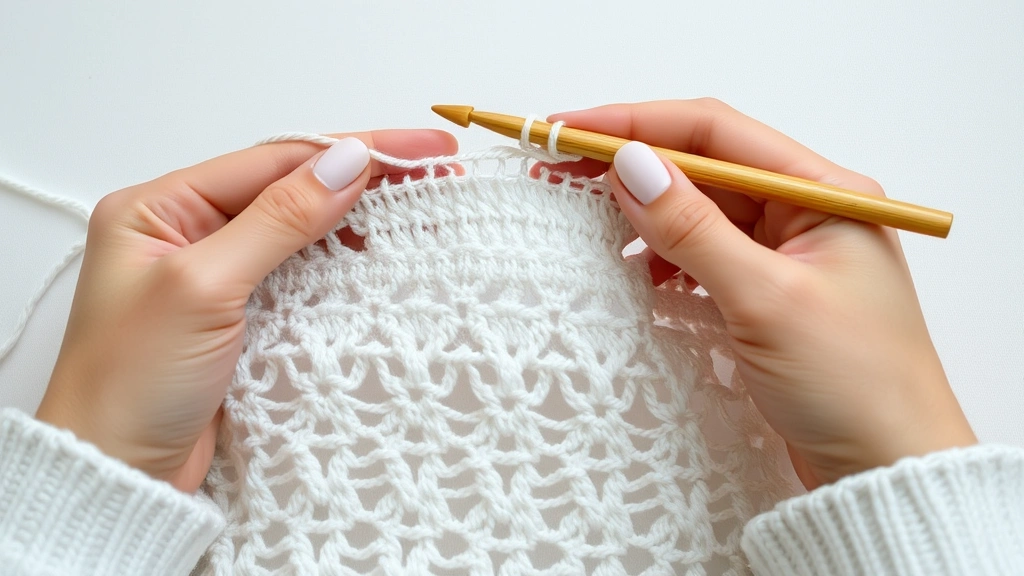
Lace and Openwork Patterns
Lace patterns might look intimidating, but they’re often easier than texture patterns because you’re working fewer actual stitches. The “holes” in lace are created by chain spaces, which means less work for you and beautiful, airy fabric perfect for summer tops and delicate shawls.
Start with simple chain space patterns. The basic concept is: chain 1 (or 2, or 3), skip a stitch, then work your next stitch. This creates a small hole where you skipped the stitch. Chain 3, skip 2 stitches creates a larger hole. It’s that simple.
The filet crochet technique is perfect for beginners who want to try lace. You work in a grid pattern using double crochets and chain-2 spaces. Filled squares are made with 3 double crochets, and open squares are made with dc, chain 2, skip 2, dc. You can create pictures, letters, or geometric patterns just by following a chart.
For something more flowing, try shell and V-stitch combinations. A basic V-stitch is (dc, chain 1, dc) all worked into the same stitch. In the next row, you work your next V-stitch into the chain-1 space. This creates a lovely zigzag pattern that’s perfect for lightweight summer garments.
Yarn choice matters: Use smooth, light-colored yarn when learning lace patterns. Dark colors make it hard to see your stitches, and fuzzy yarns can hide mistakes. I recommend cotton or bamboo in white or cream for practice.
When working lace patterns, blocking is essential. Your work might look wonky straight off the hook, but proper blocking opens up the lace and shows off the pattern beautifully. Pin your finished piece to measurements, mist with water, and let it dry completely.
Colorwork and Tapestry Techniques
Adding color to your crochet opens up endless design possibilities. Unlike knitting, where you typically carry multiple colors across each row, crochet colorwork is usually worked in blocks or changed at specific points.
Basic color changes happen at the end of a row or at specific stitch intervals. The key is to complete your last stitch with the new color. When you’re working the final yarn over of your last stitch, use the new color instead. This gives you a clean color change without a noticeable jog.
For striped patterns, you can change colors every row, every few rows, or in random intervals. I love working with Lion Brand self-striping yarns for easy color changes, but creating your own stripe sequence with solid colors gives you more control over the final look.
Tapestry crochet is where things get really exciting. You carry two colors throughout each row, working over the unused color to keep it hidden. This technique lets you create geometric patterns, pictures, or text. Start with simple two-color patterns before attempting complex designs.
The intarsia method works well for large blocks of color, like when making graphgan squares. Instead of carrying colors across the row, you use separate balls of yarn for each color section and twist the yarns when changing colors to prevent holes.
Shell and Fan Patterns
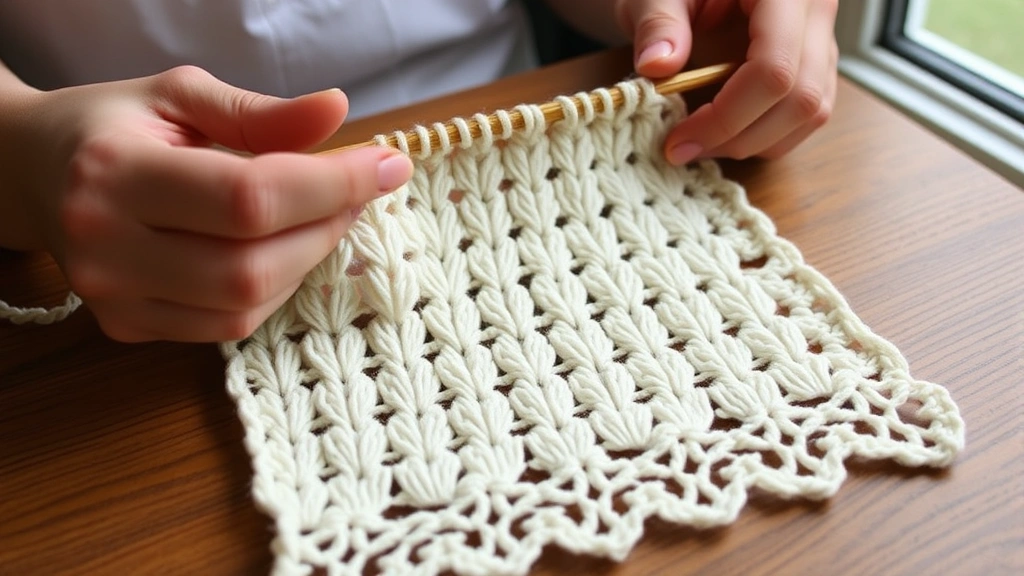
Shell and fan patterns are some of the most versatile and beautiful stitch patterns in crochet. They create flowing, scalloped edges that work beautifully for blanket borders, shawls, and decorative elements.
A basic shell stitch is typically 5 or 7 double crochets worked into the same stitch or space. The number of double crochets determines how full your shell looks. For baby blankets, I prefer 5-dc shells because they’re not too overwhelming. For dramatic shawl edges, 7 or even 9-dc shells create gorgeous drape.
The fan stitch is similar to shells but usually worked into chain spaces rather than single stitches. A typical fan pattern might be: *skip 2 stitches, work 7 dc into next stitch, skip 2 stitches, sc into next stitch* repeat across. This creates the classic fan shape with deep scallops.
Shell and chain combinations create some of the most elegant patterns. Try working a 5-dc shell, then chain 3, skip 3 stitches, work another shell. In the next row, work your shells into the chain-3 spaces. This creates a more open, lacy version of the shell pattern.
- Basic Shell Setup
Chain a multiple of 6 plus 3. Work 1 dc into 4th chain from hook, then work your first shell (5 dc) into the 7th chain from hook.
- Complete First Row
Skip 2 chains, sc into next chain, skip 2 chains, work shell (5 dc) into next chain. Repeat across, ending with 2 dc into last chain.
- Turn and Continue
Chain 3, turn. Work 1 dc into first stitch, then work shells into each single crochet from previous row. Single crochet into center of each shell.
When working with DK weight yarn, shells create beautiful drape without being too heavy. For blankets, I often use worsted weight because it gives more structure and warmth.
Post Stitch Patterns for Dimension
Post stitches are worked around the vertical post of stitches from the previous row instead of into the top of the stitch. This creates raised and recessed areas that add incredible texture and dimension to your work.
Front post double crochet (fpdc) brings stitches forward, while back post double crochet (bpdc) pushes them back. The most common combination is alternating fpdc and bpdc to create ribbing, similar to knitted ribbing but with more structure.
The classic basketweave pattern uses blocks of front post and back post stitches to create the illusion of woven strips. Typically, you work 3 fpdc, then 3 bpdc across the row, then in the next row, you work bpdc over the fpdc and fpdc over the bpdc. After a few rows, you switch the pattern to create the woven effect.
For cable-like patterns, you can cross post stitches by working them out of order. Skip the next stitch, work fpdc around the following stitch, then work fpdc around the skipped stitch. This creates a simple cable twist that looks much more complicated than it actually is.
Hook size tip: Post stitches can make your fabric tighter than regular stitches. Consider going up one hook size when working primarily in post stitches, especially for garments that need drape.
When working men’s crochet patterns, post stitches are perfect because they create structured, tailored-looking fabric that doesn’t look too delicate or feminine.
Reading Pattern Charts and Symbols
Pattern charts might look like hieroglyphics at first, but they’re actually much easier to follow than written instructions once you get the hang of them. Charts show you exactly what your finished work should look like, and you can see the pattern repeats at a glance.
Each symbol represents a specific stitch. The Ravelry database has thousands of patterns with charts, and most include a symbol key. Start with simple patterns that use only basic stitches – chains, single crochet, and double crochet.
Reading direction is crucial. Most charts are read from right to left on right-side rows and left to right on wrong-side rows. The row numbers are usually marked on the side – odd numbers on the right for RS rows, even numbers on the left for WS rows.
Stitch height in charts corresponds to actual stitch height. Single crochet symbols are short, double crochet symbols are taller, and treble crochet symbols are the tallest. This visual representation helps you understand how the pattern will look.
When working with stitch markers, place them at pattern repeat points shown in the chart. This makes it much easier to spot mistakes and keeps your pattern aligned correctly.
Troubleshooting Common Pattern Problems
Even experienced crocheters run into pattern problems. The key is recognizing issues early and knowing how to fix them without starting over completely.
Stitch count problems are the most common issue. If you’re consistently gaining or losing stitches, check that you’re working into the correct stitch at the beginning and end of each row. The turning chain usually counts as a stitch, but not always – check your pattern carefully.
When your work is curling or cupping, you’re probably working too tightly or your hook is too small for the yarn. Try going up one hook size. If your work is ruffling or flaring, you’re working too loosely or your hook is too large.
Tension consistency improves with practice, but you can help yourself by maintaining the same hand position and yarn hold throughout your project. I hold my yarn with my pinky finger and control tension with my index finger – find what works for you and stick with it.
For colorwork problems, the most common issue is loose stitches where colors change. Pull your yarn snug (but not tight) when completing the color change stitch. If you notice gaps, you can often tighten them up when weaving in ends.
Mistake recovery: Don’t rip out entire sections for small mistakes. Often, you can drop down just a few stitches and rework that small area. Use a smaller hook to pick up dropped stitches more easily.
When working amigurumi projects, stuffing can hide minor stitch irregularities, so don’t stress about perfection. Focus on maintaining consistent stitch count instead.
Common Questions
What’s the difference between US and UK crochet terms?
UK terms are one step higher than US terms. A US single crochet is called double crochet in UK patterns, US double crochet is UK treble crochet, and so on. Always check which terminology your pattern uses – it’s usually noted at the beginning. Most online patterns use US terms, but many vintage and European patterns use UK terms.
How do I know what yarn weight to use for a pattern?
Patterns should specify yarn weight (fingering, DK, worsted, etc.) and recommended hook size. If you want to substitute yarn, stay within the same weight category and make a gauge swatch first. The pattern’s finished measurements depend on achieving the correct gauge, so this step is crucial for garments and fitted items.
Why does my stitch pattern look different from the photo?
Several factors can affect how patterns look: yarn fiber (cotton vs acrylic drapes differently), hook size, tension, and whether the piece has been blocked. Make sure you’re using similar yarn weight and fiber content to the pattern sample. Blocking can dramatically change how lace and textured patterns look.
How much yarn do I need for different stitch patterns?
Solid patterns like single crochet use the most yarn, while lacy patterns with lots of chain spaces use the least. As a general rule, add 10-20% more yarn for textured patterns with bobbles or post stitches. Shell and fan patterns fall somewhere in the middle. Always buy an extra skein if you’re unsure – you can return unopened skeins to most craft stores.
Can I combine different stitch patterns in one project?
Absolutely! This is how you create unique, personalized projects. The key is making sure your patterns have compatible stitch counts or planning transition rows that adjust the stitch count between patterns. Sampler afghans are perfect for practicing pattern combinations.
What’s the easiest way to memorize stitch patterns?
Start with patterns that have short repeats (2-4 stitches) and work several rows before moving to longer repeats. Say the pattern out loud as you work – “double crochet, chain 1, skip 1, double crochet” – until it becomes automatic. Most crocheters find they can memorize a 6-8 stitch repeat after working it for about 30 minutes.
How do I fix mistakes in complex stitch patterns?
For small mistakes, you can often drop down just the affected stitches and rework them. Use a smaller hook to pick up dropped stitches more easily. For larger mistakes, rip back to the beginning of the problem row rather than trying to fix multiple errors. It’s faster in the long run and gives better results.
Should I use stitch markers with pattern work?
Yes, especially when learning new patterns! Place markers at the beginning of each pattern repeat. This helps you catch mistakes quickly and makes counting easier. For circular work, use a different colored marker to mark the beginning of each round. Remove and replace markers as you work – don’t work over them.
Learning crochet stitch patterns is like building a vocabulary – the more patterns you know, the more fluently you can “speak” crochet. Start with simple combinations of basic stitches, then gradually work your way up to more complex techniques. Remember that every expert crocheter started exactly where you are now, making the same mistakes and having the same “aha!” moments.
The most important thing is to enjoy the process. Yes, you’ll make mistakes, and yes, you’ll probably have to rip out work sometimes. But you’ll also have those magical moments when a pattern suddenly clicks, or when you finish a project and can’t believe you made something so beautiful with just a hook and yarn.
Keep practicing, be patient with yourself, and don’t be afraid to experiment. Some of the most gorgeous crochet pieces come from happy accidents or creative modifications to existing patterns. Your crochet journey is uniquely yours – embrace it, mistakes and all.