You know that feeling when you’re halfway through a gorgeous granny square blanket and suddenly realize your squares are three different sizes? Yeah, I’ve been there too. After years of making wonky squares that looked more like abstract art than anything geometric, I finally figured out the secrets to consistent, perfectly-sized granny squares every single time.
The truth is, most crochet tutorials skip over the little details that make all the difference. They’ll tell you to make a granny square, but they won’t mention that your yarn choice, hook size, and even how tightly you hold your yarn can completely change your finished measurements. I learned this the hard way when I spent three weeks making squares for a baby blanket, only to discover they ranged from 3 inches to nearly 5 inches across.
Here’s what I wish someone had told me from the beginning: consistent granny squares aren’t about perfection – they’re about understanding your materials and developing a rhythm. Once you nail down a few key techniques, you’ll be cranking out uniform squares faster than you ever thought possible.
Quick Answer
Consistent granny square size comes from maintaining steady tension, using the same yarn and hook throughout your project, and measuring after the same round each time. Most variations happen because of tension changes or switching materials mid-project.
Why Granny Square Size Consistency Matters
Let me paint you a picture of what happens when your granny squares are different sizes. You spend hours making beautiful individual squares, each one looking perfect on its own. Then comes assembly day, and suddenly you’re trying to puzzle together pieces that don’t fit. Some squares bunch up, others stretch awkwardly, and your seams look wonky no matter how carefully you join them.
I learned this lesson making my first granny square blanket – a queen-size project that took me four months. About halfway through, I noticed my squares were getting bigger. Turns out, as I got more comfortable with the pattern, my tension loosened up. The result? A blanket with visibly different sections that I ended up giving away because I couldn’t stand looking at it.
Consistent sizing isn’t just about aesthetics, though that’s definitely part of it. When your squares are uniform, your finished project drapes better, wears more evenly, and looks professionally made. Plus, you’ll save yourself hours of frustration during assembly. Trust me, trying to force mismatched squares together is about as fun as untangling a yarn ball after your cat got to it.
The good news is that achieving consistent squares isn’t as hard as you might think. It’s mostly about establishing good habits from the start and sticking with them throughout your project. Once you get the hang of it, you’ll wonder why you ever struggled with this in the first place.
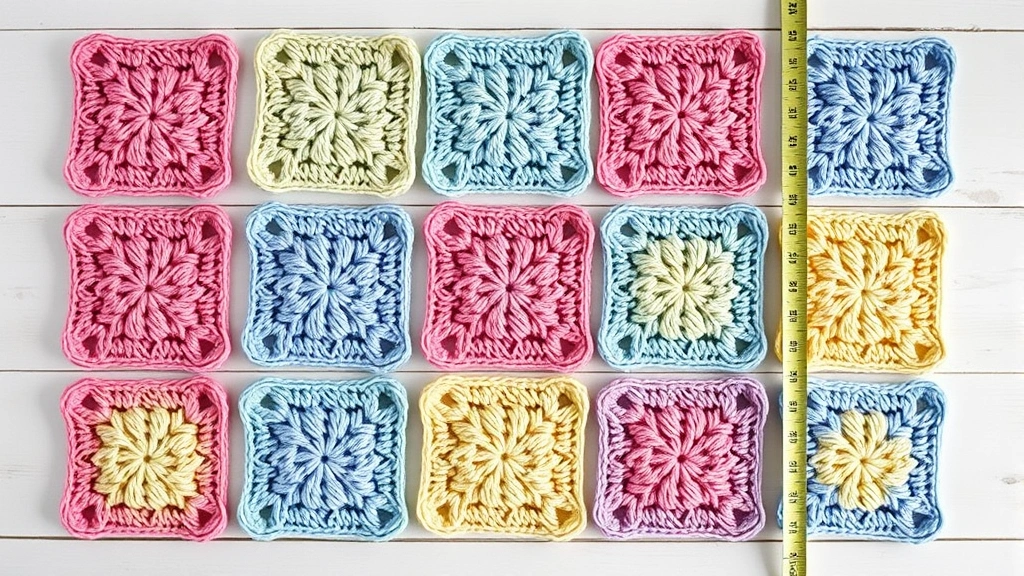
How to Measure Granny Squares Properly
Here’s something most tutorials don’t tell you: when you measure your granny square matters just as much as how you measure it. I used to measure my squares randomly – sometimes after round 3, sometimes after round 5, whenever I remembered to check. No wonder my sizes were all over the place!
The key is to pick a specific round and always measure at that same point. I recommend measuring after your third round for most projects. At this point, your square is large enough to get an accurate measurement, but small enough that you haven’t invested too much time if you need to start over.
When measuring, lay your square flat on a hard surface – not your lap or a soft cushion. Use a ruler or measuring tape and measure from the outermost points, including any chain spaces. Don’t stretch the square, but don’t compress it either. Just let it lie naturally.
Pro tip: Make a gauge square first and write down its measurements after each round. This becomes your reference for the entire project. If a new square doesn’t match these measurements at the same round, you’ll know immediately that something’s off.
For most worsted weight yarn with a 5mm (H) hook, a traditional granny square should measure about 2.5 inches after three rounds. But honestly, the exact measurement matters less than consistency. If your squares are consistently 2.25 inches or 2.75 inches, that’s perfectly fine as long as they’re all the same.
Tools You’ll Need
Keep these measuring tools handy while you work:
- A good ruler or measuring tape (I prefer a clear quilting ruler)
- A notebook to record your measurements
- Blocking mats if you plan to block your squares
- A gauge swatch for reference
Choosing the Right Yarn and Hook Combination
Your yarn and hook choice sets the foundation for consistent squares, and this is where a lot of people go wrong. I see crafters switching between different brands of “worsted weight” yarn within the same project, not realizing that even yarns in the same weight category can behave very differently.
Stick with the same yarn brand and colorway throughout your project whenever possible. Even different dye lots of the same yarn can have slight variations in thickness or twist that affect your finished size. I learned this the hard way when I ran out of Lion Brand Pound of Love halfway through a project and bought what I thought was the same color from a different dye lot. The new squares were noticeably larger.
Hook size is equally important, and here’s something that might surprise you: the hook size on the yarn label is just a suggestion. Your personal tension might require you to go up or down a hook size to achieve the measurements you want. This is why making a gauge square is so crucial.
| Yarn Weight | Typical Hook Size | Expected 3-Round Square |
|---|---|---|
| DK (3) | 4.5mm (G) | 2.25 inches |
| Worsted (4) | 5mm (H) | 2.5 inches |
| Bulky (5) | 6mm (J) | 3 inches |
If you’re working on a large project like an afghan, buy all your yarn at once if possible. This ensures consistency across your entire project. I know it’s a big upfront investment, but it’s worth it to avoid the frustration of mismatched squares later.
Yarn Substitution Guidelines
If you must substitute yarn, stick to these rules:
- Same weight category (don’t mix DK with worsted)
- Similar fiber content (all acrylic or all cotton)
- Same brand if possible
- Always make a new gauge square when switching
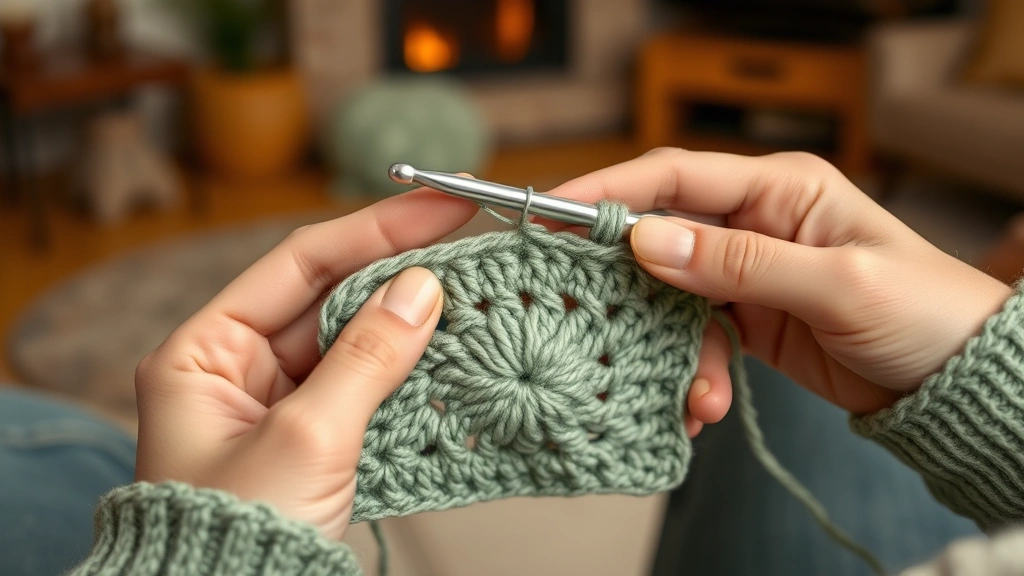
Mastering Tension for Uniform Results
Tension control is probably the biggest factor in consistent granny square sizing, and it’s also the trickiest to master. Your tension naturally changes as you get tired, stressed, or more comfortable with a pattern. I’ve noticed my squares get looser when I’m watching TV and tighter when I’m concentrating hard on something new.
The secret isn’t to achieve “perfect” tension – it’s to maintain whatever tension feels natural to you. Pay attention to how you hold your yarn and try to keep it consistent. I hold my working yarn with my left pinky, wrapped around once, and I’ve trained myself to check this grip every few stitches.
Consistency hack: Take breaks at the same point in each square. I always stop after completing a full round, never in the middle. This helps me maintain the same rhythm and tension when I pick up the work again.
Environmental factors affect tension too. Cold hands tend to crochet tighter, while warm, relaxed hands work looser. I keep a small space heater near my crafting chair in winter because I noticed my winter squares were consistently smaller than my summer ones.
Tension Troubleshooting
If you notice your tension changing:
- Check your yarn hold – is it the same as when you started?
- Are you pulling your stitches tighter or looser than usual?
- Take a short break and stretch your hands
- Compare your current square to your gauge square
Some crocheters find it helpful to count their stitches out loud or use a stitch marker to keep track of their place. This mental engagement can help maintain consistent tension throughout the project.
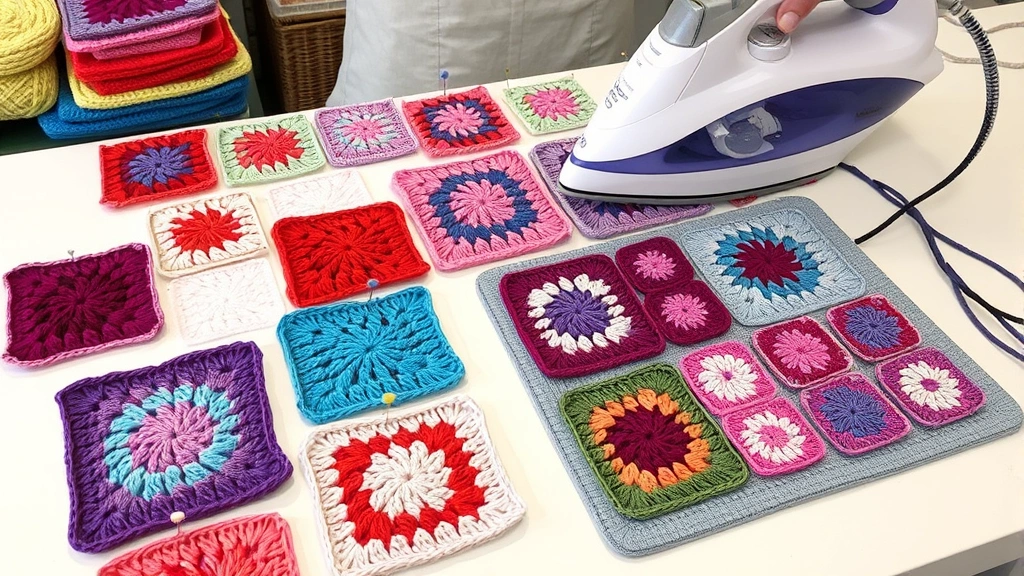
Blocking Your Squares to Perfect Size
Blocking is like magic for granny squares – it can fix minor size inconsistencies and make your squares look professionally finished. Even if your squares are slightly different sizes due to tension variations, proper blocking can often bring them into alignment.
For acrylic yarns, I use steam blocking. Pin each square to your blocking mat, making sure the corners are square and the sides are straight. Use a steam iron held about an inch above the surface – never let the iron touch the yarn directly. The steam relaxes the fibers and allows you to gently coax the square into the right shape and size.
Cotton and wool yarns can handle wet blocking. Soak your completed squares in lukewarm water for about 15 minutes, then gently squeeze out excess water (never wring). Pin them to blocking mats while damp, stretching them to your desired measurements. Let them dry completely before unpinning.
- Prepare Your Workspace
Set up blocking mats on a flat surface where they can stay undisturbed for several hours. I use interlocking foam tiles covered with towels.
- Pin Your Squares
Use rust-proof blocking pins to secure each corner and the middle of each side. Make sure your squares are actually square – use a ruler to check that opposite sides are equal length.
- Apply Steam or Water
For steam blocking, hold your iron 1-2 inches above the surface and let the steam penetrate the fibers. For wet blocking, the squares should be damp but not dripping.
- Let Them Set
Allow squares to dry completely before removing pins. This usually takes 2-4 hours for steam blocking, 6-8 hours for wet blocking.
Blocking won’t fix dramatically different sizes – if one square is 3 inches and another is 4 inches, blocking isn’t going to make them match. But it can easily reconcile differences of a quarter inch or so, which is often enough to make your project look uniform.
Fixing Common Size Problems
Let’s talk about what to do when things go wrong, because they will. I’ve made every mistake in the book, and I’ve learned that most sizing problems fall into a few common categories with straightforward solutions.
Problem: Squares getting progressively larger
This usually means your tension is loosening as you get more comfortable with the pattern. Make a conscious effort to tighten up your yarn hold, or consider going down a hook size for the remaining squares. If you’ve already made a lot of loose squares, you might need to remake some of them.
Problem: Squares getting progressively smaller
This often happens when you’re getting tired or stressed. Your hands naturally tighten up, creating smaller stitches. Take breaks more frequently, and pay attention to your grip on the yarn. Sometimes switching to a slightly larger hook for the remaining squares can help.
Problem: Random size variations
This is usually a tension issue combined with inconsistent measuring. Make sure you’re measuring at the same point every time, and really focus on maintaining consistent yarn tension. Consider using a comfortable hook that doesn’t strain your hand.
Emergency fix: If you have a few squares that are significantly different sizes and you don’t want to remake them, try adjusting the border. Add an extra round to small squares or skip a round on large ones. This works best with solid color squares where the modification won’t be obvious.
Sometimes the problem isn’t your technique – it’s your pattern interpretation. I once spent hours wondering why my squares were too big before realizing I was accidentally adding extra chain spaces. Double-check that you’re following the pattern exactly, especially if you’re working from a free pattern online where typos can slip through.
When to Start Over
Nobody wants to hear this, but sometimes you need to frog your work and start fresh. If more than 25% of your squares are significantly off-size, it’s usually faster to start over than to try to fix them all. I know it’s frustrating, but trust me – you’ll be happier with the final result.
Planning Your Project for Success
Good planning prevents most sizing issues before they start. Before you make your first square, decide on your finished project size and calculate exactly how many squares you’ll need. This helps you buy the right amount of yarn and gives you a clear goal to work toward.
For a throw blanket, I typically plan for squares that are 4 inches finished (after blocking). This means I need about 12 squares across and 15 squares down for a 48″ x 60″ blanket – that’s 180 squares total. Knowing this number upfront helps me pace myself and ensures I don’t run out of steam halfway through.
Create a simple tracking system. I use a notebook where I record the measurements of every tenth square. This helps me catch sizing drift before it becomes a major problem. Some crocheters prefer to make all their squares first, then join them, while others prefer to work in sections. Either approach works, but be consistent within your chosen method.
| Project Type | Recommended Square Size | Typical Square Count |
|---|---|---|
| Baby blanket | 3 inches | 64-100 squares |
| Throw blanket | 4 inches | 180-225 squares |
| Afghan | 5 inches | 144-180 squares |
Don’t forget to factor in your joining method when planning. Some joining techniques add bulk that affects the finished size, while others create gaps that make the project larger than expected. Make a small test section with 4 squares to see how your chosen joining method affects the overall dimensions.
Yarn Purchasing Strategy
Buy 10-15% more yarn than you think you’ll need. It’s better to have extra than to run out and discover your color has been discontinued. For a throw-sized granny square blanket in worsted weight yarn, I typically buy 2000-2400 yards total, depending on the complexity of the pattern.
Common Questions
How do I fix granny squares that are slightly different sizes?
Minor size differences (less than 1/4 inch) can usually be fixed with blocking. Pin all squares to the same measurements and use steam or wet blocking depending on your yarn fiber. For larger differences, consider adding or removing a border round to bring outliers into alignment.
Why are my granny squares curling at the edges?
Curling usually indicates tension issues – either too tight overall or inconsistent tension between rounds. Try using a slightly larger hook, and pay attention to keeping your chain spaces loose enough. Proper blocking can also help flatten curled edges.
Should all my granny squares be exactly the same size?
They should be as close as possible, ideally within 1/8 inch of each other. Small variations won’t be noticeable in the finished project, but differences larger than 1/4 inch will create problems during assembly and affect how the finished piece drapes.
How many squares can I make from one skein of yarn?
This depends on your yarn weight and square size, but as a general rule: one 364-yard skein of worsted weight acrylic will make about 12-15 four-inch granny squares. Always make a test square and calculate based on your actual yarn usage rather than estimates.
Can I mix different yarn weights in the same project?
It’s not recommended for squares that will be joined together. Different yarn weights create different stitch sizes even with hook adjustments. If you want to use multiple weights, consider making separate sections or using them for borders rather than mixing them in the main body.
How do I maintain consistent size when working on a large project over months?
Make gauge squares periodically throughout your project and compare them to your original. Keep detailed notes about your hook size, yarn brand, and tension. Take progress photos so you can spot sizing drift early. Consider working in batches – make 20-30 squares at a time rather than spreading the work over many months.
What’s the best way to store partially completed squares?
Keep completed squares flat in a box or large zippered bag to prevent stretching. If you’re working on multiple squares at once, use separate project bags for each one to avoid tangling. Store them away from pets and direct sunlight to prevent damage or fading.
How tight should my stitches be for consistent squares?
Your stitches should be firm enough that you can’t easily see through the fabric, but loose enough that your hook moves smoothly through each stitch. If you’re straining to pull your hook through or if your work is stiff and inflexible, you’re probably working too tightly. Practice will help you find the right balance for your personal style.
Making consistent granny squares really comes down to developing good habits and sticking with them. Yes, it takes some attention to detail at first, but once you get into a rhythm, it becomes second nature. Your future self will thank you when assembly time comes and all your beautiful squares fit together perfectly.
Remember, every experienced crocheter has made wonky squares at some point. The difference is that we learned from those mistakes and developed systems to prevent them. Take your time, measure regularly, and don’t be afraid to start over if something’s not working. The skills you develop making consistent granny squares will make you a better crocheter overall, and that’s worth the extra effort.