I’ll never forget the first time I tried to crochet a sweater. I was so excited, picked out this gorgeous pattern, bought the most beautiful yarn… and ended up with something that could’ve doubled as a tent. The sleeves were too long, the body was too wide, and honestly, it looked nothing like the photo. Sound familiar?
Here’s the thing nobody tells you upfront: crochet sweater sizing is completely different from buying clothes off the rack. When you’re making a sweater, you’re not just following a pattern blindly – you’re essentially becoming a fashion designer for your own body. And that means understanding how ease works, how different stitches behave, and why that “medium” in the pattern might not be your medium at all.
After making dozens of sweaters (and frogging more than I care to admit), I’ve learned that getting the right fit isn’t about magic or luck. It’s about understanding a few key principles and doing some upfront planning. The good news? Once you know what to look for, you’ll never have to deal with that tent-sweater disappointment again.
Whether you’re a complete beginner eyeing your first cardigan pattern or you’ve made sweaters before but struggled with fit, this guide will walk you through everything you need to know. We’ll cover how to take your measurements properly, decode pattern sizing, choose the right ease, and make adjustments that actually work.
Quick Answer
Choose crochet sweater sizes based on your actual bust measurement plus 2-4 inches of ease for most styles. Always check the pattern’s finished measurements, not just the size label, and consider the stitch pattern and yarn weight when determining how much ease you need.
Understanding Ease in Crochet Sweaters
Ease is probably the most important concept you need to grasp, and it’s where most people go wrong. Ease is the difference between your body measurement and the finished garment measurement. It’s what makes a sweater wearable instead of skin-tight.
There are two types of ease to consider: wearing ease and design ease. Wearing ease is the minimum amount of extra room you need to move comfortably – usually about 2 inches around the bust. Design ease is the additional room built into the pattern for the intended style and look.
A fitted sweater might have 2-3 inches of total ease, while an oversized cardigan could have 8-12 inches or more. The key is understanding what the designer intended and whether that matches what you want to wear.
Here’s a reality check: that “oversized” sweater in the pattern photo might look perfectly fitted on the model because she’s wearing a size with minimal ease for her body. Always look at the finished measurements, not just the style description.
Different crochet patterns will specify different amounts of ease, and this varies wildly between designers. Some prefer close-fitting garments with 2-3 inches of ease, while others design with 6+ inches for a relaxed fit. Neither is wrong, but you need to know which you’re working with.
When you’re looking at patterns, pay attention to phrases like “designed to be worn with 4 inches of positive ease” or “shown with 2 inches of ease.” This tells you exactly how much bigger the finished sweater will be compared to your body measurements.
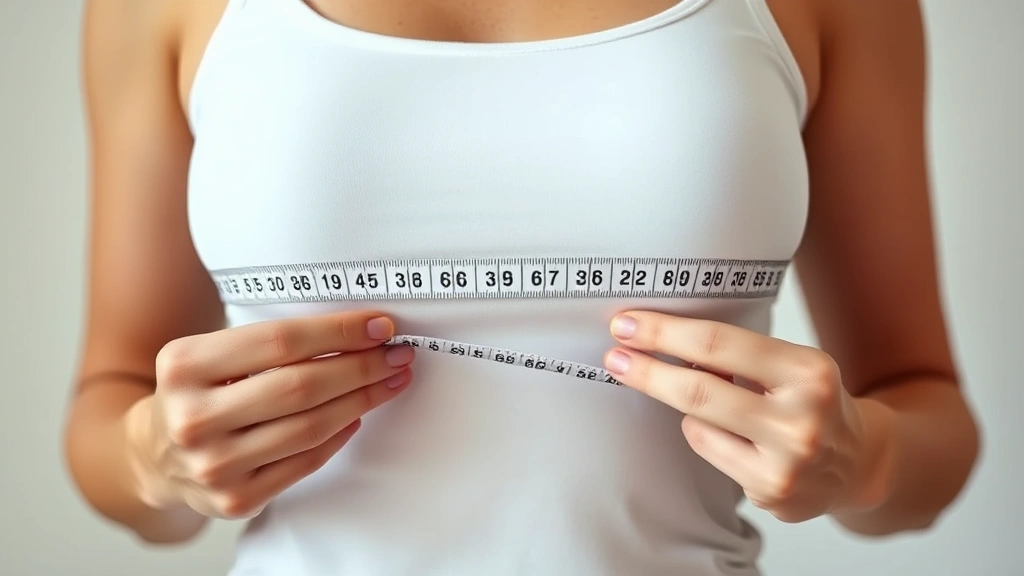
How to Measure Yourself Properly
I can’t stress this enough: accurate measurements are everything. You can’t wing it or guess based on your clothing size. Grab a flexible measuring tape and let’s do this right.
For your bust measurement, wrap the tape around the fullest part of your chest, keeping it parallel to the floor. Don’t pull it tight, but don’t let it be loose either – you want it snug but not compressing. This is your key measurement for choosing sizes.
You’ll also want to measure your waist (narrowest point), hips (fullest part), and the length from your shoulder to where you want the sweater to end. For cardigans and pullovers, measure from the base of your neck to your desired length.
Taking Accurate Measurements
Here’s my foolproof method: wear a well-fitting bra and a thin shirt. Have someone else take the measurements if possible – it’s really hard to get accurate numbers on yourself. Take each measurement twice and use the average if they’re different.
Pro tip: Write down your measurements and keep them handy. I have mine saved in my phone notes because I reference them constantly when pattern shopping.
Don’t forget about your arms if you’re making long sleeves. Measure around the fullest part of your upper arm and from your armpit to your wrist. Sleeve fit can make or break a sweater, especially when you’re working with different sleeve construction methods.
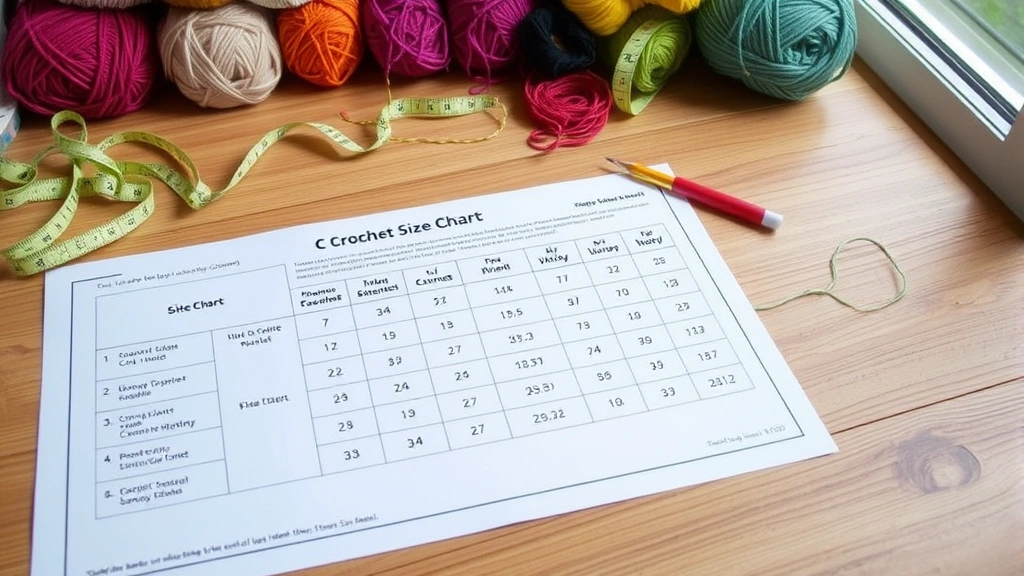
Decoding Pattern Size Charts
Pattern size charts can be confusing because they don’t always match clothing sizes. A pattern “medium” might be equivalent to a clothing size large, or vice versa. This is why you should never choose a size based on what you normally wear.
Most patterns will show something like this:
| Size | Bust (inches) | Finished Bust | Ease |
|---|---|---|---|
| XS | 32-34 | 36 | 2-4″ |
| S | 34-36 | 40 | 4-6″ |
| M | 36-38 | 44 | 6-8″ |
| L | 38-40 | 48 | 8-10″ |
The “Bust” column shows the body measurements the size is designed for. The “Finished Bust” is how big the actual sweater will be. The “Ease” column shows the difference.
Some patterns only show finished measurements, which means you need to do the math yourself. If a size medium has a 40-inch finished bust and you measure 36 inches, that’s 4 inches of ease.
Always look for the schematic or finished measurements section in a pattern. This is where you’ll find the actual dimensions of the completed sweater, which is way more useful than size labels.
Pay attention to other measurements too, especially length. A sweater might fit perfectly around your bust but be too short or long for your torso. Most patterns will give you the total length from shoulder to hem, so you can compare that to what you prefer.
Choosing Your Size
Now comes the fun part: actually picking your size. Start with your bust measurement and find where you fall in the pattern’s size range. But don’t stop there – you need to consider what kind of fit you want.
If you like fitted sweaters, choose a size that gives you 2-4 inches of ease. For a relaxed fit, go with 4-6 inches. For oversized styles, you might want 6+ inches of ease. There’s no universal “right” amount of ease – it depends on your personal style and the look you’re going for.
Here’s where it gets tricky: sometimes you might be between sizes, or your measurements might fall into one size for bust but another for hips. When this happens, I usually go with the bust measurement as my starting point and plan to make adjustments elsewhere if needed.
When You’re Between Sizes
If you’re right between two sizes, consider the yarn and stitch pattern. Crochet gauge can vary slightly, and some stitches have more stretch than others. A sweater in single crochet will have less give than one in half double crochet.
Also think about the style. A cardigan that’s slightly too big can still look great, but a fitted pullover needs to be more precise. When in doubt, I usually size up for cardigans and size down for pullovers, but that’s just my personal preference.
Consider the yarn: Cotton has less stretch than wool, so you might need more ease with cotton yarns. Acrylic falls somewhere in between but can vary widely between brands.
How Stitch Patterns Affect Fit
Different crochet stitches behave completely differently when it comes to fit and drape. Single crochet creates a dense, structured fabric that doesn’t have much stretch. Double crochet is more flexible and drapey. Shell patterns and lace stitches can be quite stretchy.
This matters because a sweater in single crochet might need more ease than the same pattern worked in double crochet. The stitch pattern affects not just how the sweater fits, but how it moves with your body.
Dense stitches like single crochet, half double crochet, and most textured patterns create structured fabrics that hold their shape well but don’t stretch much. These work great for fitted styles but need adequate ease for comfort.
Open stitches like double crochet, treble crochet, and lace patterns create more flexible fabrics with better drape. They’re forgiving if your sizing is slightly off, but they can also stretch out over time.
Stitch Pattern Guidelines
When working with dense stitch patterns, I typically add an extra inch of ease beyond what I’d normally choose. The fabric just doesn’t give as much, so you need that extra room for comfort.
For lace or very open patterns, you can sometimes get away with less ease because the fabric has natural stretch. But be careful – some lace patterns can grow significantly with wear and washing.
Textured stitches like cables or bobbles add bulk, which affects fit differently than smooth stitches. A cable sweater pattern might need slightly more ease around the body to accommodate the raised texture.
Yarn Weight and Drape Considerations
Yarn weight plays a huge role in how a sweater fits and feels. The same pattern worked in different yarn weights will fit completely differently, even if you adjust your hook size to match gauge.
Worsted weight yarn (weight 4) is the most common for sweaters and gives a nice balance of warmth, structure, and drape. DK weight (weight 3) creates a lighter, more drapey fabric that’s great for fitted styles. Chunky yarn (weight 5) makes thick, cozy sweaters but can add bulk.
The Craft Yarn Council’s yarn weight standards provide great guidelines, but remember that different fibers behave differently even within the same weight category.
Cotton yarn in worsted weight will create a completely different fabric than wool in the same weight. Cotton tends to be heavier and less elastic, while wool has natural stretch and bounce.
Fiber Content Matters
Wool has natural elasticity and memory, meaning it bounces back to its original shape. This makes it forgiving for fit issues and comfortable to wear. Acrylic can vary widely – some premium acrylics mimic wool’s properties, while budget versions can be stiff and unforgiving.
Cotton creates beautiful stitch definition but has no stretch and can be heavy. A cotton sweater might need more ease than a wool one, and it will hang differently on your body.
Blends often give you the best of both worlds. A wool-acrylic blend might have wool’s stretch with acrylic’s washability, while a cotton-bamboo blend could have cotton’s structure with bamboo’s drape.
Making Size Adjustments
Sometimes you’ll find the perfect pattern, but the sizing isn’t quite right for your body. The good news is that many adjustments are easier than you might think, especially if you plan them before you start crocheting.
Length adjustments are the easiest. To make a sweater longer or shorter, simply add or subtract rows in the body section before you start the armhole shaping. Keep track of how many rows you’re adding or subtracting so you can adjust the sleeves accordingly.
For width adjustments, you’ll need to understand how the pattern construction works. Most sweaters are sized by changing the number of stitches, so adding width means adding stitches in multiples that work with the stitch pattern.
Sleeve Adjustments
Sleeve fit is crucial and often overlooked. If you have larger arms, you might need to size up just for the sleeves, even if the body fits perfectly. This is where understanding different shaping techniques becomes really valuable.
For set-in sleeves, you can often adjust the upper arm circumference by adding stitches to the sleeve cap. For raglan sleeves, adjustments are trickier because the sleeve is integrated with the body construction.
Test your adjustments: Before committing to a full sweater, make a gauge swatch in your adjusted stitch count to see how it affects the fabric and pattern.
Remember that some adjustments will affect other parts of the sweater. If you make the body wider, you might need to adjust the sleeve attachment. If you change the length significantly, you might need more or less yarn than the pattern calls for.
Common Questions
How much ease should I add for a comfortable fit?
For most sweater styles, 2-4 inches of ease works well for a comfortable but fitted look. Add 4-6 inches for a relaxed fit, or 6+ inches for an oversized style. Dense stitch patterns like single crochet need more ease than open patterns like double crochet.
What if my bust and hip measurements fall into different sizes?
Choose your size based on your bust measurement, since that’s typically the most fitted part of a sweater. You can often adjust the hip area by working a few extra rows with increases, or by choosing a pattern with A-line shaping that naturally accommodates hip differences.
Should I size up or down if I’m between sizes?
It depends on the style and your preferences. For cardigans and oversized styles, sizing up usually works well. For fitted pullovers, sizing down might be better. Consider the yarn’s stretch and the stitch pattern – less stretchy combinations need more ease.
How do I know if a pattern runs large or small?
Check the pattern reviews on Ravelry or other crochet communities. Look for comments about fit and sizing. Also, compare the finished measurements to other patterns you’ve made successfully – if the ease seems unusually high or low, that’s a clue.
Can I adjust a pattern for a different yarn weight?
Yes, but it requires recalculating the entire pattern. You’ll need to make a gauge swatch with your new yarn, then adjust stitch counts and row counts throughout. It’s advanced work, but definitely doable with some math and planning.
What’s the difference between positive and negative ease?
Positive ease means the garment is larger than your body measurements – most sweaters have positive ease. Negative ease means the garment is smaller than your body and relies on stretch to fit. Negative ease is rare in crochet because most crochet fabrics don’t stretch enough.
How much yarn should I buy if I’m making size adjustments?
If you’re adding length or width, buy at least one extra skein beyond what the pattern calls for. Keep your receipts and check the return policy – many yarn stores will let you return unopened skeins from the same dye lot if you don’t use them.
Should I make a test garment first?
For expensive yarn or if you’re making significant adjustments, consider making a muslin version with cheaper yarn first. This is especially helpful for complex constructions like raglan sweaters where fit issues can be harder to fix later.
Getting the right size for your crochet sweater doesn’t have to be a guessing game. Once you understand how ease works, how to read pattern measurements, and how different yarns and stitches behave, you’ll be able to choose sizes confidently and make adjustments when needed.
Remember, the goal isn’t perfection on your first try – it’s understanding the principles so you can make informed decisions. Every sweater you make teaches you something new about fit and construction. Take good notes, measure carefully, and don’t be afraid to make adjustments that work for your body and style preferences.
The most important thing is that you end up with a sweater you love to wear. Whether that’s fitted or oversized, cropped or long, the right size is the one that makes you feel great when you put it on. Happy crocheting!