I’ll never forget the first time I tried to make a corner-to-corner blanket. I’d seen those gorgeous diagonal patterns all over Pinterest and thought, “How hard could it be?” Well, let me tell you – after frogging my first attempt three times and ending up with what looked more like a wonky trapezoid than a square, I realized there’s definitely more to C2C than meets the eye.
The corner-to-corner technique has become one of my absolute favorite ways to crochet blankets, and once you get the hang of it, it’s surprisingly meditative. There’s something satisfying about watching your project grow diagonally, building up those little blocks row by row. Plus, it’s perfect for color work and graphgans – those pixel-style blankets that look like cross-stitch but work up much faster.
What makes C2C special is how it grows. Instead of working in traditional rows from bottom to top, you start with a single block in one corner and increase diagonally until you reach your desired width, then decrease back down to a point. It creates this beautiful diagonal grain that looks complex but is actually pretty straightforward once you understand the basic increase and decrease pattern.
Quick Answer
Corner-to-corner crochet (C2C) is worked diagonally using 3-chain blocks, starting from one corner and increasing to form a triangle, then decreasing to complete a square or rectangle. Each “block” consists of 3 double crochets separated by chain-2 spaces, creating a grid perfect for color work and graphgans.
What Is Corner-to-Corner Crochet?
Corner-to-corner crochet creates a diagonal grid of small squares or “blocks” that work together to form larger pieces. Unlike traditional crochet that builds in horizontal rows, C2C grows diagonally from one corner, creating a unique texture and structure that’s perfect for geometric designs and pixel art patterns.
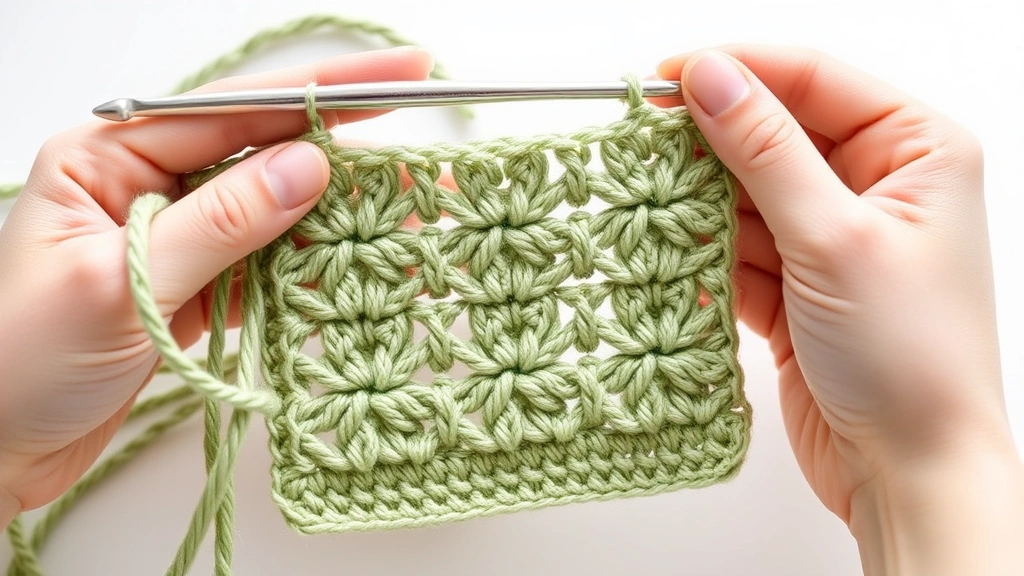
Each block in C2C consists of three double crochets separated by chain-2 spaces. When you’re working with basic crochet stitches, you’ll find that the double crochet foundation makes C2C work up relatively quickly compared to single crochet projects. The chain spaces between the double crochets create natural gaps that give the fabric its characteristic open, airy feel.
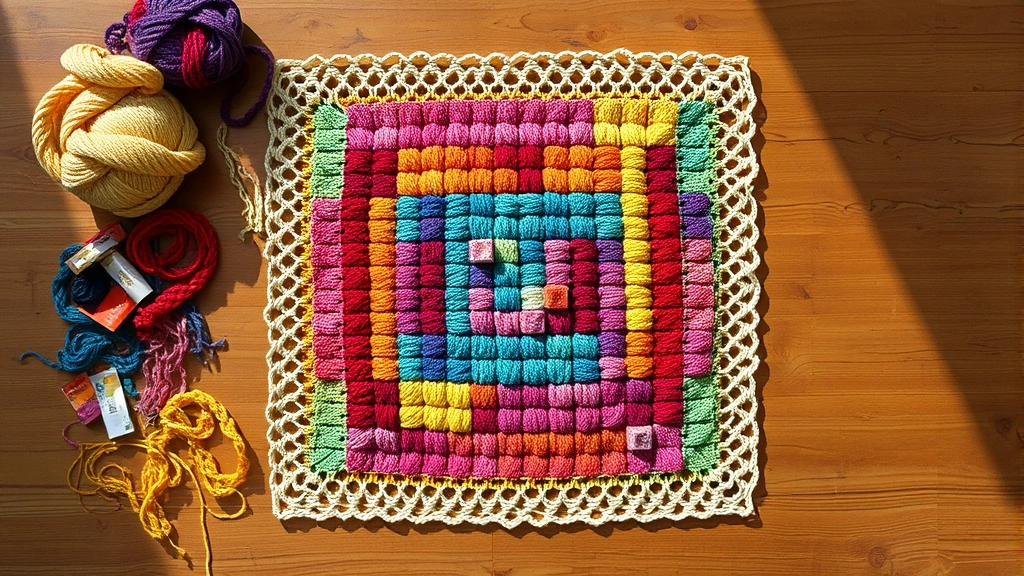
What makes C2C particularly appealing is its versatility. You can work it in a single color for a textured, geometric look, or use multiple colors to create everything from simple stripes to complex pictorial designs. The blanket patterns that use C2C technique range from beginner-friendly solid colors to intricate graphgans that rival cross-stitch in detail.
The technique gets its name from literally starting in one corner – usually the bottom right – and working diagonally across to the opposite corner. This creates a natural diamond or square shape when you increase to a point and then decrease back down. For rectangular projects, you’ll work a section of straight rows (no increases or decreases) in the middle.
Essential Supplies and Yarn Choices
Getting started with C2C doesn’t require any special tools beyond your basic crochet supplies, but choosing the right materials can make a huge difference in your finished project. I’ve learned this the hard way after struggling with yarn that was too splitty or hooks that were too small for the yarn weight.
For yarn, worsted weight (size 4) is your best friend when learning C2C. It’s thick enough to clearly see your stitches and blocks, but not so bulky that it becomes unwieldy. Lion Brand Vanna’s Choice and Red Heart Super Saver are excellent budget options that come in tons of colors – perfect for your first graphgan attempts.
| Yarn Weight | Hook Size | Best For | Approximate Gauge |
|---|---|---|---|
| DK (3) | 5.5mm (I) | Baby blankets, detailed work | 4 blocks = 3 inches |
| Worsted (4) | 6.5mm (K) | Afghans, learning projects | 3 blocks = 3 inches |
| Chunky (5) | 8mm (L) | Quick throws, bulky texture | 2.5 blocks = 3 inches |
Hook size is crucial for C2C success. I typically go up one hook size from what the yarn label recommends to keep the fabric from becoming too tight. When working with chunky yarn patterns, this becomes even more important since the multiple double crochets in each block can create density.
You’ll also want good scissors, a yarn needle for weaving in ends, and stitch markers if you’re working on a large project. I like to mark every 10th row when increasing – it helps me keep track of my progress and catch mistakes early.
The Basic C2C Block Technique
The foundation of corner-to-corner crochet is the basic block, and once you master this, everything else falls into place. Each block contains exactly three double crochets, and understanding how these blocks connect is key to successful C2C projects.
To create your first block, you’ll start with a slip knot and chain 6. This creates your foundation: chain 3 (counts as first double crochet) plus chain 3 for the corner space. Work 3 double crochets in the 4th chain from your hook – this gives you your first complete block. The beauty of this technique is that it’s essentially the same motion repeated over and over.
- Foundation Block
Chain 6, then work 3 dc in the 4th chain from hook. This creates your starting corner with the proper chain-3 space.
- Block Connection
Chain 3, skip the chain-2 space from the previous row, slip stitch into the next chain-3 space. Chain 3 (counts as dc), work 2 more dc in the same space.
- Corner Spaces
The chain-3 spaces between blocks are what allow your fabric to lie flat and create the characteristic C2C grid pattern.
When I first learned C2C, I struggled with tension – my blocks were either too tight or too loose. The key is consistency. Each chain-3 should be the same tension, and your double crochets should have a nice, even height. If you’re finding your work is curling or puckering, you might be working too tightly.
Pro tip: Count your double crochets in each block as you go. It’s easy to accidentally add an extra dc or miss one, and this will throw off your entire grid pattern.
The chain-2 spaces between your double crochets within each block are just as important as the chain-3 spaces between blocks. These create the openwork texture that makes C2C perfect for summer projects – the fabric has great drape and breathability.
Mastering Increases and Decreases
Understanding how to increase and decrease in C2C is where the real magic happens. This is what transforms your work from a simple strip of blocks into shaped pieces like squares, rectangles, or even more complex forms.
Increases in C2C happen at both ends of your row. At the beginning of each row, you’ll create a new block by chaining 6 and working your first block in the 4th chain from the hook (just like your foundation). At the end of the row, you create another new block by chaining 3, then working 3 dc in the same chain-3 space where you just completed your last block.
I remember being confused about this at first – it seemed like I was working two blocks in one space. But that end increase is what creates the diagonal growth pattern. You’re essentially building a new block on top of and slightly offset from the previous row’s end block.
Decreases are the opposite – you skip the increase at the beginning and end of rows. Instead of chaining 6 to start, you slip stitch across to the first chain-3 space and begin your row there. At the end, you simply stop before creating the end increase block.
Here’s where many people get tripped up: the transition from increasing to decreasing (or working straight sections). For a perfect square, you increase until you reach your desired width, then immediately start decreasing. For rectangles, you work several rows straight (no increases or decreases) in the middle section.
When working with double crochet techniques, maintaining consistent stitch height becomes crucial during increases and decreases. Uneven stitches will show up as wonky edges or blocks that don’t align properly with the grid.
Working with Multiple Colors
Color changes in C2C are what make this technique truly shine. Whether you’re creating simple stripes or complex graphgan patterns, understanding when and how to change colors will elevate your projects from basic to stunning.
The easiest place to change colors in C2C is at the beginning of a row. Complete your last block in the old color, then start your new row with the new color. This creates clean, diagonal color lines that follow the natural grain of the C2C fabric. When I’m working color-changing projects, I always plan my color changes to happen at row beginnings when possible.
For graphgan work – those pixel-style designs – you’ll need to change colors within rows. This is where C2C gets a bit more complex, but it’s totally manageable once you understand the technique. You change colors on the last yarn over of the final double crochet in a block. Pull through with your new color, then continue with the new color for the next block.
Managing multiple colors can feel overwhelming at first. I like to use small yarn bobbins or even just loosely wind small amounts of each color. For simple two-color patterns, you can often carry the unused color along the back of your work, picking it up when needed.
When working graphgans, always check your pattern carefully. Some designers show the right side of the work, others show the wrong side. This affects how you read the color chart.
One thing I learned the hard way: weave in your ends as you go, especially with color changes. Trust me, you don’t want to face 200+ ends to weave in when you finish a large graphgan. I weave in ends every few rows now, and it makes finishing so much more pleasant.
The Craft Yarn Council recommends keeping consistent yarn weights when working with multiple colors to maintain even fabric texture and gauge.
Common Problems and Solutions
Even experienced crocheters run into issues with C2C, and I’ve definitely made my share of mistakes over the years. The good news is that most C2C problems have straightforward solutions once you know what to look for.
The most common issue I see is uneven edges. If your increases aren’t consistent, you’ll end up with a wobbly triangle instead of a neat geometric shape. This usually happens when the beginning chain-6 is worked at different tensions, or when the end increases aren’t placed correctly. The fix is to pay extra attention to these edge blocks and maintain consistent tension.
Another frequent problem is blocks that don’t line up properly in a grid. This typically means you’ve either added or missed double crochets within blocks, or your chain spaces aren’t consistent. I always count my dc’s as I work – it seems tedious, but it prevents major frogging later.
Tension issues plague many C2C beginners. Too tight, and your fabric will cup or pucker. Too loose, and you’ll have floppy, uneven blocks. The solution is practice and paying attention to how your yarn feels as you work. When learning proper tension control, I recommend working several small practice squares before starting a large project.
Color bleeding can be a nightmare in multi-color C2C projects. Always test your yarns first, especially reds and dark colors. I learned this lesson when a beautiful blue and white baby blanket turned slightly purple after the first wash. Now I always do a small test wash with yarn scraps before committing to a color combination.
If you’re working from a graphgan chart and your finished piece doesn’t look right, double-check that you’re reading the chart correctly. Some patterns show the right side, others the wrong side. Also, make sure you’re starting from the correct corner – most C2C patterns start from the bottom right, but not all.
Perfect Projects for C2C
Corner-to-corner technique works beautifully for so many different types of projects. After years of experimenting, I’ve found that certain projects really showcase what makes C2C special, while others might be better suited to different techniques.
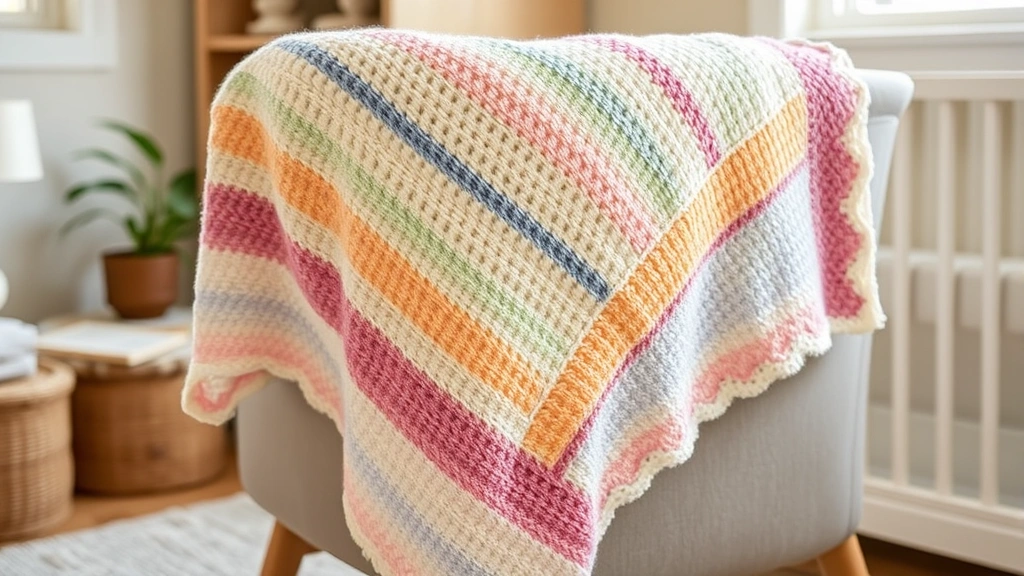
Blankets and afghans are the obvious choice, and for good reason. The diagonal construction creates gorgeous drape, and the open texture is perfect for year-round use. I love making baby blankets with C2C because the technique works up relatively quickly, and parents appreciate the breathable fabric for little ones.
Graphgans are where C2C really shines. The block structure creates perfect pixels for reproducing images, logos, or geometric patterns. I’ve made everything from superhero blankets for kids to elegant mandala designs for adults. The key is choosing patterns with good contrast – subtle color differences don’t show up well in the C2C grid.
Kitchen items like dishcloths and potholders work wonderfully in C2C. The open texture is great for scrubbing, and the cotton yarn typically used for these projects shows off the geometric pattern beautifully. Plus, they’re small enough to finish quickly, making them perfect for practicing your technique.
| Project Type | Yarn Weight | Approximate Size | Skill Level |
|---|---|---|---|
| Dishcloth | Worsted Cotton | 8×8 inches | Beginner |
| Baby Blanket | DK or Worsted | 30×36 inches | Beginner |
| Throw Blanket | Worsted | 45×60 inches | Intermediate |
| Graphgan | Worsted | Variable | Intermediate-Advanced |
Scarves and shawls can work in C2C, but you need to be thoughtful about the design. The diagonal grain creates interesting drape, but the open texture might not provide enough warmth for cold weather accessories. I’ve had good success with lightweight summer wraps using the technique.
Wall hangings and decorative pieces are another great application. The geometric nature of C2C lends itself well to modern, minimalist designs. I’ve made several pieces for my own home using gradient color schemes that really show off the diagonal construction.
Frequently Asked Questions
How much yarn do I need for a C2C blanket?
For a worsted weight throw blanket (approximately 45×60 inches), you’ll need about 2000-2500 yards of yarn. Baby blankets typically require 800-1200 yards. Always buy an extra skein when working with dye lots, as C2C uses more yarn than you might expect due to the chain spaces.
Can I use different yarn weights in the same C2C project?
It’s not recommended for beginners. Different yarn weights will create blocks of different sizes, making your grid uneven. If you want to experiment with mixed weights, stick to yarns that are very close in weight, like worsted and aran, and do a gauge swatch first.
Why does my C2C blanket have holes or gaps?
Small gaps are normal in C2C due to the chain spaces – that’s part of the design. Large holes usually indicate tension issues or missed stitches. Check that you’re working exactly 3 dc in each block and maintaining consistent chain-space sizes.
How do I fix a mistake several rows back in C2C?
Unfortunately, C2C doesn’t allow for easy spot fixes like some other techniques. You’ll typically need to frog back to the mistake. This is why I recommend using stitch markers every 10 rows and checking your work frequently as you go.
Can I make C2C blankets without a pattern?
Absolutely! For solid color blankets, you just need to decide on your finished size and increase until you reach the desired width, then decrease. Many free patterns provide basic size charts to help you plan.
What’s the best way to block a C2C project?
C2C generally doesn’t require aggressive blocking since the fabric naturally lies flat. Light steam blocking or wet blocking works well. Pin out your corners and edges, ensuring the diagonal grain is straight and the blocks are properly aligned.
How long does it take to complete a C2C throw blanket?
For an experienced crocheter working on a worsted weight throw, expect 40-60 hours of work time. Beginners might take 60-80 hours. Graphgans with frequent color changes take longer due to the additional time needed for color management and end weaving.
Can I use C2C technique for clothing?
While possible, C2C isn’t ideal for most garments. The open, geometric texture and diagonal grain don’t provide the drape and fit needed for most clothing. It can work for loose, poncho-style pieces or decorative elements, but traditional construction methods are usually better for fitted garments.
Corner-to-corner crochet opened up a whole new world of possibilities for me, and I hope it does the same for you. Yes, there’s a learning curve, and yes, you’ll probably make some mistakes along the way – I certainly did. But once you get comfortable with the basic block technique and understand how the increases and decreases work, you’ll find yourself reaching for C2C for all sorts of projects.
The technique’s versatility is what keeps me coming back. Whether I’m working on a simple solid-color throw for relaxation or tackling an ambitious graphgan with dozens of color changes, C2C delivers results that look far more complex than the actual technique. Plus, there’s something deeply satisfying about watching your project grow diagonally, building up those perfect little blocks row by row.
Don’t be discouraged if your first attempt doesn’t turn out exactly as planned. My first C2C project was supposed to be a square baby blanket, but it ended up more rectangular due to inconsistent increases. The recipient loved it anyway, and I learned valuable lessons that made my next project much better. That’s the beauty of crochet – even our “mistakes” often turn into beloved finished pieces.