Last month, I was helping my neighbor Sarah with her first crochet project when she held up her work with a frustrated sigh. “Why does everyone else’s crochet look so neat and professional, while mine looks like a hot mess?” she asked. I totally get it – we’ve all been there, staring at our wonky stitches and wondering if we’ll ever create something that doesn’t look like it was made during an earthquake.
Here’s the thing: perfect-looking crochet isn’t about being naturally gifted or having magic fingers. It’s about understanding a handful of key techniques that most beginners never learn properly. After 15 years of crocheting (and making every mistake in the book), I’ve discovered that the difference between amateur-looking and professional-looking crochet often comes down to just a few crucial details.
Whether you’re struggling with uneven tension, messy edges, or stitches that look nothing like the ones in your pattern photos, I’m going to walk you through the exact techniques that transformed my crochet from “meh” to “wow, you made that?” These aren’t complicated tricks that take years to master – they’re simple adjustments that you can start using on your very next project.
Quick Answer
Professional-looking crochet comes from mastering consistent tension, proper stitch placement, and finishing techniques. Focus on maintaining even yarn tension, counting stitches religiously, and blocking your finished pieces – these three elements will instantly elevate your work’s appearance.

Master Your Tension Control
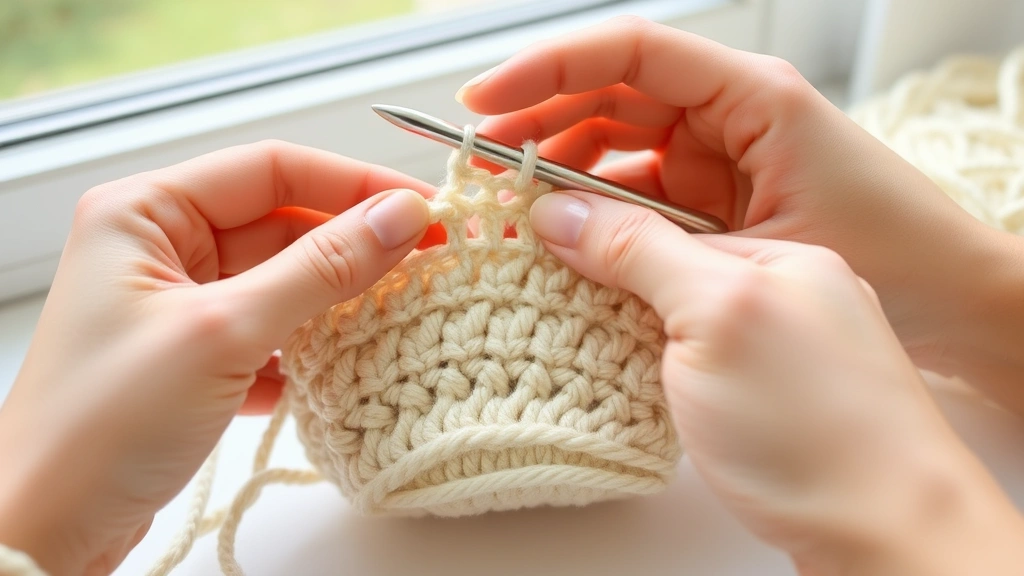
Tension is hands down the biggest factor that separates beginner-looking crochet from professional work. When I started crocheting, my tension was all over the place – some stitches were so tight I could barely get my hook through them, while others were loose enough to drive a truck through.
The key to consistent tension isn’t gripping your yarn in a death hold or letting it flow like water. It’s about finding your sweet spot and maintaining it throughout your project. I hold my yarn using the “pinky wrap” method: the working yarn goes over my index finger, under my middle finger, over my ring finger, and around my pinky. This gives me consistent control without cramping my hand.
Your hook hold matters just as much as your yarn hold. I prefer the pencil grip for most projects, but switch to the knife grip when I’m working with bulky yarn patterns that require more leverage.
Practice tip: Make a swatch using worsted weight yarn and a size H (5mm) hook. Work 20 single crochet stitches across for 10 rows. If your stitches look uneven, you’re probably changing your tension unconsciously. Focus on keeping the same yarn position in your fingers throughout.
Temperature and humidity affect your yarn’s behavior, which can throw off your tension. Cotton yarn gets stiffer in dry conditions, while wool can feel different on humid days. I keep this in mind and adjust my grip slightly when the weather changes dramatically.
Perfect Stitch Placement Every Time
This might sound basic, but improper stitch placement is the culprit behind 90% of wonky-looking crochet. When you’re working a single crochet, your hook should go under both loops of the stitch from the previous row – not just one loop, not between stitches, but cleanly under both loops.
Here’s where beginners often go wrong: they work into the wrong part of the stitch because they can’t clearly see where the previous row’s stitches are. Good lighting is crucial. I use a daylight LED lamp positioned over my left shoulder, which eliminates shadows and helps me see exactly where each stitch begins and ends.
For double crochet and taller stitches, stitch placement becomes even more critical. The top of your double crochet should have a clear “V” shape formed by the two loops. When you work into the next row, your hook goes under both strands of this V. If you’re accidentally working into the space between stitches, your work will start looking loose and uneven.
When working amigurumi projects, stitch placement becomes even more crucial since you’re working in continuous rounds. I always place a marker in the first stitch of each round and move it up as I work. This prevents the spiral effect that can make your amigurumi look lopsided.
Counting and Tracking Like a Pro
Professional crocheters count everything. I mean everything. Stitches per row, rows completed, pattern repeats – if it can be counted, they’re counting it. This isn’t obsessive behavior; it’s the foundation of consistent, professional-looking work.
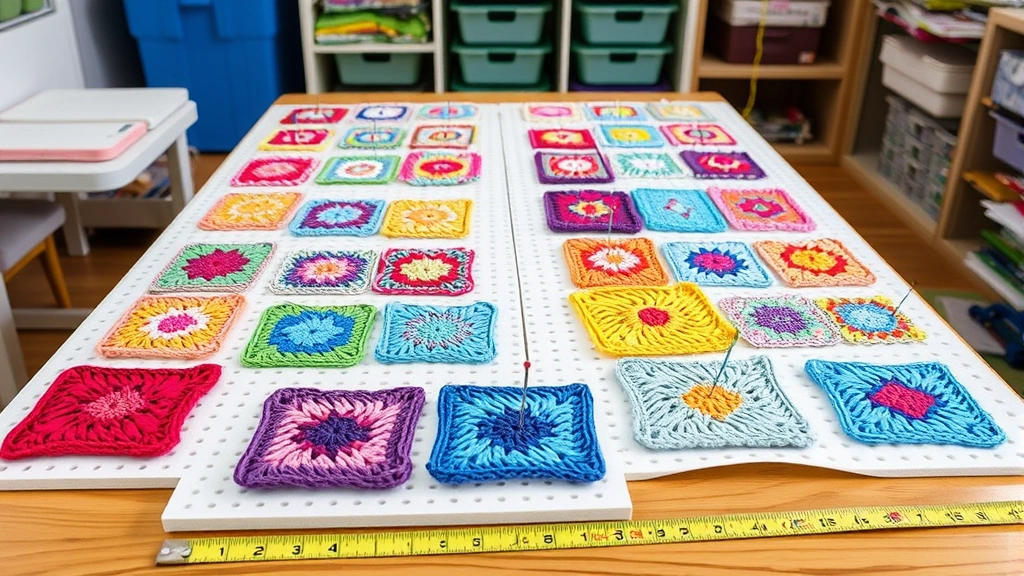
I use a combination of tools to keep track: a row counter for simple projects, sticky notes for complex patterns, and my phone’s voice memo app for recording where I stopped mid-row. For granny square projects, I keep a tally sheet showing how many squares I’ve completed in each color.
| Project Type | Tracking Method | Why It Works |
|---|---|---|
| Simple scarves/blankets | Row counter | Quick, automatic counting |
| Complex patterns | Sticky note system | Visual reminder of pattern position |
| Amigurumi | Stitch markers + notes | Tracks rounds and shaping |
| Colorwork | Graph paper | Visual representation of progress |
The “lifeline” technique saved my sanity on complex projects. Every 10-20 rows, I thread a contrasting yarn through all the active stitches. If I make a mistake later, I can rip back to the lifeline instead of starting over. This technique works especially well for lace patterns where dropped stitches can be catastrophic.
Don’t trust your memory, especially during long crochet sessions. I learned this the hard way when I spent three hours working the wrong section of a complex cardigan pattern. Now I use a highlighter to mark completed rows on printed patterns, or keep detailed notes if I’m following a digital pattern.
Clean Edges and Professional Borders
Edges can make or break your project’s professional appearance. Sloppy edges scream “homemade” while clean, consistent edges whisper “handcrafted with skill.” The difference often comes down to how you handle your turning chains and edge stitches.
For single crochet projects, I chain 1 and turn, but I don’t count that chain as a stitch. When I work back across the row, I work my first single crochet into the same stitch where I made the turning chain. This creates a clean, straight edge without the loose loops that plague many beginners’ work.
Double crochet edges require more attention. I chain 3 for the turning chain, which counts as the first double crochet of the new row. When I work back, I skip the first actual stitch and work into the second stitch. At the end of the row, I work my last double crochet into the top of the turning chain from the previous row.
Edge perfection tip: Keep your turning chains at consistent tension. Too loose and you’ll have floppy edges; too tight and your work will pucker. Practice on a swatch until your turning chains match the tension of your regular stitches.
Adding a border can transform an amateur-looking project into something that looks store-bought. Even a simple single crochet border worked evenly around the entire piece creates clean, finished edges. For baby blankets, I often add a shell or picot border that adds visual interest while maintaining clean lines.
Blocking for Perfect Results
If you’re not blocking your finished projects, you’re missing the single most transformative step in professional crochet. Blocking is like magic – it can turn a lumpy, uneven piece into something that looks like it came from a high-end boutique.
There are three main blocking methods: wet blocking, steam blocking, and spray blocking. For most projects, I use wet blocking with wool wash like Eucalan or Lion Brand wool wash. I soak the finished piece for 15-20 minutes, gently squeeze out excess water (never wring!), and pin it to measurements on blocking mats.
Steam blocking works well for synthetic yarns that might not respond to wet blocking. I use a handheld steamer held about 6 inches from the fabric, never touching the yarn directly with the steamer head. The heat and moisture relax the fibers and allow them to settle into their proper shape.
For sweater patterns, blocking is absolutely non-negotiable. Each piece should be blocked to the exact measurements specified in the pattern before seaming. This ensures proper fit and prevents the dreaded “handmade sweater” look that screams amateur.
Don’t skip blocking even for simple projects. A blocked dishcloth lies flat and looks crisp. A blocked scarf drapes beautifully instead of curling at the edges. The Craft Yarn Council has excellent resources on blocking techniques for different fiber types.
Seamless Color Changes
Nothing ruins the professional look of a project like messy color changes. Whether you’re working stripes, granny squares, or complex colorwork, clean color transitions are essential for polished results.
The key to invisible color changes is completing the last stitch of the old color with the new color. For single crochet, insert your hook, yarn over with the old color, pull through one loop (two loops on hook), then yarn over with the new color and complete the stitch. This places the color change at the base of the first stitch in the new color, not at the top of the last stitch in the old color.
When working in rounds, like for hat patterns, I use the “invisible join” technique. Instead of slip stitching to close the round, I cut the yarn leaving a 6-inch tail, thread it through a tapestry needle, and weave it under both loops of the first stitch of the round, then back through the last stitch. This creates a seamless join that’s nearly impossible to detect.
For projects with multiple color changes, like afghans with complex patterns, I keep a color change journal. I note exactly where each color change occurs, which helps maintain consistency across the entire project. This is especially important for corner-to-corner patterns where color placement affects the overall design.
Professional tip: Always change colors on the last yarn over of the previous stitch, never at the beginning of a new stitch. This rule applies to all stitch types and creates much cleaner color transitions.
Professional Finishing Touches
The difference between homemade and handmade often lies in the finishing details that most crocheters rush through or skip entirely. Professional finishing takes patience, but the results are worth every minute invested.
Weaving in ends properly is crucial. I never just weave back and forth a few times and call it done. Instead, I weave through at least 6-8 stitches in one direction, then change direction and weave through 4-5 more stitches. For slippery yarns like bamboo or silk, I weave through even more stitches and sometimes tie a tiny knot before weaving to prevent the end from working loose.
Seaming techniques can make or break a project’s professional appearance. For joining motifs or seaming garment pieces, I prefer the mattress stitch worked from the right side of the fabric. This creates an invisible seam that’s both strong and flexible.
When joining granny squares, the join-as-you-go method creates much neater results than sewing squares together later. I work the final round of each square, joining to adjacent squares on the appropriate sides. This eliminates bulk and creates smooth transitions between squares.
For projects that will see heavy use, like bags or children’s toys, I reinforce stress points with extra stitching. Handle attachment points, pocket corners, and any areas that will experience repeated stretching get additional reinforcement stitches worked in matching thread.
Avoiding Common Pitfalls
Even experienced crocheters fall into certain traps that can sabotage their professional results. I’ve made all these mistakes myself, often multiple times before learning my lesson.
The biggest mistake I see is rushing through projects without paying attention to gauge. Your gauge swatch isn’t just a suggestion – it’s a roadmap to professional results. I make gauge swatches for every project, even simple ones, and I block them before measuring. A 4-inch square tells you everything you need to know about how your finished project will look and fit.
Another common pitfall is ignoring yarn substitution guidelines. Just because two yarns are labeled the same weight doesn’t mean they’ll behave identically in your project. Cotton has no stretch, wool has memory, acrylic has different drape – these characteristics affect your finished results. When substituting yarns, I always make a larger gauge swatch and sometimes adjust my hook size to compensate for different yarn behaviors.
Inconsistent working environment affects your crochet more than you might realize. I learned this when I started a blanket in my bright, well-lit craft room but finished it while watching TV in dim lamplight. The tension difference between the two sections was obvious in the finished project. Now I try to maintain consistent lighting and seating position throughout a project.
Reality check: Professional-looking crochet takes time. Don’t rush through projects trying to finish quickly. The extra time spent on careful stitch placement and consistent tension is what separates amateur work from professional-quality pieces.
Pattern reading errors plague even experienced crocheters. I always read through the entire pattern before starting, highlighting any unfamiliar techniques or abbreviations. For complex patterns, I keep a notebook with my own notes about confusing sections or personal modifications that improve the results.
Common Questions
How long does it take to develop professional-looking crochet skills?
With focused practice, you can see significant improvement in 2-3 months. The key is working on technique, not just completing projects. Spend 15-20 minutes each day practicing consistent tension and stitch placement on simple swatches. Most crocheters notice their work looking more professional after completing 3-4 projects using proper techniques.
What’s the most important tool for professional-looking results?
Good lighting beats fancy hooks every time. A daylight LED lamp positioned correctly eliminates shadows and helps you see exactly where to place each stitch. I use a 1200-lumen LED desk lamp with adjustable positioning – it cost $40 and transformed my crochet quality more than any expensive hook set ever did.
Should I block every project, even simple ones?
Yes, blocking makes a dramatic difference even on simple projects. A blocked dishcloth lies flat and has crisp edges. A blocked scarf drapes properly instead of curling. Even quick projects like coasters benefit from light steam blocking. The only exception might be items that will be washed frequently in hot water, where blocking effects won’t last.
How do I fix uneven tension in a project I’ve already started?
If the tension issues are minor, blocking can often even out slight inconsistencies. For major tension problems, you’ll need to rip back to where the tension became inconsistent and rework those sections. Prevention is better than correction – use stitch markers every 20-30 stitches to check your tension as you work.
What yarn weight is best for beginners learning professional techniques?
Worsted weight (size 4) yarn in a light, solid color works best for learning. It’s thick enough to see your stitches clearly but not so bulky that it’s hard to handle. Light colors show stitch definition better than dark colors. I recommend starting with cotton or cotton blend yarns because they hold their shape well and don’t stretch out of shape like some acrylics can.
How do I know if my gauge is correct?
Make a 6-inch square swatch using the recommended hook size and yarn. Block it, then measure a 4-inch square in the center. Count stitches horizontally and rows vertically within that 4-inch area. If your counts match the pattern’s gauge, you’re good to go. If not, adjust your hook size – larger hook for fewer stitches per inch, smaller hook for more stitches per inch.
What’s the difference between expensive and budget crochet hooks for achieving professional results?
Hook quality affects comfort more than stitch appearance. A smooth hook that glides easily through yarn prevents hand fatigue and helps maintain consistent tension. However, proper technique matters more than hook price. I’ve created professional-looking pieces with $2 aluminum hooks and seen poor results from expensive ergonomic hooks used with bad technique.
How do I prevent my edges from curling?
Curling edges usually indicate tension issues or incorrect stitch placement. Make sure you’re working into both loops of each stitch and maintaining consistent tension on your turning chains. For single crochet projects, try chaining 2 instead of 1 for your turning chain, or add a border of single crochet around the entire finished piece to stabilize the edges.
Your Path to Professional-Looking Crochet
The journey from “homemade” to “handcrafted” crochet isn’t about perfection – it’s about consistency and attention to detail. Every professional crocheter started exactly where you are now, making wonky stitches and wondering if they’d ever create something worthy of gifting.
Start with one technique from this guide and focus on mastering it completely before moving to the next. Maybe spend this week working on consistent tension, using the same yarn and hook for several small swatches until your stitches look uniform. Next week, tackle proper stitch placement with good lighting and careful attention to where your hook goes.
Remember that professional-looking crochet is a skill that builds over time. Each project teaches you something new about your craft, and every mistake is actually valuable feedback about what to adjust next time. The key is approaching each project with intention, not just rushing to finish.
Your crochet journey is uniquely yours, and there’s real joy in watching your skills develop with each completed project. Trust the process, be patient with yourself, and most importantly, keep creating. Before you know it, people will be asking where you bought that beautiful piece you made with your own two hands.