You know that feeling when you’re halfway through a beautiful crochet project and suddenly realize your gauge is completely off? Your delicate lace shawl looks more like a tablecloth, or worse, your cozy sweater could fit a toddler instead of you. I’ve been there more times than I care to admit, and it taught me something crucial: understanding crochet gauge isn’t just helpful—it’s absolutely essential for any project where size matters.
Gauge is basically your crochet fingerprint. It’s how your unique tension, hook size, and yarn choice come together to create a specific number of stitches and rows per inch. Think of it as the foundation of successful crochet projects. Without it, you’re essentially flying blind, hoping everything will magically work out in the end.
Here’s the thing that took me years to really grasp: gauge isn’t just about following pattern instructions blindly. It’s about understanding how your personal crochet style affects the final outcome. Some of us are naturally tight crocheters, creating dense, structured fabric. Others have a looser hand, producing more drapey, flowing results. Neither is wrong, but both need different approaches to achieve the same finished measurements.
The frustrating truth is that even experienced crocheters can struggle with gauge consistency. Your tension might change based on your mood, the time of day, or even the chair you’re sitting in. I’ve noticed my gauge tends to be tighter in the morning when I’m fresh and looser in the evening when I’m relaxed. Understanding these personal quirks is part of mastering your craft.
Quick Answer
Crochet gauge measures how many stitches and rows you create per inch with specific yarn and hook combinations. Making a gauge swatch before starting any sized project ensures your finished piece matches the pattern’s intended dimensions and prevents costly mistakes.

What Crochet Gauge Really Means
Gauge is expressed as two numbers: stitches per inch (or 4 inches) horizontally, and rows per inch vertically. When a pattern says “18 stitches and 24 rows = 4 inches in single crochet,” it’s giving you the exact specifications the designer used to create their sample.
But gauge goes deeper than just numbers. It reflects the relationship between your yarn weight, hook size, stitch type, and personal tension. A worsted weight yarn worked with a size H hook will create a completely different gauge than the same yarn worked with a size K hook.
The stitch pattern also dramatically affects gauge. Single crochet creates a tight, dense fabric with more stitches per inch, while double crochet produces a more open fabric with fewer stitches per inch. Even basic crochet stitches can vary significantly in gauge depending on how you work them.
Understanding Gauge Notation
Patterns typically express gauge in one of these formats:
- “18 sc and 20 rows = 4 inches” (most common)
- “4.5 sc and 5 rows = 1 inch” (less common but equivalent)
- “Gauge: 18 stitches × 20 rows = 4 inches square”
Some patterns only give stitch gauge, especially for projects like scarves where length is easily adjustable. However, both stitch and row gauge matter for shaped garments and fitted accessories.
Pro Tip: Always check what stitch the gauge is measured in. A pattern might give gauge in single crochet even if the main fabric uses a different stitch, just for consistency.
Why Gauge Accuracy Is Critical
I learned this lesson the hard way when I spent three weeks on a cardigan that ended up fitting my eight-year-old niece instead of me. My gauge was off by just half a stitch per inch, but over the width of an adult sweater, that added up to about 6 inches too small. That’s when I truly understood why experienced crocheters are so adamant about gauge swatches.
For garments, gauge directly determines fit. A sweater pattern designed for a 38-inch bust will only achieve that measurement if your gauge matches the designer’s exactly. Even small discrepancies compound across the width and length of a garment, potentially making it unwearable.
But gauge isn’t just about clothing. It affects the drape and structure of shawls, the coverage of blankets, and even the proportions of amigurumi projects. A loose gauge on an amigurumi toy might leave gaps where stuffing shows through, while a tight gauge could make the fabric too stiff to shape properly.
The Economics of Gauge
Getting gauge wrong isn’t just frustrating—it’s expensive. If your gauge is significantly looser than the pattern calls for, you’ll use more yarn than calculated. I once needed an extra skein of expensive alpaca yarn because my loose gauge made a shawl larger than expected.
Conversely, if your gauge is much tighter, you might end up with leftover yarn but a project that’s too small to use. Either way, you’re not getting the value you expected from your materials and time investment.
| Gauge Difference | Impact on 40″ Sweater | Likely Outcome |
|---|---|---|
| 0.5 stitches/inch too few | 5-6 inches too large | Baggy, oversized fit |
| 0.5 stitches/inch too many | 5-6 inches too small | Tight, unwearable |
| 1 stitch/inch difference | 10+ inches difference | Completely wrong size |
How to Make a Proper Gauge Swatch
Here’s where many crocheters go wrong: they make tiny swatches that don’t give accurate readings. A proper gauge swatch should be at least 6 inches square, preferably larger. This gives you enough fabric to measure accurately and accounts for how your tension might vary across a larger piece.
Start by chaining enough stitches to create a piece about 2 inches wider than your target measurement. If the pattern calls for 18 stitches in 4 inches, chain about 27-30 stitches to give yourself extra room on the sides for measuring.
- Chain Your Foundation
Make your foundation chain using the same yarn and hook specified in the pattern. Don’t chain too tightly—this can skew your entire swatch.
- Work the Pattern Stitch
Crochet in the same stitch pattern specified for the gauge measurement. If the pattern says “18 sc = 4 inches,” work your swatch entirely in single crochet.
- Maintain Consistent Tension
Try to crochet as you normally would on a project. Don’t overthink your tension or try to force it to match—you want to know your natural gauge.
- Work Sufficient Rows
Continue until your swatch is at least 6 inches tall. This ensures you can measure row gauge accurately too.
- Finish Properly
Fasten off and weave in ends, but don’t block the swatch yet. You want to measure your natural, unblocked gauge first.
Time-Saving Tip: Make your gauge swatch large enough to incorporate into your project later. For blankets, your swatch can become the first square. For garments, it might work as a pocket or trim piece.
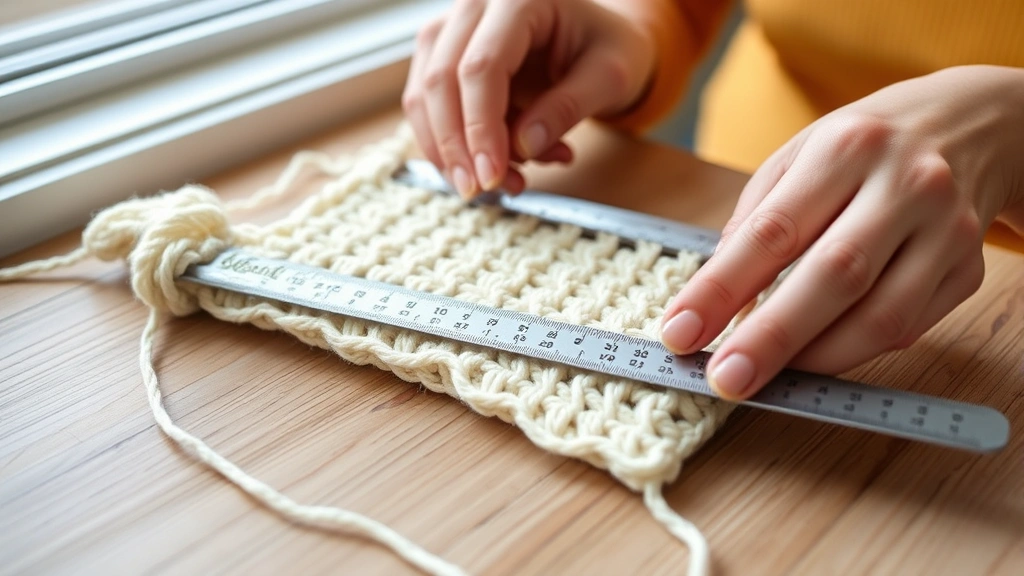
Measuring Your Gauge Correctly
This is where precision matters most. Lay your swatch on a flat surface and let it relax naturally—don’t stretch or compress it. Use a rigid ruler or gauge tool rather than a flexible measuring tape, which can give inconsistent readings.
Place your ruler horizontally across the swatch, avoiding the very edges where tension might be different. Count the stitches within a 4-inch span, including any partial stitches at the edges. If you have 17.5 stitches in 4 inches, don’t round up to 18—that half-stitch difference matters.
Reading Stitch Gauge
For stitch gauge, count the tops of your stitches. In single crochet, count the V-shaped tops. In double crochet, count the posts. If you’re working in a complex stitch pattern, count the pattern repeats and calculate accordingly.
Sometimes it helps to mark your stitches with pins or stitch markers as you count. Place markers at the beginning and end of your 4-inch measurement, then count everything in between.
Reading Row Gauge
For row gauge, turn your swatch and measure vertically. Count the actual rows, not the spaces between them. In single crochet, each row creates a distinct horizontal line. In taller stitches, count the number of times you’ve turned your work.
Row gauge can be trickier to measure accurately, especially in taller stitches. Take multiple measurements across different parts of your swatch and average them for the most accurate reading.
“I always measure my gauge in three different spots on the swatch and take the average. Tension can vary slightly across the piece, and this gives me a more reliable number.” —experienced crocheter tip
Adjusting When Your Gauge Is Off
When your gauge doesn’t match the pattern, resist the urge to just “make it work.” Small adjustments now save major headaches later. The most straightforward adjustment is changing your hook size, but it’s not the only option.
If you have fewer stitches per inch than called for (loose gauge), try a smaller hook. Go down one size at a time—from an H (5mm) to a G (4.25mm), for example. If you have more stitches per inch than specified (tight gauge), go up a hook size.
Hook Size Adjustments
| Your Gauge vs Pattern | Hook Adjustment | Expected Result |
|---|---|---|
| Too few stitches/inch | Go down one size | Tighter, more stitches |
| Too many stitches/inch | Go up one size | Looser, fewer stitches |
| Significantly off | Adjust 2+ sizes | Major gauge change |
Remember that changing hook size affects both stitch and row gauge, though not always proportionally. You might achieve perfect stitch gauge but find your row gauge is now off, especially when working with cotton yarns that don’t have much stretch.
Alternative Adjustments
Sometimes hook size changes aren’t enough, or they create other problems. Consider these alternatives:
- Yarn substitution: A slightly different yarn weight might give you better gauge
- Tension adjustment: Consciously modify how tightly you hold your yarn
- Stitch modification: Work into back loops only for tighter gauge, or use a looser stitch variant
For projects where exact gauge is less critical, like dishcloths or decorative items, you might choose to adjust the pattern instead of your gauge.
Gauge Requirements by Project Type
Not every project demands the same level of gauge precision. Understanding when gauge is critical versus when it’s flexible helps you prioritize your time and energy effectively.
Critical Gauge Projects
Garments: Sweaters, cardigans, fitted tops, and pants require exact gauge matching. Even small deviations can make the difference between a perfect fit and an unwearable garment. Always make a swatch for clothing projects.
Hats and fitted accessories: Beanies, gloves, and socks need proper gauge for correct sizing. A hat that’s too loose won’t stay on; too tight and it’ll give you a headache.
Amigurumi: While size flexibility exists, gauge affects the fabric’s structure. Too loose and stuffing shows through; too tight and the piece becomes stiff and hard to shape.
Flexible Gauge Projects
Scarves and shawls: Length is easily adjustable, and width variations often don’t matter much. You might still want to swatch to check drape and fabric hand.
Blankets and afghans: Size variations are usually acceptable, though gauge affects yarn usage significantly. A loose gauge might require extra skeins.
Home decor: Items like pillow covers or wall hangings often work fine with gauge variations, as long as the fabric has the right drape and structure.
Project Planning Tip: For flexible-gauge projects, consider making your swatch first and adjusting the pattern to match your natural gauge rather than forcing your gauge to match the pattern.
Troubleshooting Common Gauge Issues
Even experienced crocheters encounter gauge challenges. Here are the most common issues I see and practical solutions that actually work.
Inconsistent Tension
This is probably the most frequent problem, especially for newer crocheters. Your gauge might start tight and gradually loosen as you get into a rhythm, or vice versa. The solution isn’t to stress about every stitch, but to develop consistent habits.
Practice holding your yarn the same way every time. Some crocheters wrap the working yarn around their pinkie for consistent tension, while others prefer to hold it between specific fingers. Find what works for you and stick with it.
Take regular breaks during long crochet sessions. Fatigue affects tension, and a tired hand often produces looser stitches. I’ve learned to check my gauge periodically during large projects, especially after breaks or when switching between different crochet sessions.
Hook Size Limitations
Sometimes you need a hook size that doesn’t exist in standard ranges. If you need something between a G and H hook, you’re out of luck with most hook sets. Consider investing in interchangeable hook systems that offer more size options, or look for specialty hooks in half sizes.
Alternatively, different hook materials can affect gauge slightly. Aluminum hooks tend to be slippery and may produce looser gauge, while bamboo or wood hooks have more grip and might tighten your stitches.
Yarn Behavior Issues
Some yarns are just difficult to gauge consistently. Slippery yarns like bamboo or silk can slide around, making even tension challenging. Fuzzy yarns like mohair make it hard to see individual stitches clearly for counting.
For slippery yarns, consider using hooks with more grip—bamboo instead of aluminum, or hooks with textured grips. For fuzzy yarns, work your gauge swatch in good lighting and use a smooth hook that won’t catch the fibers.
“I keep a collection of different hook materials and sizes specifically for gauge challenges. Sometimes the solution is as simple as switching from aluminum to bamboo.”
Common Questions
Do I really need to make a gauge swatch for every project?
For fitted garments, hats, and amigurumi, absolutely yes. For scarves, dishcloths, and decorative items where exact size isn’t critical, you can often skip it. However, swatching helps you get familiar with how the yarn and stitch pattern work together, so it’s rarely wasted effort. Even experienced crocheters swatch for new yarn or unfamiliar stitch patterns.
How big should my gauge swatch be?
At least 6 inches square, but bigger is better for accuracy. I prefer 8-inch squares when possible, as they give more reliable measurements and account for tension variations across the fabric. For complex stitch patterns, make sure your swatch includes at least two complete pattern repeats.
Should I block my gauge swatch before measuring?
Measure both before and after blocking if the pattern specifies blocked gauge. Many patterns assume unblocked measurements, but some—especially lace patterns—require blocking for accurate gauge. When in doubt, check the pattern notes or measure both ways to be safe.
What if my stitch gauge is right but my row gauge is off?
This is common and often acceptable for many projects. Row gauge primarily affects the length of your work, which is often adjustable. For garments, you can usually work more or fewer rows to achieve the right length. However, for colorwork or stitch patterns that depend on specific row counts, you may need to adjust your technique or hook size.
Can I adjust the pattern instead of changing my gauge?
For some projects, yes. If your gauge gives you fewer stitches per inch, you can reduce the number of stitches in the pattern proportionally. This works best for simple shapes like rectangles or basic garments. Complex shaping or fitted garments make pattern adjustments much more complicated and error-prone.
How much yarn should I buy if my gauge is different?
If your gauge is looser (fewer stitches per inch), you’ll need more yarn—roughly 10-20% extra for each half-stitch difference per inch. If your gauge is tighter, you might need less, but it’s safer to buy the full amount anyway. Leftover yarn is better than running short mid-project.
Why does my gauge change between swatching and the actual project?
This happens because your tension can change when working larger pieces or different construction methods. Working in the round often produces different gauge than working flat. Long crochet sessions can also cause tension drift as your hands get tired or you settle into a rhythm. Check your gauge periodically during large projects.
What’s the best way to measure gauge in textured stitch patterns?
Focus on the dominant stitch or the most regular element of the pattern. For shell patterns, count the spaces between shells rather than individual stitches. For bobble patterns, count the bobbles themselves. Some complex patterns require measuring over multiple pattern repeats to get accurate gauge—the pattern should specify how to measure.
Understanding and mastering crochet gauge might seem tedious at first, but it’s truly one of the most valuable skills you can develop as a crocheter. Every swatch you make teaches you something about how yarn, hooks, and your personal style work together. Those few extra minutes spent checking gauge can save hours of frustration and ensure your finished projects fit and look exactly as intended.
Remember, gauge isn’t about perfection—it’s about consistency and understanding your craft well enough to achieve the results you want. The more you practice measuring and adjusting gauge, the better you’ll become at predicting how your projects will turn out. Start incorporating gauge swatches into your routine now, and future you will thank you when every project turns out exactly right.
Happy crocheting, and may all your gauges be spot-on!