
I still remember the first time I tried to make a crochet chain. What should have been a simple foundation turned into a tangled mess of loops that looked more like a macramé disaster than the beginning of a beautiful project. The worst part? I had no idea what I was doing wrong. My chains were either so tight I couldn’t fit my hook through them, or so loose they looked like they belonged on a giant’s necklace.
If you’ve ever felt frustrated trying to get your crochet chains just right, you’re definitely not alone. The foundation chain is literally the foundation of most crochet projects, but it’s also where many beginners (and even experienced crocheters) run into trouble. Too tight, and your first row becomes a wrestling match with your yarn. Too loose, and your project starts looking sloppy before you’ve even gotten started.
Here’s what I wish someone had told me from the beginning: mastering your crochet chain isn’t just about knowing the basic motion. It’s about understanding tension, recognizing when your hook grip needs adjusting, and learning the little tricks that make all the difference. Whether you’re working on baby blankets that need perfectly even edges or attempting your first amigurumi project, getting your chain right sets you up for success.
Quick Answer
A proper crochet chain should be loose enough to easily insert your hook for the next row, but tight enough to maintain structure. Keep consistent tension by maintaining steady yarn flow and practice the rhythm of yarn over, pull through, repeat.
Understanding Chain Stitch Basics
Let’s start with what makes a good chain stitch. When you’re creating a foundation chain, you’re essentially making a series of loops that will support your entire project. Each chain stitch should be uniform in size and loose enough that you can easily work into it on your next row.
The basic motion involves wrapping the yarn over your hook (yarn over), then pulling it through the loop already on your hook. Sounds simple, right? But the devil is in the details. The way you hold your yarn, the angle of your hook, and the speed at which you work all affect the final result.
I’ve found that beginners often focus too much on the individual motions and not enough on the rhythm. Think of it like learning to ride a bike – once you get the flow down, your hands will naturally find the right tension. When I’m teaching someone new, I always tell them to practice making chains while watching TV. The distraction actually helps because you’re not overthinking each stitch.
Hook Position and Yarn Flow
Your hook should move smoothly through each motion without catching or snagging. If you’re fighting with your yarn, something’s off. Most tension issues come from gripping the yarn too tightly or holding your hook at an awkward angle.
For worsted weight yarn (that’s your standard Red Heart Super Saver or Lion Brand Yarn), I recommend starting with a size H (5mm) hook. This gives you room to work without making chains that are too loose. If you’re using different yarn weights, adjust accordingly – DK weight works well with a G (4mm) hook, while chunky yarn might need a J (6mm) or larger.
Pro tip: Count your chains out loud as you make them. This helps establish rhythm and ensures you don’t lose track of your count, especially on longer foundation chains.
Common Chain Problems and Solutions
After years of helping crocheters troubleshoot their projects, I’ve noticed the same chain problems come up again and again. The good news is that most of these issues have straightforward solutions once you know what to look for.
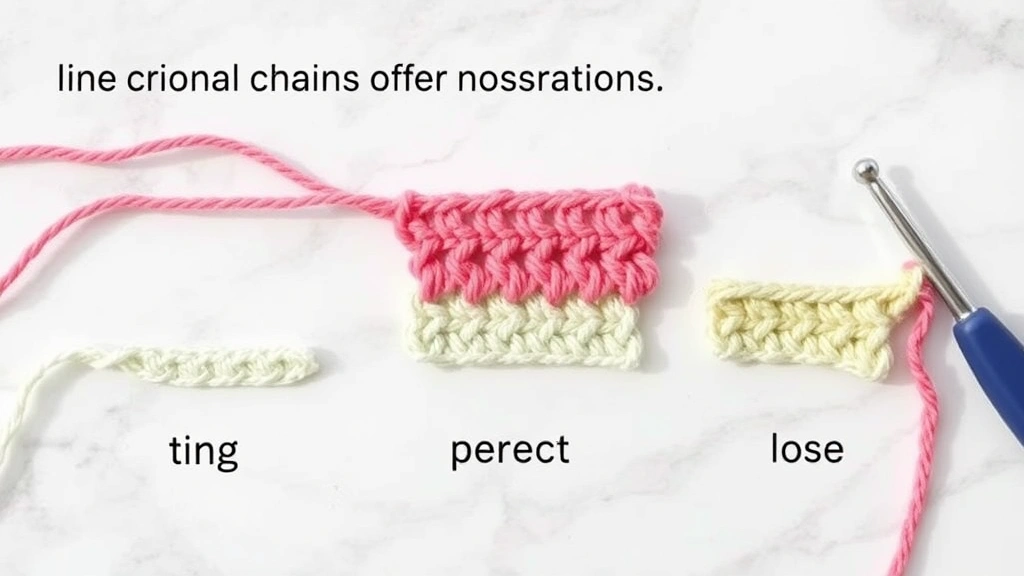
Chains Too Tight
This is probably the most common problem I see. You’ll know your chains are too tight if you struggle to insert your hook for the first row, or if your foundation chain doesn’t have any give when you gently stretch it. Tight chains create a rigid base that can make your entire project pucker.
The fix usually involves loosening your grip on the working yarn. Try holding the yarn more loosely between your fingers, or even go up a hook size just for your foundation chain. I know it sounds counterintuitive, but using a larger hook for your chain and then switching to your project hook for the rest can save you a lot of frustration.
Chains Too Loose
Loose chains create gaps and make your project look messy from the start. They also don’t provide good structure for the stitches that follow. If your chains look more like a loose necklace than a sturdy foundation, you need to increase your tension.
Try holding your yarn a bit more firmly, or switch to a smaller hook for your foundation chain. Some crocheters find it helpful to wrap the working yarn around their pinky finger an extra time to create more resistance.
Inconsistent Chain Size
When your chains vary in size, it creates an uneven foundation that throws off your entire project. This usually happens when you’re not maintaining consistent tension or when you’re rushing through the chain.
Slow down and focus on making each chain the same size as the previous one. It helps to look at your work frequently and compare each new chain to the ones you’ve already made.
| Problem | Cause | Solution |
|---|---|---|
| Chains too tight | Excessive yarn tension | Loosen grip, use larger hook for chain |
| Chains too loose | Insufficient yarn tension | Increase grip, use smaller hook for chain |
| Inconsistent size | Variable tension | Practice rhythm, maintain steady pace |
| Twisted chains | Hook angle issues | Keep hook facing same direction |
Perfecting Your Chain Tension
Tension is everything in crochet, and it starts with your very first chain. Good tension means your stitches are even, your fabric has nice drape, and you’re not fighting with your yarn every step of the way.
The key to consistent tension is finding a yarn-holding method that works for you and sticking with it. Some crocheters wrap the yarn around their pinky finger, others weave it between multiple fingers, and some just hold it loosely in their palm. There’s no right or wrong way – just what feels comfortable and gives you control.
Testing Your Chain Tension
Here’s a simple test I use with my students: make a chain of 20 stitches, then try to work a single crochet into each chain. If you can easily insert your hook and complete each stitch without struggling, your tension is probably good. If you’re fighting to get your hook through, your chains are too tight. If there are big gaps and the stitches feel loose and sloppy, you need more tension.
For most projects, your chain should have just a little bit of stretch when you gently pull on it. It shouldn’t be rigid, but it also shouldn’t stretch out significantly. Think of it like a good pair of jeans – fitted but not restrictive.
Remember: Your chain tension affects more than just the foundation row. If your starting chain is too tight, it can cause the entire edge of your project to pull in and distort the shape.
Adjusting for Different Yarns
Different yarn fibers behave differently, and you’ll need to adjust your technique accordingly. Cotton yarn, like the kind used in many dishcloth patterns, tends to be less forgiving than acrylic, so you might need slightly looser chains. Wool has natural stretch and memory, so it’s more forgiving of minor tension variations.
Slippery yarns like bamboo or silk blends can be tricky because they don’t grip the hook the same way. With these, I find it helpful to use a hook with a better grip surface or to maintain slightly tighter tension to compensate for the yarn’s natural slipperiness.
Different Chain Techniques for Different Projects
Not all projects need the same type of foundation chain. Depending on what you’re making, you might want to use different techniques to get the best results.
Standard Foundation Chain
This is your basic chain that most patterns call for. It works well for projects like afghans, scarves, and rectangular projects where you need a straight, sturdy edge.
For a standard foundation chain, aim for chains that are about the same width as the stitches you’ll be working into them. If you’re planning to work single crochet, your chains should be relatively small. For double crochet projects, you can make them slightly larger.
Foundation Single Crochet
This technique combines the chain and first row into one step, creating a more flexible edge that’s perfect for projects that need stretch. I love using this for the bottom edge of sweaters or any project where the foundation edge will be visible.
The Craft Yarn Council has excellent tutorials on foundation stitches if you want to learn this technique. It takes a bit more practice than regular chains, but the results are worth it.
Adjustable Ring (Magic Ring)
For projects that start in the round, like hats or the center of granny squares, an adjustable ring often works better than a traditional chain ring. It eliminates the hole in the center and gives you more control over the starting size.
Tip: When making a magic ring, leave a longer tail than you think you need – about 6 inches. This makes it easier to weave in later and ensures you won’t run out of yarn when closing the ring.
Troubleshooting Chain Issues
Even experienced crocheters run into chain problems sometimes. Here are the most common issues I see and how to fix them without starting over.
Miscounted Chains
We’ve all been there – you’re supposed to have 150 chains, but somehow you ended up with 147. Before you rip it all out, try this: if you’re short a few chains, you can often add them to the end. If you have too many, you can usually skip the extras at the beginning of your first row.
For future projects, use stitch markers every 20 or 25 chains to keep track. Those little plastic markers from Ravelry patterns work great, or you can use safety pins in a pinch.
Twisted Foundation Chain
Sometimes your chain gets twisted, especially on longer foundations. This usually happens when you’re not keeping your hook facing the same direction as you work. A twisted chain will cause problems when you try to work your first row.
If you catch it early, you can often untwist the chain by gently rotating it. If the twist is severe or you don’t notice until you’ve started your first row, it’s usually better to start over.
Chain Breaking
If your yarn breaks while you’re making your foundation chain, don’t panic. You can join new yarn right in the chain by making a slip knot with the new yarn and pulling it through the last loop, just like you would when changing colors in regular stitches.
Make sure to leave tails of about 4 inches on both the old and new yarn so you can weave them in securely later. This join will be virtually invisible once your project is complete.
Advanced Chain Tips and Tricks
Once you’ve mastered basic chains, these advanced techniques can take your crochet to the next level.
Counting Chains Efficiently
For long foundation chains, I’ve developed a system that saves time and prevents mistakes. Instead of counting each chain individually, I count in groups of 10, placing a stitch marker after each group. This makes it easy to see at a glance how many chains you have, and if you lose count, you only need to recount the last group of 10.
Some patterns, especially complex lace patterns, require very specific chain counts. For these, I recommend using a row counter or even making tick marks on paper as you work.
Creating Stretchy Chains
For projects that need extra stretch at the foundation, like the brim of a hat or the cuff of a sleeve, try this technique: work your foundation chain with a hook that’s 1-2 sizes larger than your project hook, then switch to the smaller hook for the rest of the project.
Another option is to work foundation half double crochet instead of regular chains. This creates a foundation that has built-in stretch and works beautifully for garments that need to fit snugly.
Joining Chains for Rounds
When you’re working in rounds and need to join your foundation chain, the placement of your slip stitch matters. Join in the first chain you made (not the last one), and make sure you haven’t twisted the chain before joining.
I always hold the chain up and look at it from different angles before making that final slip stitch. A twisted foundation will create problems that are difficult to fix later.
Advanced tip: For projects with very long foundation chains (like king-size blankets), consider working the foundation in sections and joining them. This prevents the chain from getting tangled and makes the project more portable while you work.
Color Changes in Foundation Chains
If your pattern calls for color changes right from the start, you can change colors in your foundation chain just like you would in regular stitches. Complete the chain stitch until you have two loops on your hook, then switch to the new color and pull it through both loops.
This technique is especially useful for granny square patterns that start with multiple colors or striped projects where the color change begins at the foundation.
Common Questions
How do I know if my chain is the right tension?
Your chain should be loose enough that you can easily insert your hook for the next row, but not so loose that there are visible gaps. Try working a few stitches into your chain – if you’re struggling to get your hook through, the chain is too tight. If the stitches feel loose and sloppy, you need more tension.
Should I use a different hook size for my foundation chain?
Many experienced crocheters use a hook one size larger for their foundation chain, then switch to the pattern hook for the rest of the project. This creates a slightly looser foundation that’s easier to work into. It’s especially helpful if you tend to crochet tightly or if you’re using a less flexible yarn like cotton.
How many chains do I need for a baby blanket?
For a standard baby blanket (about 30 inches wide), you’ll typically need 120-150 foundation chains when using worsted weight yarn and single crochet stitches. The exact number depends on your tension and the specific stitch pattern. Always work up a gauge swatch first to determine your personal stitch count per inch.
Why does my foundation chain curl?
Curling usually indicates that your chain is too tight compared to the stitches you’re working into it. The tight chain creates tension that causes the work to curl. Try using a larger hook for your foundation chain, or consciously loosening your tension while chaining.
Can I fix a foundation chain that’s too tight without starting over?
Sometimes you can salvage a tight foundation chain by gently stretching it before you start your first row. Work slowly and use the tip of your hook to open up each chain stitch as you work into it. However, if the chain is extremely tight, it’s usually faster and less frustrating to start over with proper tension.
How do I keep track of chain count in long foundations?
Use stitch markers every 20 or 25 chains to break up long counts into manageable sections. You can also count out loud or use a row counter. Some crocheters find it helpful to make small tick marks on paper as they work, especially for complex patterns with specific chain requirements.
What’s the difference between a chain and a foundation chain?
A chain refers to the basic chain stitch technique, while a foundation chain specifically refers to the starting chain that forms the base of your project. Foundation chains need to be the correct length and tension to support the entire project, while regular chains (like those used for turning or spacing) have different requirements.
Why do some patterns say to skip the first chain?
The first chain in your foundation often serves as a turning chain rather than a working stitch. Patterns typically tell you to skip it to prevent your work from increasing unintentionally. The exact instructions depend on the stitch height you’re using – single crochet usually skips one chain, while double crochet might skip two or three.
Getting your foundation chain right really is the key to starting any crochet project on the right foot. I know it can feel frustrating when something so basic causes so many headaches, but remember that even experienced crocheters had to master this skill. The difference is that now you have the knowledge to troubleshoot problems before they derail your entire project.
Take your time with those foundation chains, especially when you’re starting a new project that you’re excited about. A few extra minutes spent getting the tension right will save you hours of frustration later. And don’t be afraid to start over if something doesn’t feel right – your future self will thank you when you’re working on row 50 and everything is flowing smoothly.
Keep practicing, be patient with yourself, and remember that every expert crocheter started exactly where you are now. Before you know it, creating perfect foundation chains will become second nature, and you’ll be ready to tackle any pattern that comes your way.