You know that feeling when you’re scrolling through crochet patterns and suddenly stop dead in your tracks? That’s what happened to me the first time I saw a granny square cardigan. The geometric beauty, the endless color possibilities, the perfect blend of vintage charm and modern style – I was completely hooked (pun intended).
But here’s the thing about granny square cardigans: they look intimidating as heck when you’re staring at that first pattern. I remember printing out a 12-page pattern, spreading it across my kitchen table, and feeling like I needed a degree in engineering just to understand the construction. The reality? Once you break it down, making a granny square cardigan is actually pretty straightforward – it’s just a bunch of squares sewn together with some shaping tricks.
I’ve made seven granny square cardigans over the past few years (yes, I have a problem), and each one taught me something new. From my first wonky attempt that looked more like a poncho than a cardigan, to my latest masterpiece that gets compliments every time I wear it, I’ve learned all the tricks that make the difference between “homemade” and “handmade with love.”
The best part about granny square cardigans? They’re incredibly forgiving. Made a square slightly too big? No problem. Want to change colors halfway through? Go for it. Need to put the project down for three months because life got crazy? Your squares will wait patiently in their basket.
Quick Answer
A granny square cardigan is made by creating individual granny squares, then joining them according to a specific layout to form the cardigan shape. Most patterns use 50-80 squares depending on size, with strategic placement creating armholes, neckline, and front openings without complex shaping techniques.
Planning Your Granny Square Cardigan
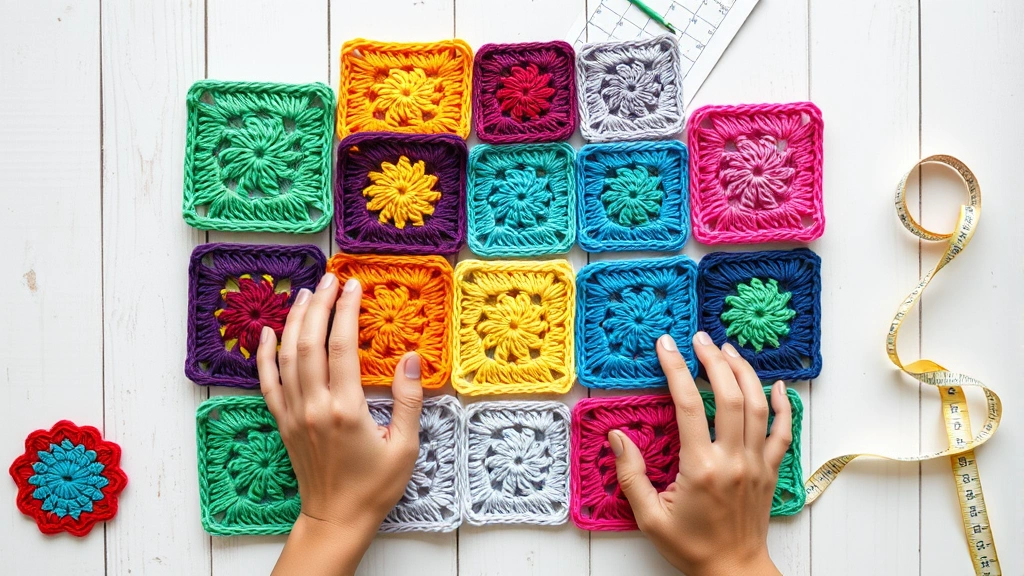
Before you dive into making squares like a maniac (been there, done that), you need a solid plan. Trust me, I learned this the hard way when I made 60 beautiful squares in sunset colors, only to realize they’d create a cardigan that could house a small family.
Start by choosing your pattern. If you’re new to garment construction, look for patterns that include a schematic – that’s the technical drawing showing exactly where each square goes. Ravelry has hundreds of free and paid granny square cardigan patterns with detailed photos and reviews from other makers.
Most granny square cardigans follow one of three basic construction methods:
- Traditional construction: Make all squares, then sew them together in the final cardigan shape
- Join-as-you-go: Connect squares while making them, reducing seaming work later
- Motif-to-motif: Work directly from one square to the next without cutting yarn
I personally prefer the traditional method for beginners because it gives you more flexibility to rearrange squares if you change your mind about the layout. Plus, you can work on squares anywhere – perfect for those waiting room crochet sessions.
Pro Tip: Make a sample square first and measure it carefully. Write down your hook size, yarn brand, and exact measurements. This becomes your blueprint for consistency throughout the project.
Choosing the Right Yarn and Tools
Yarn choice can make or break your granny square cardigan. I’ve seen gorgeous cardigans turn into shapeless blobs after one wash because someone chose the wrong fiber content. Here’s what actually works:
| Yarn Weight | Best Hook Size | Square Size | Best For |
|---|---|---|---|
| DK (3) | 4.5-5mm (G-H) | 3-4 inches | Lightweight cardigans, layering pieces |
| Worsted (4) | 5.5-6mm (I-J) | 4-5 inches | Most versatile, good for beginners |
| Chunky (5) | 6.5-8mm (K-L) | 5-6 inches | Cozy winter cardigans, quick projects |
For fiber content, I swear by cotton-acrylic blends like Lion Brand Comfy Cotton Blend or Red Heart Soft. They’re machine washable, hold their shape well, and won’t break the bank when you need 1200-2000 yards of yarn.
Speaking of yardage, here’s a rough guide:
- Small/Medium: 1200-1500 yards
- Large/X-Large: 1500-1800 yards
- 2X-3X: 1800-2200 yards
Always buy an extra skein or two. Color lots can vary significantly, and running out of yarn when you’re 90% done is a special kind of heartbreak. I learned this lesson with a beautiful sage green cardigan that ended up with slightly different colored sleeves because I couldn’t find the same dye lot six months later.
For tools, you’ll need your main crochet hook, a yarn needle for seaming, scissors, and stitch markers. I also recommend a blocking mat if you want professional-looking results. When working with larger crochet projects, having the right tools makes all the difference in your final result.
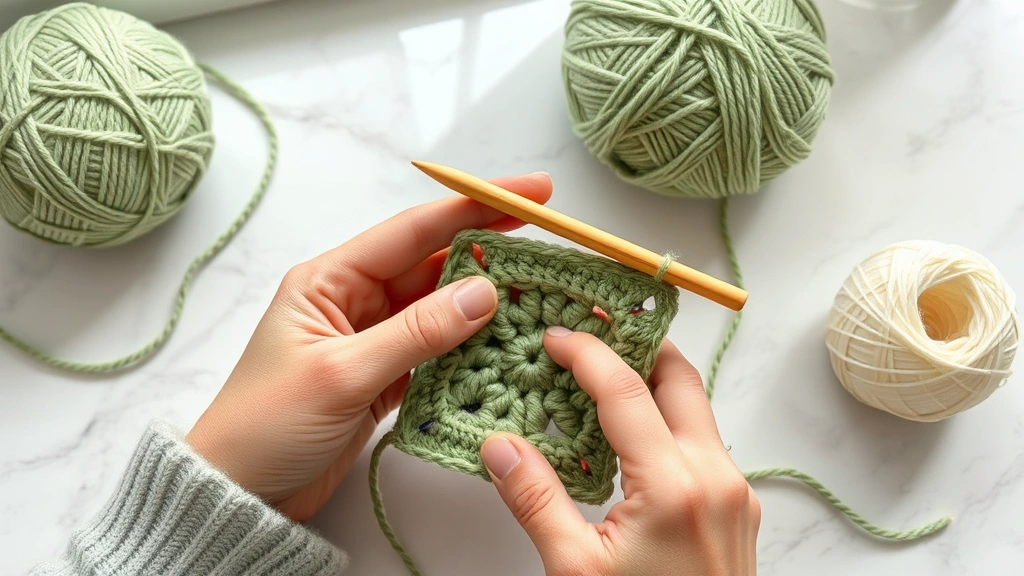
Mastering the Basic Granny Square
If you can make a basic granny square, you can make a cardigan. But there’s a difference between “can make” and “makes them well.” The key is consistency – every square needs to be the same size and tension, or your cardigan will look wonky.
Here’s my foolproof method for perfect granny squares:
- Start with a Magic Ring
Chain 4, slip stitch to form a ring (or use a magic ring if you know how). The magic ring creates a tighter center, but don’t stress if you prefer the chain method.
- Round 1: Foundation
Chain 3 (counts as first double crochet), work 2 more double crochets in ring, chain 2, *3 double crochets, chain 2* repeat 2 more times, slip stitch to top of beginning chain 3.
- Round 2: Building Corners
Slip stitch to first chain-2 space, chain 3, work 2 double crochets in same space, chain 2, 3 double crochets in same space (first corner made), *chain 1, work 3 double crochets, chain 2, 3 double crochets in next chain-2 space* repeat around.
- Round 3 and Beyond
Continue adding rounds, working corner increases in chain-2 spaces and single chain-1 spaces between groups along the sides.
The magic number for most cardigan patterns is 4-5 rounds per square, creating squares that measure about 4-5 inches. But here’s the crucial part: measure every single square. I use a small ruler and check each one before moving to the next. If a square measures 4.25 inches instead of 4 inches, that quarter-inch difference multiplied across 60 squares equals 15 inches of sizing problems.
“I made my first granny square cardigan using seven different colors in a rainbow pattern. By the time I finished, I had learned to keep detailed notes about which hook size worked best with each color – some yarns are just thicker than others, even within the same brand and weight category.”
When learning granny square techniques, practice makes perfect. I recommend making at least 10 practice squares before starting your cardigan project, experimenting with tension and hook sizes until you find your sweet spot.
Calculating How Many Squares You Need
This is where math meets crochet, and honestly, it’s not as scary as it sounds. Most patterns tell you exactly how many squares to make, but what if you want to modify the size or create your own design?
Here’s my tried-and-true method:
- Measure yourself: Bust circumference, desired length from shoulder to hem, sleeve length from shoulder to wrist
- Calculate fabric needed: Add 2-4 inches of ease to your bust measurement for a comfortable fit
- Divide by square size: If your squares are 4 inches and you need 40 inches around, that’s 10 squares per row
A typical cardigan layout looks like this:
- Back panel: Usually 4-6 squares wide by 5-7 squares long
- Front panels: 2-3 squares wide by 5-7 squares long (each side)
- Sleeves: 3-4 squares wide by 4-5 squares long (each sleeve)
Don’t forget about partial squares! Many patterns require half-squares or triangle fills to create smooth armhole curves and necklines. These aren’t difficult to make – they’re just granny squares worked in rows instead of rounds.
Smart Shopping Tip: Buy your yarn after making your gauge square, not before. I once bought 12 skeins of beautiful yarn, only to discover my tension created squares that were too big for my chosen pattern. Had to completely redesign the cardigan layout.
Joining Your Squares Like a Pro
This is where good cardigans become great cardigans. The joining method you choose affects both the look and the durability of your finished piece. I’ve tried them all, and here are my honest thoughts:
Whip Stitch Seaming
The most common method, and my personal favorite for beginners. You literally whip stitch the squares together using a yarn needle. It creates a slightly raised seam that adds texture and visual interest. Takes about 2-3 minutes per seam once you get the hang of it.
Single Crochet Join
Creates a flatter seam that’s almost invisible from the right side. Perfect if you want a smooth, professional look. This technique works especially well when you’re making cardigan patterns that need to lay flat against the body.
Join-as-You-Go
You connect squares while making them, which eliminates most seaming work later. Sounds amazing in theory, but requires careful planning. One mistake early on can throw off your entire layout. I recommend this only after you’ve made at least one traditional cardigan.
Regardless of which method you choose, consistency is key. Use the same joining technique throughout the entire cardigan, and always join squares with right sides together (unless the pattern specifically says otherwise).
Here’s my seaming setup: good lighting, comfortable chair, favorite TV show queued up, and all squares laid out in the correct order. I also keep a pattern copy nearby with squares numbered so I don’t accidentally sew something in the wrong spot. Yes, I’ve done this. Multiple times.
Cardigan Construction and Assembly
Now comes the exciting part – watching your pile of squares transform into an actual cardigan. The construction order matters more than you might think. Here’s the sequence I’ve found works best:
- Join Back Panel
Start with the back panel squares. This gives you a large, stable piece to work with and helps you double-check your measurements before committing to the front panels.
- Create Front Panels
Join each front panel separately. Remember, these are usually narrower than the back panel to create the cardigan opening.
- Join Shoulders
Connect the back panel to the front panels at the shoulder seams. This is when your cardigan starts looking like actual clothing instead of a geometric puzzle.
- Add Sleeves
Attach sleeves to the armholes, then seam the underarm and side seams in one continuous line.
- Finish Edges
Add borders around the front opening, neckline, and bottom hem.
The trickiest part is getting the armholes right. Most patterns create armholes by simply leaving spaces between squares, but this can result in gaping or binding issues. If your pattern doesn’t include specific armhole instructions, try the cardigan on (inside out) before seaming the sides completely. You want about 1-2 inches of ease around the armpit area.
When working on garment construction, understanding basic crochet stitches becomes crucial for creating clean, professional-looking seams and edges.
Pro tip from my grandmother, who made cardigans for decades: “Always try it on before you finish the edges. A cardigan that doesn’t fit properly will never be worn, no matter how beautiful the squares.”
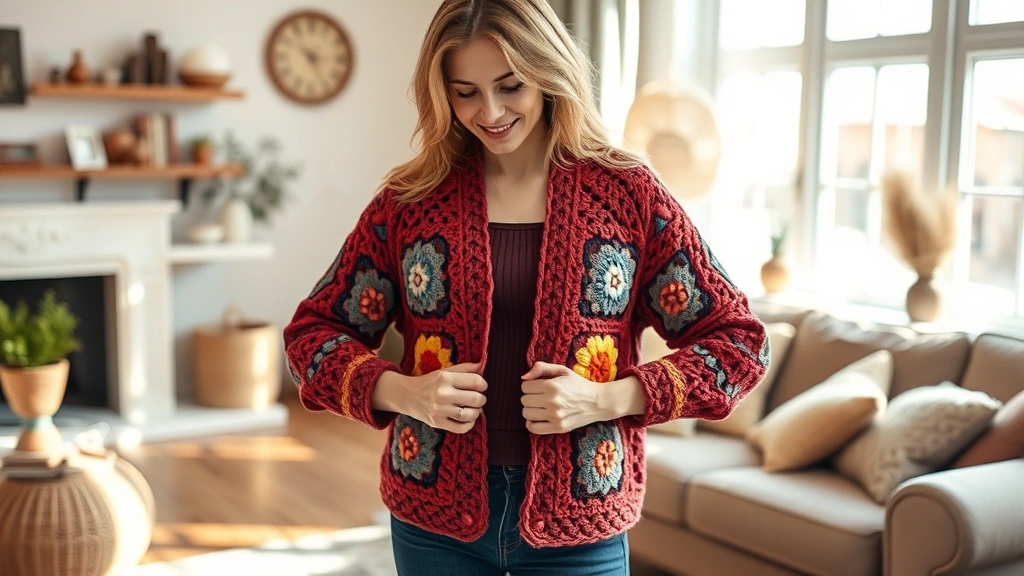
Adding Professional Finishing Touches
The difference between a homemade-looking cardigan and a boutique-worthy piece often comes down to the finishing details. These final touches take your project from “I made this” to “Where did you buy this gorgeous cardigan?”
Blocking Your Cardigan
This step is non-negotiable if you want professional results. Blocking evens out your stitches, opens up the lacework in granny squares, and helps the cardigan hold its shape. I use foam blocking mats and T-pins, misting the entire cardigan with water and pinning it to the correct measurements.
For granny square cardigans, I block each piece separately before final assembly – back panel, front panels, and sleeves. This gives me more control over the final dimensions and ensures everything lines up perfectly during construction.
Border and Button Bands
Most granny square cardigans need some kind of border to finish the edges and provide structure. A simple single crochet border works, but I prefer a more substantial border that includes buttonholes.
For button placement, I follow the “rule of odd numbers” – 5, 7, or 9 buttons usually look more balanced than even numbers. Space them evenly from neckline to hem, with the top button positioned about 2 inches below the neckline and the bottom button about 2 inches from the hem.
Choosing the Right Buttons
Button choice can make or break your cardigan’s aesthetic. I prefer wooden or shell buttons for cotton cardigans, and vintage-style plastic buttons for acrylic yarn projects. Size matters too – buttons should be proportional to your squares. For 4-inch squares, 3/4-inch to 1-inch buttons work best.
Washing and Care: Before wearing your finished cardigan, wash it according to your yarn’s care instructions. This final wash settles all the stitches and gives you the true finished size and drape.
Troubleshooting Common Problems
Even experienced crocheters run into issues with granny square cardigans. Here are the problems I see most often, along with practical solutions:
Squares Won’t Lay Flat
This usually means your tension is too tight or you’re not making enough chain spaces. Try going up a hook size, or add an extra chain between stitch groups in your corner spaces.
Cardigan Gaps at the Seams
Your seaming tension might be too loose, or you’re not catching enough yarn with each stitch. When whip stitching, make sure you’re going through both loops of the edge stitches, not just one.
Sleeves Are Too Tight or Too Loose
This is why trying on during construction is so important. If sleeves are too tight, you can add a partial square or triangle insert at the underarm. If they’re too loose, take in the seam gradually from armpit to wrist.
Front Panels Don’t Meet Properly
Check your shoulder seam placement. If the shoulders are too wide or narrow, it affects how the front panels hang. Sometimes you need to adjust the button band width to compensate.
The most important troubleshooting advice I can give? Don’t be afraid to rip out and redo sections that aren’t working. I’ve unseamed and re-sewn parts of cardigans multiple times to get them right. It’s better to spend extra time fixing issues than to end up with a cardigan you never wear.
When facing challenges with complex projects, reviewing fundamental crochet techniques can often reveal simple solutions to seemingly complicated problems.
Common Questions
How long does it take to make a granny square cardigan?
For an average-sized cardigan with 60 squares, expect 40-60 hours of work time. I can make about 2-3 squares per hour, plus 8-10 hours for seaming and finishing. Spread over a few months of casual evening crafting, it’s totally manageable.
Can I use different colors for each square?
Absolutely! This is one of the best features of granny square cardigans. You can use scraps, create ombre effects, or follow specific color patterns. Just make sure all your yarns are the same weight and fiber content for consistent results.
What’s the best yarn for beginners?
I recommend worsted weight acrylic or cotton-acrylic blend. Red Heart Super Saver or Lion Brand Vanna’s Choice are excellent beginner choices – affordable, widely available, and forgiving to work with.
Do I need to block every single square?
Not necessarily, but blocking the finished cardigan is important. If your squares are very consistent in size and shape, you can skip individual blocking and just block the completed garment. However, if you notice size variations, blocking squares individually helps achieve uniformity.
Can I make a granny square cardigan without a pattern?
Yes, but I’d recommend having at least a basic schematic or layout plan. Measure a well-fitting cardigan you own, divide those measurements by your square size, and create a simple grid layout. Start with a basic rectangle construction before attempting more complex shaping.
How do I prevent the cardigan from stretching out of shape?
Choose yarn with good stitch definition and recovery. Cotton blends hold their shape better than pure acrylic. Also, don’t skip the border – it provides structure and prevents stretching at the edges. When storing, fold rather than hang to prevent shoulder stretching.
What if my squares end up different sizes?
Small variations (1/8 inch or less) can usually be evened out during blocking. Larger variations need to be addressed by adjusting your technique. You might need to add or remove a round from certain squares, or use different hook sizes to achieve consistency.
Can I add pockets to a granny square cardigan?
Definitely! The easiest method is to make two additional squares and sew them onto the front panels as patch pockets. Position them about 6-8 inches from the bottom hem and 2-3 inches from the front edge for the most flattering placement.
Ready to Start Your Granny Square Cardigan Journey?
Making a granny square cardigan is like putting together a beautiful, wearable puzzle. Each square you complete brings you closer to having a unique piece that nobody else in the world owns. Sure, there are challenges along the way – wonky squares, seaming frustrations, and the occasional “what was I thinking” moment – but that’s all part of the creative process.
The best part? Every mistake teaches you something that makes your next project even better. My first cardigan had uneven squares and wonky seams, but I wore it proudly because I made it with my own hands. My latest cardigan gets compliments from strangers and feels like it came from an expensive boutique, but it started with the same basic granny square technique.
Start with good yarn, take your time with consistency, and don’t be afraid to ask for help in online crochet communities when you get stuck. Before you know it, you’ll be planning your second cardigan before you’ve even finished your first. Trust me, granny square cardigans are seriously addictive – in the best possible way.